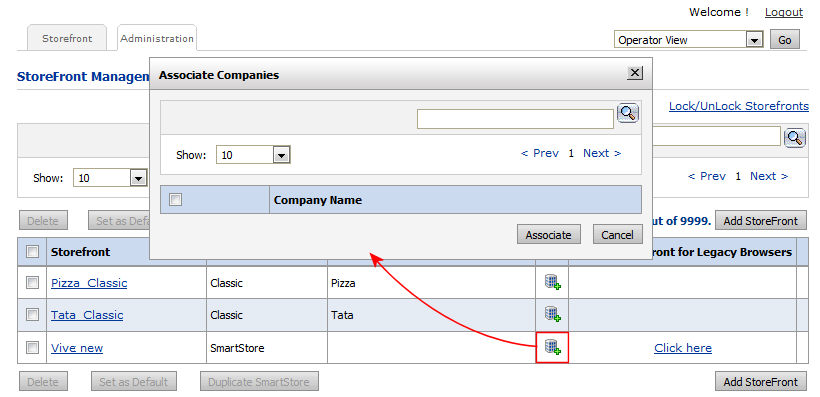
IMPORTANT NOTE: You must associate the relational branded company with the customized (branded) storefront on the StoreFront Management page or it will not work properly.
For an overview of companies and how to manage them see Companies Management. This topic covers how to add a new company or edit an existing one.
On the Manage Company page, use the fields described below to set up your company.
1. Company Name: Type a name for the company.
2. Name For URL Branding: From the pull-down list, select an allowed domain/DNS zone, which will cause the company branded name to become a DNS entry mapped to the chosen domain. Then type a name for the URL branding in the text entry box.
Note: If you choose a domain that is set to be used exclusively, then you can leave the branded URL blank and save the entry.
Note:
MarketDirect StoreFront
provides two ways to create URLs for your branded companies:
(1) On the Company page Name for
URL Branding field: Follow the steps below.
(2) On the Multiple URL Configuration page: For more information, see the
help topic Multiple URL Configuration.
Note:
Relational
URL branding: Unless
you use relational branding (or company-branded URLs), visitors to your
site will land on the default storefront (set up in Storefront
Customization). Using relational or company-branded URLs you can specify
the branding site visitors see when they first login to a web page (i.e.,
the login page) or visit your site (i.e., with anonymous shopping). Site
branding (or storefront customization) in MarketDirect StoreFront
is associated with the company a user is a member of, but a company is
not invoked until a user logs in (because a user's login profile is associated
with a company). So if you want to apply your custom branding to your
site's pre-login homepage, you will need to enter a name for URL branding
to create a login path with a pointer to the company whose branding you
want users to see. So if you want web visitors to your site to see a custom-branded
company site (i.e., with your logo and banner) even before they login,
use this URL branding. Otherwise, they will see the default branding for
the site rather than branding tailored to a specific company.
IMPORTANT NOTE: You must associate
the relational branded company with the customized (branded) storefront
on the StoreFront Management page or it will not work properly.
Note: Clicking Company Branded URL from the Companies or Manage Company page opens the branded page so you can view or adjust the branding (storefront customization).
● Syntax Format for Standalone (customer-hosted) sites: Customer-hosted sites will create their own branding (following the instructions in Storefront Customization). For example: http://www.[name_of_your_company.com]/dsf/companies/[company_branded_URL]/storefront.aspx
where
www.[name_of_your_company.com] stands for your site’s URL and
[company_branded_URL] stands for the name of the company (exactly as you
configured it on the Administration >
Companies page).
Note: You can now send users a shortcut via email with your site URL appended with the name of a company that you have custom branded (exactly as it is named in your system). The user will then see your branding on the site home page when first accessing your web site.
● Syntax Format for cloud (EFI-hosted) sites: Hosted sites will create their own branding (following the instructions in Storefront Customization). To make it available, you must append a branding pointer to the site URL that the hosting center provides.
● Example
- if you have not enabled short URLs for company-branded sites on the
Multiple URL Configuration page will take this form: http://[your_name].myprintdesk.net/dsf/[asp_number]/companies/[company_branded_URL]/storefront.aspx
where [your_name] is the name you provided to the hosting center and
[asp_number] is the number you received from the hosting center (e.g.,
“asp10”) and
[company_branded_URL] stands for the name of the company (exactly as you
configured it on the Administration >
Companies page)
storefront.aspx is the homepage for your pre-login site
● Example
- if you have enabled short URLs for company-branded sites on the Multiple
URL Configuration page, the URL will take this form:
http://[your_company_name].myprintdesk.net/dsf/storefront.aspx
where [your_company_name] is the name of your company
Note: You can now send users a shortcut via email with your site URL appended with the name of a company that you have custom branded (exactly as it is named in your system). The user will then see your branding on the site home page when first accessing your web site.
Note: IMPORTANT NOTE: To ensure that visitors to company-branded sites can see only those product categories intended for members of the company the group is branded for, complete the steps in Creating and Editing Product Categories (i.e., on setting security for categories).
3. Supported Payment Methods: specifies the forms of payment you will accept for customer jobs submitted to the Print Shop. For example, Accounting Codes, Cost Center, Credit Card, Other Account, Pay At Store, PayPal, PO Number.
Note: An item must be checked (enabled) in order for the payment method to be displayed for a buyers account. Note that the labels Accounting Codes and Cost Center are correct even if they have been assigned different names in the account-level management (because these settings are for a Print Shop and are conceptually separate from the renaming that is done at the company level).
4. Default Payment Method—select the default payment method for the Print Shop: Accounting Codes, Cost Center, Credit Card, Other Account, Pat At Store, PayPal, PO Number.
Note: Only those methods you selected in the Supported Payment Methods section above will be available as a default payment method option.
5. Credit Card Merchant—
● Use the Print Shop merchant account: This is the default option that uses default merchant account set up in the Print Shop to which the company is associated.
● Other: You can select any of the other merchant accounts that are set up in the site from the pull-down list.
Note: For instructions on setting up merchant accounts in MarketDirect StoreFront see Managing Merchant Accounts.
● Paypal Merchant Account ID—will show only if you have selected PayPal as a supported payment method.
● Use the Print Shop merchant account: Choose this option to use the Print Shop's default PayPal merchant account ID.
● Other: You can select any of the other PayPal options listed in the pull-down list.
Note: If you are using Payflow Pro be sure it is configured to use PayPal transactions. Contact PayPal Payflow Pro Customer Support for more information. For details on setting up a PayPal account in MarketDirect StoreFront, see Managing Merchant Accounts.
6. Other Accounts: Validate Other Account
Note: This field will show only if you select Other Account as a supported payment method. Other Accounts are used for buyers who wish to control their own payment IDs (i.e., provide whatever data they want to provide).
● Select this option if you want to require buyers to enter data (e.g., account codes) in the Other Account payment method field (i.e., they cannot leave the field blank and proceed to checkout). If you do not select this option, buyers will be able to place an order without entering anything in the Other Account field. (The option "validates" only that the buyer has entered some data in the Other Account field.)
7. Supported Delivery Methods
a. Click Assign/Edit Delivery Methods to select delivery method/s to assign to this company.
Note: The Assign/Edit Delivery Methods link will not appear until you save the company and return to it (i.e., by selecting it from the table on the Companies page).
b. Click Add Delivery Method to add a new delivery method to this company.
Note: For detailed instructions on adding delivery methods, see To add a delivery method.
Note: DHL
Delivery Methods: When using AuctionInc or UPS Connect shipping cost configuration,
if you select any DHL delivery method, you will be prompted to enter the
following information:

Enter your DHL Account ID and Postal Code.
● Initial Group Access—specifies the user group that can initially access the company (i.e., to manage it).
● If you want to use UPS Connect for shipping cost calculation for this company, enter the following information that you received from UPS when you set up your UPS Connect account:
● UPS Auth Key
● UPS Username
● UPS Password
● If you are using AuctionInc or UPS for shipping cost calculation: Click Expand in the View Auctioninc or UPS Connect Configuration Steps field.
AuctionInc Shipping Cost Calculator |
|
Handling Charges |
Specify an amount to charge (above and beyond the cost of shipping) for each order processed by the Print Shop. Notes on handling charges with AuctionInc: If you want to add a handling charge over and above the shipping cost, set it using the Handling Charges and Handling Charge Percentage fields on this screen. The handling charge can be configured as a fixed amount or as a percentage of shipment cost. During calculation, MarketDirect StoreFront will check the values and calculate handling charges based on whichever handling charge yields the higher value. |
Handling Charge Percentage |
Specify a percentage of the shipping cost for each order processed by the Print Shop. |
View Auctioninc or UPS Connect Configuration Steps |
Click Expand to see a wizard of steps for configuring Auctioninc or UPS Connect. See Shipping Cost Configuration. |
● Do Not Allow Order Cancellation: When checked, this will override the Buyer Order Settings (configured on the Print Shop page) that specify that a buyer can cancel orders in certain statuses.
Note: For information on Buyer Order Settings see Buyer Order Permissions.
8. Supported Alternate Currencies
a. Click Assign/Edit Currencies.
b. On the Assign Alternate Currency window, select the available alternate currencies you want to make available to buyers associated with this company (i.e., the currency conversion you set will be displayed to buyers), then click Save.
Note: For instructions on configuring and enabling alternate currencies, see Configuring Alternate Currencies.
9. Handling Charges
● Use Print Shop Setting—select this option to use the handling charge settings specified in the Print Shop page for the Print Shop associated with this company.
● Amount—specify a fixed amount to charge (above and beyond the cost of shipping) for each order processed by the company.
● Percentage—specify a percentage of the order subtotal for each order processed by the company.
10. Password Policy
a. Select Password Policy: Select the password policy you want to apply to users registered to this company.
Note: For more information on password policies, see Managing Password Policies. Password policies let you establish the strength of user passwords.
b. No Password Policy: Select this radio button if you do not want to apply a password policy to users registered to this company.
11. Do not show Print Shop to buyer: Check this box to hide references to the Print Shop from buyers on the following pages: "Storefront," "Shopping Cart," "Order Checkout," "Order Summary," "My Account - Profile," and "My Account - Selected Printshop." The Print Shop will also not be shown on the Storefront menu bar, and the Print Shop selection field will not be shown on the user registration page.
12. Checkout Settings:
The checkout setting lets you specify
which checkout workflow the company will use when a buyer places an order:
For instance, in a SmartStore:
Standard Checkout Workflow In the shopping cart, buyers: |
Rapid Checkout Workflow In the shopping cart, buyers: |
Very Rapid Checkout Workflow In the shopping cart, buyers: |
1: Click Proceed to Checkout. |
1: Click Proceed to Checkout. |
1: Click Proceed to Checkout. |
2: Specify shipping options on the Shipping page. |
2: Specify shipping options on the Shipping page. |
2: Specify shipping and payment options on Rapid Checkout pop-up window. |
3: Click Proceed to Payment. |
3: Click Proceed to Payment. |
|
4: Specify payment options on the Payment page. |
4: Specify payment options on Rapid Checkout pop-up window. |
|
5: Click Place My Order. |
5: Click Place My Order. |
3: Click Place My Order. |
|
Buyers skip the Payment page in the process. |
Buyers skip the Shipping and Payment pages in the checkout process. |
All Payment Types Supported |
Supported
Payment Types: |
Supported
Payment Types: |
Note:
Note: Rapid and very rapid checkout
support only the following four payment methods:
— Pay At Store
— Cost Center
— Accounting Codes
— PO Number
If the company has any other supported payment methods, rapid checkout
will not work and the system will default to the standard checkout workflow.
Note: If Pay At Store is
the only payment method defined for the company, the Proceed
to Checkout button will take the buyer directly to the Order Confirmation
page (bypassing the Rapid Checkout pop-up window).
Note: If you configure either rapid or very rapid checkout, it is recommended that you let your buyers know what to expect during the checkout process.
Note: In a classic storefront, the rapid checkout will bypass both the payment selection and order review pages.
Warning:
Very Important Note: In very rapid checkout, the order will be
shipped to the address in the buyer's profile. Please ensure that buyers
have their addresses updated in their profile because for delivery methods
that require an address (i.e., those that are not Customer Pick-Up), very
rapid checkout has the order shipped to the buyer's default profile address.
Note: If Pay At Store is the only
payment method and only one delivery method is defined for the company
(i.e., and thus does not require buyer input to select a carrier), the
Proceed to Checkout button will
take the buyer directly to the Order Confirmation page (bypassing step
2 in the Very Rapid Checkout workflow described immediately above).
Note: In a classic storefront, the very rapid checkout will bypass the shipping, payment, and order review pages.
a. Handling Charges: Specify a value for handling charges for items that are either shipped or held for pickup.
Note: By design, direct mail pieces are never subject to handling fees. They are governed by postage and postage markup and fees you specify.
● From the pull-down menu, select an option:
● Use Print Shop Setting: uses the handling charge specified at the Print Shop level.
● Percentage: adds a handling fee as a percentage of the line item amount (i.e., for items that are either shipped or held for pickup). Specify the percentage in the text box.
● Amount: adds a specified handling fee to each line item (i.e., that is either shipped or held for pickup). Specify the amount in the text box.
b. Handling Charges:
● Use Print Shop Setting—uses handling charge settings specified at the Print Shop level.
● Display Handling Charges—causes handling charges to be listed as a separate line item in the shopping cart.
● Do not display Handling Charges—causes handling charges to not be listed as a line item in the shopping cart.
c. Turnaround Time:
● Use Print Shop Setting—uses Turnaround Time settings specified at the Print Shop level.
● Display Turnaround Time (at each line item in shopping cart)—causes the turnaround time for each item in the order to be displayed to buyers in the shopping cart (at the line item level).
● Do not display Turnaround Time—causes any turnaround time calculation not to be shown to buyers in the shopping cart.
Note: The turnaround time for products is set in the Turnaround Time field on the Settings tab of the Manage Products page.
d. Calendar Date:
● Use Print Shop Setting—uses Calendar Date settings specified at the Print Shop level.
● Preselect earliest date in the calendar—this option causes MarketDirect StoreFront to automatically set the due date and time as the earliest regular (i.e., non-rush) time available based on the turnaround time you specified in the Turnaround Time field on the Settings tab of the Manage Products page.
Note: This option prevents the buyer from having to select a due date on the calendar before proceeding with checkout.
● Force user selection of date in calendar—this option requires the buyer to select a due date on the calendar before proceeding with checkout. This option lets buyers see the turnaround time for each product (e.g., in a multi-product order) and then choose whether to accept the default date calculated (based on the turnaround time yoMarketDirect StoreFrontu specified in the Turnaround Time field on the Settings tab of the Manage Products page) or to specify an earlier date and on the calendar and see the applicable rush hour charges for expediting the order.
● Do not display due date to buyer—this option prevents the due date and time from being shown to buyers in the shopping cart.
e. Reorder: This section specifies how reorders are handled when the ticket template has changed since the buyer last ordered the product. These settings apply to products of the following types: ad hoc, static, VDP (EFI VDP, FusionPro, XMPie).
Note: For information on specifying how reorders for static document products are handled when the content (i.e., a file or files in the product) has changed since the buyer last ordered the product, see Reorder File Behavior.
● Use original ticket template (original may be out-of-date)—Select this option if you want the system to use the original ticket template that was in use when the order was previously placed even though the ticket template may have been updated with changed options.
● Use latest/current ticket template (latest may have changes from original)—Select this option if you want the system to use the latest version of the ticket template for the product, which may have been updated with additional options or otherwise modified. If this option is selected, and the buyer chooses to reorder a product or saved job with a changed ticket template, the system will check the product type to see if it supports automated ticket upgrades.
● If the product type supports automated upgrades: If the product's ticket information is different from when this order was placed, then a new job is created as if the buyer clicked Begin and, if the product allows for buyer configuration, then the older ticket options are migrated into the new job if they are still able to be honored.
● If the product does not support automated ticket upgrades or the ticket template information remains the same: The system will simply copy the job and put it into the cart.
Note: In the second case in which the ticket template has changed, buyers will be alerted that changes have been made to the ticket template with a link to a "Print options have changed” alert in the shopping cart. If buyers are allowed to configure the product, they can click the link and on the resulting ticket page view a side-by-side comparison of the original versus the new ticketing options. They may also select new print options available in the new ticket template.
f. Always Show Promo Code:
● Check this box if you want the promo code field to always be displayed in the shopping cart (even when promo codes are not in effect).
● Uncheck this box if you want the promo code field to be displayed in the cart only when promo codes are in effect.
14. Estimated Pricing Policy: In some cases, MarketDirect StoreFront is not able to calculate the actual tax and shipping charges for an order. Thus, the order prices in the shopping cart are estimated rather than actual. Configuring an estimated pricing policy will help you manage how this "subject to change" information is communicated to buyers in the shopping cart to prevent unexpected discrepancies between the estimated price quoted in the shopping cart and the actual price charged to the buyer's account when enough data is available to render actual amounts.
Note: You can also set an estimated pricing policy at the site level so that it will be applied to all orders placed on your site (for more information, see the topic Configuring Estimated Pricing Policy) or at the Print Shop level (for more information, see the topic Estimated Pricing Policy - Print Shop Level).
● You can communicate estimated pricing for the following types of charges:
● Shipping
● Handling
● Tax
● Subtotal
Note: For sites integrated with an MIS: If you want to use the estimated pricing feature, make sure that your MIS supports receiving buffer values. If it does not, do not use estimated pricing because doing so could result in errors during the order process.
Note:
If you do not want to communicate that prices for any of the order elements
(shipping, handling, tax, subtotal) are estimated rather than actual,
you do not need to do anything. By default, MarketDirect StoreFront
does not communicate to buyers that amounts are estimated rather than
actual. If you want to override this default and communicate that prices
in the shopping cart are estimated rather than actual following the steps
below.
Note: Note that the estimated values
are labeled "Estimated" and prefixed with an asterisk that directs
buyers to a message stating that the final charges will be calculated
when the order is completed: "Your order contains estimated amounts;
final charges will be calculated upon completion of your order. If paying
by Credit Card, the initial authorization may not reflect the final total.
You will only be charged for the final amount." The buffer applied
to the subtotal will have the label "Subtotal Adjustment." Please
note that the message and labels are customizable using MarketDirect StoreFront's Language
Management string customization tools (for more information see the topic
Language
Management - Customize Strings).

Note: Note that the estimated pricing policy settings place at the time an order is placed will be retained even if the estimated pricing policy settings are changed after the order is placed (i.e., the buffered amounts will be retained for a specific order as they were calculated at order placement).
a. Check
the Estimated Pricing Policy box
to open the pricing policy table.
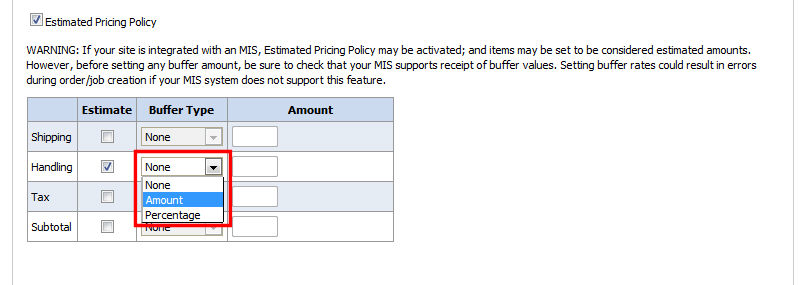
b. Check the Estimate box for each order element whose price you want to designate as estimated.
● Shipping: This is the shipping charge for delivering the order.
● Handling: This the handling charge you assess for the order (picking, packing, packing materials).
● Tax: This is the tax assessed on the order.
● Subtotal: The price of the order before shipping, handling, and tax charges are added.
c. After you select an element, the Buffer Type pull-down list becomes active. Specify the buffer type:
Note:
The buffer is the amount to add to the estimated price in the shopping
cart. You can set a buffer as a fixed amount or a percentage of the estimated
price.
Note that Shipping and Handling buffers are combined and reflected in the
Shipping line item in the Shopping Cart.
● None: Select this option to have the calculated amount for the element considered as estimated (and communicated to buyers via a message).
● Amount: Select this option to have the estimated price of the element increased by a fixed amount that you specify in the Amount field as a "buffer."
● For example, if you select the Amount Buffer Type and specify an Amount of 5.00, a fixed amount of $5.00 (or 5 units in the selected currency) will be added to the estimated order total in the shopping cart.
● Percentage: Select this option to have the estimated price of the element increased by a percentage that you specify in the Amount field as a "buffer."
● For example, if you select the Percentage Buffer Type and specify an Amount of 5, a percentage amount of 5% will be added to the estimated order total.
Note: Note that the buffer percentage is calculated before taxes and any other buffered amount is added to the order subtotal.
d. After you select an Amount or Percentage buffer type, specify an amount in the Amount field as a numeric (decimal) value such as 5, 5.0, or 5.5.
15. Department Information
Note: The Department Information section will appear only after you save the company and return to it (i.e., by selecting it from the table on the Companies page).
● To view or manage existing departments, click View/Manage to open the Departments page and view a list of all departments within the company. Click the department name to open the Edit Department page.
● To create a new department, click Add Department to open the Add New Department page and follow the instructions in the topic Add or Edit a Department.
16. Company Contact Information: This is the representative of the company that will be contacted with email notifications.
● Click Contact Information and complete all required fields (indicated by *).
● Click Save.
17. Company Address Book: The company address book contains contact information for users in the company.
Note: The Company Address Book section will appear only after you save the company and return to it (i.e., by selecting it from the table on the Companies page).
● Click the Include Include All Users In Company to automatically add all users in the company to the address book.
● To add or edit a company address book, click Manage Address Book to open the Manage Company - [company name] page and then following the instructions in the topic Add or Edit a Company Address Book.
18. Company Approvers: An approver is a representative of the company who is designated to approve the purchase of orders submitted by users associated with this company.
Note: The Company Approvers section will appear only after you save the company and return to it (i.e., by selecting it from the table on the Companies page).
Note: For more information on Approvals, see the Approvals help topic .
● Click Disable Approvals to disable approvals for the company, or
● Click View/Manage to assign approvers for the company.
● Click Add Approver, then select an approver from the list of users and click Add.
● You can also click Edit to change an approver's status, click Reassign to assign to a different approver, or click Delete to delete the approver.
● In the Automatic Approval Limit text box type a currency amount below which approval is automatic.
19. Job Level Approver Settings: Job level approvals let approvers approve or decline each job within an order rather than approviing or declining only the entire order. With job level approvals, approvers can also make changes to a job (for example, the approver might opt to change the quantity, binding type,media choice, or other attributes of a job to adjust the price before approving).
Note: For more information on Approvals, see the Approvals help topic .
● Click Enable Job Level Approvals to allow job level approvals for orders placed in this company. The approver will then be able to approve, decline, and adjust each job within an order.
20. CSR: Click Assign to assign and manage customer service representatives authorized to place orders for this company. Complete the information on the Assign CSRs page.
Note: For more information on CSR management, see CSR User Accounts.
21. User Registration: Default Group: Select the default group to which users associated with this company belong. When self-registering users specify this company, they will belong to this default group.
Note: Later, you can assign particular users to a different (i.e., non-default) group as needed. For more information on user groups, see Overview of Managing Groups.
● View/Manage Email Notifications: Click this link to edit company-level email notifications.
● Follow the instructions in the topic Email Notifications.
23. Company Settings: Sets the standard of measurement to use for the company.
● Unit System: Select the unit system of measurement to use for this company from the pull-down list.
Note: For more information on unit systems, see Unit System.
24. Language Management: Company-level language management enables you to override the default field labels and UI text on companies deployed as SmartStore storefronts.
Note: Text strings used to describe features,media, products, etc., cannot be overridden.
● If you want to override the default language used on the UI for this company, click Company-Level Language Management.
● Then follow the instructions in the help topic Language Management - Customize Strings - Company Level.
25. VAT Settings: Sets the VAT standards for the company.
Note: These settings will be available only if you are using the VAT taxation model. For more information on VAT taxation model in MarketDirect StoreFront, see VAT Taxation Model for Cross Border VAT Taxation.
● Subject to VAT: This is the default setting. Select this option if products sold through the company are subject to VAT.
● VAT Number: Select this option if you want to use one number for all products sold through the company. Enter a VAT country code number in the text box.
Note: This number must correspond with the code for the country as specified in the Print Shop contact information.
● Validate: Click to validate the number against the European Commission (VIES) database.
● Force VAT Exemption: Select this option if you want all products sold through the company to be exempt from VAT.
26. File Expiration: Specifies how long customer files will remain in the system before being deleted.
WARNINGS
The accumulation of customer-uploaded
files can deplete your system resources (hard drive space). Over time,
these job files need to be deleted to free up disk space. The accumulation
of files can deplete your system resources and impair performance. It
is recommended that you set a reasonable time limit for storing files
in your system and specify when they should be deleted automatically.
If you need to archive your files, consider a backup option that will
preserve your data but free up system resources.
Changing this setting will affect the shopping cart and buyers’ saved jobs,
and, if set too low, can cause the system to delete job files unexpectedly.
File expiration should be long enough to provide customers with enough
time to place orders with the uploaded file.
Please note that any changes you make to the file expiration settings will
take effect for new files and will not affect existing files.
● Use Company Level File Expiration Settings: Select this option if you want to specify file expiration settings for this company (that are different from any file expiration settings you have specified at the site level).
Note: The file expiration settings on this page are company-level settings that apply only to this company and override the entire site. You can also set file expiration settings at the company level and override these settings. For information on how to configure file expiration settings at the site level, see File Expiration.
● In the File Expiration: Delete Files After section, enter the number of minutes after which this site should time out.
● Files: These are files buyers upload when creating products (ad hoc, VDP). These files include images, text documents, CSV data list files, images saved to galleries, etc. and both the original files and converted PDF files.
● Saved Files: These are files buyers have saved for later use.
● Credit Card Transactions: These are files associated with credit card order transactions.
Note: Periodically purging these files will cause the Credit Card Transaction page to load faster.
● To set MarketDirect StoreFront to automatically delete files for this company after a given time:
● Enter a number to specify the number of minutes, hours, days, or years after which MarketDirect StoreFront will delete files.
● Specify the interval (in minutes, hours, days, or years) from the pull-down menu.
● Click Save Changes.
Note: Recommended values: It is recommended that you set 6 months as the file expiration period. If you select this option—automatic deletion of files—buyers will have a Reset link corresponding to their uploaded files that enables them to reset the expiration time to prevent losing files they will use for reorders.
OR
● To disable automatic deletion of jobs and allow only manual deletion:
● From the pull-down list, select Never.
● Click Save Changes.
● Use Site Level File Expiration Settings: Select this option if you want to use any file expiration settings you have specified at the site level.
Note: The file expiration settings on this page are company-level settings that apply only to this company and override the entire site. You can also set file expiration settings at the company level and override these settings. For information on how to configure file expiration settings at the site level, see File Expiration.
27. Tax Exemption Settings:
● Check the box Allow Tax Exemption to enable users associated with this company to buy on tax exempt terms.
Note: You can also designate only users associated with a department within the company as tax exempt.
28. Order Accounting:
● Cost Centers: Click View/Manage to set up a cost center. See Cost Centers.
● Accounting Codes: Click View/Manage to define accounting codes. See Accounting Codes.
29. Price Sheet Management:
● Select a price sheet for all users associated with this company. See Price Sheet Management. If the special company pricing is used, the special company price sheet will override Print Shop and site level pricing.
● Check the box Show Pricing To Buyer if you want buyers registered for this company to see pricing information on the storefront (e.g., when browsing the catalog, in the shopping cart, etc.).
Note: If you leave this box unchecked, no pricing information will appear anywhere on the buyer UI/storefront for this company (regardless of login credentials; thus, even administrators will not be able to see pricing when they are viewing pages on the storefront). A typical use for hiding pricing is for in-plants where it is not necessary for buyers to see pricing information.
● Unit Price Visibility: Select whether you want to show or hide unit prices for buyers or inherit the setting from the site level (i.e., as set on the Price Sheet Management | Settings tab.
● Check the box Show Inventory To Buyer to allow buyers associated with this company to see inventory data.
● Clear the Show pricing to approvers if approvals in your organization are based on the content of orders (not price) so that approvers who belong to the company will not see an Order Total on the Approvals page for orders that are placed by users in any company.
● Check the Disable Rush Fee for this Company if you want to completely disable the rush fee and rush functionality (including the ability to select a Rush Date/Time from within the calendar) for the company.
Note: Selecting this option will completely disable the ability for buyers to select a Rush option.
30. Manage PrintMessenger Redirect: PrintMessenger Redirect enables you to associate a particular product with the PrintMessenger so that when buyers submit a job through PrintMessenger they will be taken immediately into the associated product's workflow (the Visual Product Builder) in MarketDirect StoreFront (without having to manually select the product to link the submitted file to).
Note:
For detailed information on PrintMessenger Redirect, see the help topic
PrintMessenger Redirect.
You can also set PrintMessenger Redirect at the site level. For more information,
see Site
Settings - PrintMessenger Redirect Tab.
● From the Product activated for PrintMessenger Redirect pull-down list, select the default product to link with the PrintMessenger.
Note: The list will include all ad hoc products defined for the company that are published to the Featured Products category.
31. Click Save.
What are company price sheets for? |
Why should you use them? |
Specifying the default price sheet for the company. |
To set pricing for all users associated with the company. If you do not set pricing at the company level, pricing will default to the pricing set at the Print Shop level. If no pricing is set at the company or Print Shop level, pricing will default to the default site-level pricing. |
This section enables you to specify the default price sheet to use for users associated with the company. You can use only one price sheet per company.
Note: For more information on pricing and price sheets, see Pricing and Define Special Pricing.
● Print Shop or Default Site Pricing: If you want to use either Print Shop or Default site pricing, click Use Print Shop or Default site pricing.
● Special Company Pricing: If you want to use special pricing for this company (a special price sheet to use for users registered with this company, i.e., if it is different from the Print Shop pricing, which is configured on the Print Shops page), click This company uses special pricing and then follow the steps in the section below.
Note: Special pricing means pricing that differs from the price sheet in use by the Print Shop and configured on the Manage Print Shops page (see Management for more information).
1. Go to Administration > Companies.
2. On the Companies page, click the name of the company to set pricing for to open the Manage Company page.
3. Scroll down to the Price Sheet Management section.
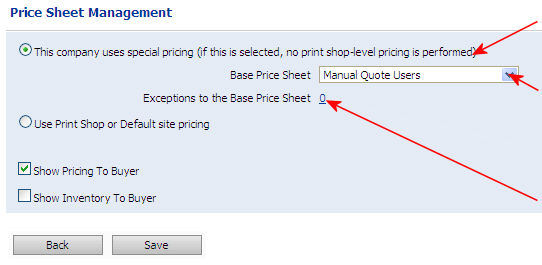
|
Click to use company pricing |
Select the base price sheet for the company |
|
Shows how many exceptions there are to the base price sheet, click the link to create exceptions to the price sheet for this company only |
4. Select This Company uses special pricing (if this is selected, no Print Shop-level pricing is performed).
5. From the Base Price Sheet pull-down list, select the published price sheet to use.
6. To add an exception (for instance if you want to give members of the company a special price on Green paper), click the exception number (e.g., 0) to open a copy (for this company only) of the base price sheet you selected in the previous step to open the company's pricing page.
Note: Exceptions to the Base Price Sheet: You can make pricing exceptions for the specified company. The hyperlinked number displays the number of exceptions to the base price sheet in use for the company.
7. From
the View By pull-down list, on
the pricing page, select the component category filter (Print Services,
Media, Impressions, Products,
Shipping) whose price you want to review.
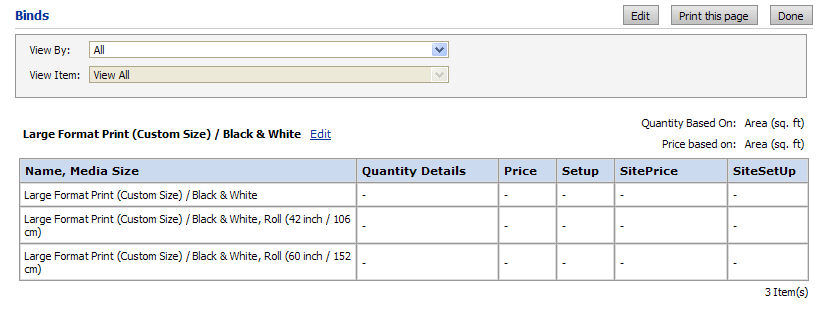
8. Scroll down to view the price sheet.
9. To edit the price of a component, click Edit for it to open the price sheet editor.
a. The price sheet editor is arranged into 6 tabs:
● Price Sheet Details
● Print Services
● Media
● Impressions
● Products
● Shipping
b. Select the tab for the component whose price you want to edit.
c. Select the [component] Type to edit from the pull-down list.
● Range Unit used in pricing the component. The range unit enables administrators to set price breakpoints at which pricing for the component will increase or decrease.
● Billing Unit used in pricing the component. The billing unit is independent of the range unit (which is used for establishing price breakpoints) and specifies the unit of the component that is priced.
Note: Only site administrators can edit the range and billing units. For more information on how to edit price sheets, see Overview of the Pricing Model.
d. Change the regular and setup pricing for the component as needed.
10. When finished, click Save And Go Back.
11. Click Done to return to the Manage Company page.
12. If you want buyers registered for this company to see pricing information on the storefront (e.g., when browsing the catalog, in the shopping cart, etc.), check the box Show Pricing To Buyer.
Note: If you leave this box unchecked, no pricing information will appear anywhere on the buyer UI/storefront for this company (regardless of login credentials; thus, even administrators will not be able to see pricing when they are viewing pages on the storefront). A typical use for hiding pricing is for in-plants where it is not necessary for buyers to see pricing information.
13. If you want buyers registered for this company to see inventory data, check the box Show Inventory To Buyer.
14. If you do not want to impose rush fees for jobs processed through this company, click Disable Rush Fee for this Company (this will completely disable the rush fee and rush functionality (including the ability to select a Rush Date/Time from within the calendar) for the company).
15. Click Save.
Note: This will cause the system to use the price sheet for the Print Shop or, if no special pricing is selected at the Print Shop level, to use the default site price sheet.
1. Go to Administration > Companies.
2. On the Companies page, click the name of the company to set pricing for to open the Manage Company page.
3. Scroll
down to the Price Sheet Management
section.
Select Use Print Shop
or Default site pricing.
4. If you want buyers registered for this company to see pricing information on the storefront (e.g., when browsing the catalog, in the shopping cart, etc.), check the box Show Pricing To Buyer.
Note: If you leave this box unchecked, no pricing information will appear anywhere on the buyer UI/storefront for this company (regardless of login credentials; thus, even administrators will not be able to see pricing when they are viewing pages on the storefront). A typical use for hiding pricing is for in-plants where it is not necessary for buyers to see pricing information.
5. If you want buyers registered for this company to see inventory data, check the box Show Inventory To Buyer.
6. Click Save.
Note: The Federated SSO Configuration Settings section will be shown on the Manage Company page only if (1) you have activated the licensed option Authentication Pkg: LDAP and Login Bypass and (2) you opted to let the federated SSO (Single Sign-On) settings be configured on a per-company basis. Federated SSO can also be set up the entire site (site-level SSO) on the Federated SSO Configuration Settings page. For more information on Federated SSO user authentication, see Directory Services Authentication-LDAP-Hosted. For more information on User Authentication in MarketDirect StoreFront, see User Authentication.
1. Go to Administration > Companies.
2. On the Companies page, click the name of the company for which to configure federated SSO authentication to open the Manage Company page.
3. Scroll down to the Federated SSO Configuration Settings section.
4. Choose the authentication method by which users access this company:
● This company's users authenticate with the company's own federated SSO system: Select this option if you want users associated with this company to login via the company's own federated SSO authentication system.
● This company's users authenticate within this MarketDirect StoreFront site, with the MarketDirect StoreFront user name and password: Select this option if you want users associated with this company to login via the standard authentication method of entering a valid username and password combination.
5. In the Federation Server Connection section, configure the connection:
Note:
This section will be shown only if you select the option This
company's users authenticate with the company's own federated SSO system
in the previous step.
The settings in this section are site-level settings that govern how MarketDirect StoreFront connects
with the federation system. Once the URL is entered, the fields will be
automatically populated.
● Federation Server's Metadata
● Click Browse... and, on the File Upload dialog, navigate to and select the federation metadata XML file.
Note: The metadata XML URL depends on the ADSF server setup. Most of the time, if the ADSF server is "myadfs.mycompany.com", the metadata URL will be found at "https://myadfs.mycompany.com/FederationMetadata/2007-06/FederationMetadata.xml". This URL can be found in the ADSF server's ADSF 2.0 Manager in "AD FS 2.0 / Service / Endpoint" in the Metadata section.
● Click Open.
● Click Upload.
● Issuer Name ID: This is the ADFS server's unique identifier URL. It can be found in ADSF 2.0 Manager in "AD FS 2.0 / Service / Properties / General / Fderation Service Identifier".
● Issuer Passive Redirect URL: The is the URL to which MarketDirect StoreFront will direct the web browser to request login. It can be found in ADSF 2.0 Manager in "AD FS 2.0 / Service / Endpoints / Token Issuance / SAML 2.0/WS-Federation".
● Valid Issuers: This is the list of issuer name IDs from which MarketDirect StoreFront will accept XML login tickets. This should typically contain a copy of Issuer Name ID.
● Token Signing Cert. Thumbprints: This is a hash/thumbprint of the ADFS server's token signing certificate. In can be found in ADSF 2.0 Manager in " AD FS 2.0 / Service / Certificates / Token-signing / View Certificate / Details / Thumbprint".
● Token Encryption Symmetric Keys: This is used only when XML login ticket encryption is manually set up. By default, MarketDirect StoreFront does not request the token encryption and this field should be left blank.
● Other Connection Settings
● Notify the federation server about the Logoff actions: Select this option to notify the federation server when a user logs out.
● Force SSO for any user entering this site on behalf of the company: Select this option if you want to mandate that all users who login to this company enter via SSO user authentication.