Many organizations have approval policies that require orders that exceed a specified amount (price approval) or contain a certain product (product approval) to be approved. Such orders that require approval are on hold pending review and approval by the designated approver (single level approvals) or approvers (multi-level approvals) who have the authority to approve or decline the order. The approval system supports both price and product approval policies. Price approvals can be configured for both single-level approvals (only one designated person must approve) and multi-level approvals (i.e., hierarchical approval in which each level typically corresponds to a successively higher price point and a more senior manager).
The approval system lets you define approvals at both the order level (an approver can either approve or decline an entire order) and the job level (an approver can approve or decline the jobs within an order or make edits to the jobs within the order to affect the price before approving).
You can set up single-level product-level approvals for companies and Print Shops on the Manage Companies and Manage Print Shops pages (by clicking View/Manage in the Approvers section and then following the steps in Approvers).
You can set up Job-level approvals for companies on the Manage Companies page (in the Job Level Approval Settings section; see Job Level Approval Settings for more information).
The approval system is flexible enough to accommodate a variety of approval policies.
● You might have a simple single-level approval policy that requires all orders over $100 submitted through a specified Print Shop to be approved by a single approver.
● You might want to give your company-level approvers the ability to edit a job within an order (for instance, change the color mode or other job specifications to affect the price or appearance of the finished job) before approving.
● You might have a more complex multi-level approval policy that requires escalated approvals based on order amount so that a manager must approve all orders placed in a specified department over $50, a director must approve all orders over $250, and a general manager must approve orders over $500.
● You might require one or more designated approvers to approve all purchases of a specific product.
● You might require two designated approvers to approve all orders over $500.
Two Approval Types: Price Approvals & Product Approvals |
|
What are Price Approvals? |
Why should you use them? |
Price approvals are approvals based on the price of an order (or the order amount). If the order amount is equal to or greater than a specified amount (e.g., $100) it will require approval by a designated approver. |
To prevent orders that exceed a certain amount from being processed without prior authorization of "sign-off" by a manager or supervisor responsible for the buyer/s. Price approvals enable managers to monitor spending and ensure that purchase expenditures do not exceed an appropriate spending limit. |
What are Product Approvals? |
Why should you use them? |
Product approvals are approvals based on a specified catalog item. It is independent of price. Whenever a buyer attempts to purchase the item (whether it is the only item in an order or a part of a multi-item order), it will trigger the approval process and the designated approver will be notified. |
To prevent buyers from order a specific product without prior authorization. For instance, you might want to require authorization for all super wide format products Product approvals enable managers to ensure that buyers for whom they are responsible make appropriate product purchases. |
Note: The approval system does not require more than one person to approve an order at a single price point. Thus, if two approvers are designated to approve orders of $250 or higher, the order is approved whenever one of the approvers approves it. Both approvers will be notified of the pending approval and either can approve the order or product.
Note: In a multi-level approval hierarchy, a buyer who is a designated approver cannot approve his or her own order. The order will proceed to the approver at the next level (if required).
Click here to see a diagram of the approval flow in MarketDirect StoreFront.
Note: You can set up as many levels of approval as needed to suit the approval policies of your organization.
You can configure price-based approval policies for the following entities (meaning where an order originates):
● Companies: Approval is required for all orders placed by buyers (users) in a company with amounts equal to or greater than the specified price.
● Departments: Approval is required for all orders placed by buyers (users) in a department.
● Print Shops: Approval is required for all orders placed by buyers (users) in a Print Shop.
● Users: Approval is required for all orders placed by the specified buyer (user).
● Groups: Approval is required for all orders placed by buyers (users) in the specified group.
● Cost Centers: Approval is required for all orders placed by buyers (users) who select a specified cost center account number as a payment method.
Note: Note that setting approval policies for cost centers and accounting codes must be performed using the Import functionality (using the Approval_Configuration.csv template). For more information, see Set Up Approvers Using the Import Template in this help topic. For more information on the Export / Import functionality, see the help topic Export - Import.
● Accounting Codes: Approval is required for all orders with a specified accounting code (e.g., "Charge Back," "Other Account," etc.).
You can configure product-based approval policies for:
● Products: Approval is required for all orders placed for the specified product.
MarketDirect StoreFront provides two methods to set up multi-level approval rules:
● Managing on the Manage Approvals page: See Set Up Approvers on the Manage Approvals Page.
Note: This is ideal if you prefer a simple user interface as opposed to working with CSV files. This method provides such advantages as filtering, sorting, and data lookups. This is the recommended method for most users.
● Managing using the Import / Export functionality: See Set Up Approvers Using the Import Template.
Note: This method is a potentially faster way to get the work done than the user interface (e.g., if you prefer to work with a large number of approval rules in CSV format). Using this method, you will download a template, populate it with your data, and then import it to MarketDirect StoreFront on the Import page. You can then manage the approvals on the Approvals page (accessible from the Manage Approval Settings link on the Administration Home page).
Note: Single-level approvals can be set up for companies and Print Shops on the Manage Companies and Manage Print Shops pages (by clicking View/Manage in the Approvers section and then following the steps in Approvers).
Note: The Approvals page will list all approvers you have imported using the Import / Export functionality.
Note: Approvers do not need to approve their own orders, which are auto-self approved.
Note: Note that setting approval policies for cost centers and accounting codes must be performed using the Import functionality (using the Approval_Configuration.csv template). For more information, see Set Up Approvers Using the Import Template in this help topic. For more information on the Export / Import functionality, see the help topic Export - Import.
To add an approval rule
1. Go to Administration > Manage Approvals Settings.
2. On the Approvals page, click the appropriate Add ... Rule button for the entity for which you want to set an approval rule. For example, if you want to add a company approver, you would click Add Company Rule.
● Add Company Rule: Sets up a company approval (meaning all orders placed through the specified company over the specified amount must be approved).
● Add Department Rule: Sets up a department approval (meaning all orders placed through the department over the specified amount must be approved).
● Add Group Rule: Sets up a group approval (meaning all orders placed by a user who belongs to the specified group must be approved).
● Add User Rule: Sets up a user level approval (meaning all orders placed by the specified user must be approved).
● Add Print Shop Rule: Sets up a Print Shop approval (meaning all orders placed through the specified Print Shop over the specified amount must be approved).
● Add Product Rule: Sets up a product approval (meaning all orders that include the specified product must be approved).
● Add Cost Center Rule: Sets up a cost center approval (meaning all orders that include the specified cost center must be approved).
● Add Accounting Code Rule: Sets up an accounting code approval (meaning all orders that include the specified accounting code must be approved).
3. On the Add Approval Rule page:
a. Company / Department / Group / User / Print Shop / Product: Click
Lookup to select the entity, user,
product to set an approval rule for.
Note: If you are setting up a department level approver you will have to select both the Company and the Department.
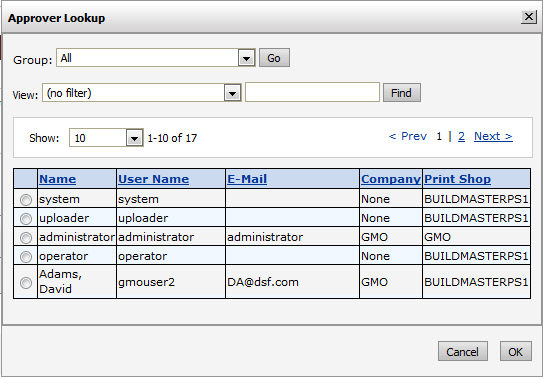
b. Approver: Click Lookup and select the approver from the list of users in the system.
c. Approval Amount: Enter the amount that will trigger the approval (i.e., any order placed via the selected entity that is equal to or greater than the specified amount will require approval. Enter integers with decimals in the format 0.00. Do not use a currency symbol.
Note: To force approval of all orders, leave this value at 0.00. This will require approval of all orders for the specified entity.
Note: The Approval Amount field will not be available on the Add Approval Rule page for Products.
d. Level: Enter (or use the up and down arrows to select) the approver level if you are using multi-level approvals. Must be an integer of value 1 or above.
e. Status: Enter a status for the approval. The following values are acceptable: Active, AutoApprove, Disabled.
f. Reason Needed: Enter a reason approval is needed so that the buyer placing the order and the designated approver will know why an order must be approved.
4. Click Save.
1. Go to Administration > Manage Approvals Settings.
2. On the Approvals page, locate the approval rule you want to edit.
3. Click Edit.
4. On the Edit Approval Rule page, make changes as needed.
5. Click Save.
Tip:
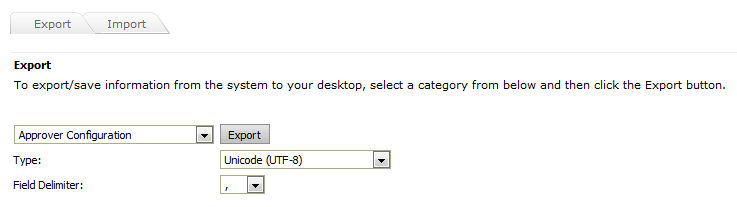
You can also export your approval rules (all approval rules set up in
the system, whether imported from the CSV spreadsheet or set on the Manage
Approvals page) on the Export / Import
page and edit them on the exported spreadsheet. On the Export
tab, select Approver Configuration
and then click Export to download
the approval rules in CSV (comma-separated value) format that you can
open in an application such as Microsoft Excel. You can then make changes
to the approval rules as needed and then import the revised CSV file on
the Import tab.
1. Go to Administration > Manage Approvals Settings.
2. On the Approvals page, locate the approval rule you want to reassign.
3. Click Reassign.
4. Locate
and select the approver to reassign the approval rule to (using the search
tools as needed).
5. Click OK.
1. Go to Administration > Manage Approvals Settings.
2. On the Approvals page, locate the approval rule you want to delete.
3. Click Delete.
4. On the "Are you sure?" dialog, click OK (or Cancel to not delete the approval rule).
A shorthand way to create an approval rule based on an existing approval rule is to copy the existing rule and then make changes to the existing rule and save it.
Tip: For example, if you have set up a first level approver for Company A for all orders over $50 and you want to add a second level approver: You can select the first level approver and click Copy and then choose the level 2 approver and change the approval amount (e.g., to $150) and save.
1. Go to Administration > Manage Approvals Settings.
2. On the Approvals page, locate the approval rule you want to copy.
3. Click Copy.
4. On the Add Approval Rule page, make changes (e.g., to the approval Level or Reason Needed).
5. Click Save.
1. Go to Administration > Manage Approvals Settings.
2. On the Approvals page, enter a search term in the appropriate search filter:
● Approver: Search for an approval rule containing a specified approver.
● Company: Search for an approval rule containing a specified company.
● Department: Search for an approval rule containing a specified department.
● Group: Search for an approval rule containing a specified group.
● User: Search for an approval rule containing a specified user.
● Print Shop: Search for an approval rule containing a specified Print Shop.
● Approval Amount $: Search for an approval rule for a specified approval amount.
● Product: Search for an approval rule containing a specific product.
● Level: Search for an approval rule containing a specified approver level.
● Status: Search for an approval rule containing a specified approval status.
● Reason Needed: Search for an approval rule containing a specified reason needed for the approval.
3. Click
the filter icon  and select the appropriate filtering
limiter option:
and select the appropriate filtering
limiter option:
● NoFilter: Clears the search field (i.e., resets it to the default value – blank).
● Contains: Limits the results to approval rules that contain the search term.
Note: For example, if you enter John in a search for Approver, the results will include all approval rules with approvers with the name "John" in their name (e.g., "John Smith" and "Johnson" would be included but Johanna would not).
● Equal To: Limits the results to approval rules that exactly match the search term.
Note: For example, if you enter 50.00 in a search for Approval Amount $, the results will include all approval rules with approval amounts equal to 50.00 (e.g., 40.00 would not be included nor would 60.00).
● Greater Than: Limits the results to approval rules that are greater than the search term.
Note: For example, if you enter 50.00 in a search for Approval Amount $, the results will include all approval rules with approval amounts greater than 50.00 (e.g., 60.00 would be included but 40.00 would not).
● Less Than: Limits the results to approval rules that are less than the search term.
Note:
For example, if you enter 50.00
in a search for Approval Amount $, the results will include all approval
rules with approval amounts less than 50.00 (e.g., 40.00 would be included
but 60.00 would not).

Note: If no results match the search parameters, the Approvals table will contain no values and you will receive a message: "No records to display."
4. To end the search and reset the Approvals table, click Reset Filters.
An alternative to adding approval rules one at a time is adding them in bulk using the Import functionality on the Import page.
1. Go to Administration > Export / Import.
2. Open the Import tab.
Note: If you have existing approver settings: It is recommended that you go to the Export tab and export your existing settings and edit them as needed. If you choose this option, skip steps 2. and 3. in this section and edit the exported CSV file as directed in step 4. below.
3. Download the Approver Configuration sample template that you can use to enter approval rules.
Note: For detailed steps on the template download process, see To import approvers, company address books, , data lists, string overrides, or users.
4. Modify the sample templates to configure approvals (using the guidance for the sample scenarios in the sections below).
Fields on the Approvers Import Template |
Comments |
Column A: CompanyName |
Enter a valid company name if you are setting up a company level approver and leave fields B - I blank unless you are setting up a department level approver in which case you must enter both a valid company name and department name. So if you are setting up a department level approver you will have to enter valid names in both Column A: CompanyName and Column B: DepartmentName and leave columns C - I blank. |
Column B: DepartmentName |
Enter a valid department name if you are setting up a department level approver and also make sure to enter a valid company name in column A. Then leave columns C - I blank. |
Column C: PrintShopName |
Enter a valid Print Shop name if you are setting up a Print Shop level approver and leave all other fields (A, B, D, E, F, G, H, I) blank. |
Column D: CatalogItemName |
Enter a valid catalog item (product) name if you are setting up a product level approval (meaning all orders that include the specified product must be approved) and leave all other fields (A, B, C, E, F, G, H, I) blank. |
Column E: UserName |
Enter a valid user name if you are setting up a user level approval (meaning all orders placed by the specified user must be approved) and leave all other fields (A, B, C, D, F, G, H, I) blank. |
Column F: GroupName |
Enter a valid group name if you are setting up a group level approval (meaning all orders placed by a user who belongs to the specified group must be approved) and leave all other fields (A, B, C, D, E, G, H, I) blank. |
Column G: CostCenterAccountNumber |
Enter a valid cost center account number if your are setting up a cost center approval (meaning all orders placed by a user who uses the specified cost center account number as a payment method must be approved) and leave all other fields (A, B, C, D, E, F, H, I) blank. |
Column H: AccountingCode |
Enter a valid accounting code (as defined
in your system) if your are setting up an accounting code approval
(meaning all orders with the specified accounting code must be
approved) and leave all other fields (A, B, C, D, E, F, H, I)
blank. |
Column I: AccountingCodePermittedValue |
Enter the value associated with the accounting code to use for this approval. |
Column J: ApproverName |
Enter the approver's user name. If you enter a value in this field you cannot also enter the approver's email address in Column K. Important note: To avoid an error, you must specify only valid, active users. If you attempt to upload users who are inactive, you will receive an error on import. |
Column K: EmailAddress |
Please note: This field is not currently active. Enter the approver's email address. If you enter a value in this field you cannot also enter the approver's user name in Column J. |
Column L: ApprovalAmount |
For product approvals, enter 0 or leave blank. For price approvals, enter integers with decimals. Do not use a currency symbol. If you do no enter a value in this column, MarketDirect StoreFront will interpret it as "0" and thus require approval of all orders for the specified entity. |
Column M: ApprovalHierarchy |
Enter the approver level if you are using mult-level approvals. Must be an integer of value 1 or above. |
Column N: NotificationOnly |
Please note: This field is not currently active. This field will when activated will, if set to TRUE, inform the approver that the order has been made and will not be on hold. This should be set to FALSE. |
Column O: Status |
(Optional) Enter a status for the approval. The following values are acceptable: Active, AutoApprove, Disabled, Deleted. |
Column P: ReasonNeeded |
(Optional) Enter a reason that approval is needed for the specified order. |
The following are some common approval template formatting issues that will cause problems when imported to MarketDirect StoreFront:
● The
template can contain either a company (or Print Shop)
entity or a user entity but not
both. Remember that only one column from A - I can contain a value except
in the case of department approvals, which require both a CompanyName
(Column A) and a DepartmentName (Column B).

● Column
I: ApprovalAmount cannot contain a dollar sign, but only positive integers
and decimal points. If you do no enter a value in this column, MarketDirect
StoreFront will interpret it as "0" and thus require approval
of all orders for the specified entity.

● You
can either provide a value for Column G, the approver's name (i.e., username
in MarketDirect StoreFront),
or Column H, the approver's email address, but not
both.

● If
you want to require approval of all orders placed by members of a department,
you must provide a value for both Column A, CompanyName, and Column B,
DepartmentName.

● For
product approvals you cannot specify both a company name (Column A) and
a product (or catalog item) name (Column D). The product approval requires
that you specify only the catalog item name.

● Note on Editing Multi-Level Approval Policies: If you need to make changes to your approval policies, after exporting your approval template on the Export tab on the Export / Import page, delete all records (rows in the template) that you are not going to be modifying. This will save time and reduce the risk of introducing errors in the approval editing process because you will be importing only those records (rows) that were changed.
Let's examine several scenarios for configuring your MarketDirect StoreFront site per your organization's approval policies.
You require all orders submitted by buyers associated with a specified company that exceed a specified order price to receive approval.
Note: The sample data below is for a company approval. The process would be the same for Print Shop or department buyers (depending upon which entity you select).
Here are your approval rules:
● Any order a company buyer places that is less than $100 requires no approval.
● Any order a company buyer places that is more than $100 must be approved by Sue, the company manager.
● Any order a company buyer places that is more than $250 must be approved by both Sue, the company manager, and Mark, the company VP.
● Any order a company buyers places that is more than $1,000 must be approved by Sue, the company manager, Mark, the company VP, and Liv, the company president.
So you will need to set up a three-level approval process in MarketDirect StoreFront following these steps:
1. Open the downloaded template file in an application that can read .csv files (e.g., a text editor such as Notepad or a spreadsheet application such as Microsoft Excel) and enter or import data in the proper format as shown below:
● In column A "CompanyName," enter the name of the company. We will enter the name "PrintCo-West" for our example.
Note: This is the name of the company as it is set up in MarketDirect StoreFront.
● In column G "ApproverName," enter the approvers' usernames in MarketDirect StoreFront.
Note: This is the username as it is set up in MarketDirect StoreFront.

Note: Important Note: For each row only one of the columns A - F can contain a value (unless you are setting up a department level approver, in which case both Column A: Company and Column B: Department must contain a valid value). In the example above we have used the Company Name.

● In column I "ApprovalAmount," enter the price breakpoints for each approver. The spreadsheet above reflects the policy above in which Sue must approve all orders of $100 or more; Mark, all orders of $250 or more; and Liv, all orders of $1,000 or more.
Note: Do not enter any currency symbols in this column, only positive integers and decimals. Enter 0 in this column will require all orders for the specified entity (e.g., Print Shop, Company, Group) to be approved. If you do no enter a value in this column, MarketDirect StoreFront will interpret it as "0" and thus require approval of all orders for the specified entity.
Note: If you start with the value 100 for the first approver, all orders less than that value will require no approval.
Note: Column K ("NotificationOnly") should be "FALSE."
Note: In Column J ("ApprovalHierarchy"), you can specify an approval level. In the example, the levels are 1, 2, and 3. You could also have an approval policy that requires two approvers to approve any order over a specified amount.
2. Save the Approver Configuration Sample in csv file format and upload it (Import Template) on the Import tab.
3. Check the Upload Results below the import form. The results show how many records (i.e., approval rules or table rows) were successfully updated, how many records that have been added, and how many were found to be invalid. If the Invalid Records value is greater than 0, click the link and download a version of the template that contains the invalid rows along with an error message for each row. Correct any issues with the template and then import it again.
You require all orders submitted by a specified buyer (or group) that exceed a specified order price to receive approval.
Here are your approval rules:
● Any order the buyer/group places that is less than $100 requires no approval.
● Any order the buyer/group places that is more than $100 must be approved by Sue, the company manager.
● Any order the buyer/group places that is more than $250 must be approved by both Sue, the company manager, and Mark, the company VP.
● Any order the buyer/group places that is more than $1,000 must be approved by Liv, the company president.
So you will need to set up a three-level approval process in MarketDirect StoreFront following these steps:
1. Open the downloaded template file in an application that can read .csv files (e.g., a text editor such as Notepad or a spreadsheet application such as Microsoft Excel) and enter or import data in the proper format as shown below:
● In column E "UserName," enter the username of the buyer. We will enter the name "jon_f" for our example.
● In
column G "ApproverName," enter the approvers' usernames in MarketDirect StoreFront.

Note: Important Note: For each row only one of the columns A - F can contain a value (unless you are setting up a department level approver, in which case both Column A: Company and Column B: Department must contain a valid value). In the example above we have used the UserName.

● In column I "ApprovalAmount," enter the price breakpoints for each approver. The spreadsheet above reflects the policy above in which Sue must approve all orders of $100 or more; Mark, all orders of $250 or more; and Liv, all orders of $1,000 or more.
Note: Do not enter any currency symbols in this column, only positive integers and decimals. Enter 0 in this column will require all orders for the specified entity (e.g., Print Shop, Company, Group) to be approved. If you do no enter a value in this column, MarketDirect StoreFront will interpret it as "0" and thus require approval of all orders for the specified entity.
Note: If you start with the value 100 for the first approver, all orders less than that value will require no approval.
Note: Column K ("NotificationOnly") should be "FALSE."
● Column M ("ReasonNeeded") is optional.
2. Save the Approver Configuration Sample in csv file format and upload it (Import Template) on the Import tab.
Note: Please be sure to retain the format of the file. If you do not you will get an output error message.
3. Check the Upload Results below the import form. The results show how many records (i.e., approval rules or table rows) were successfully updated, how many records that have been added, and how many were found to be invalid. If the Invalid Records value is greater than 0, click the link and download a version of the template that contains the invalid rows along with an error message for each row. Correct any issues with the template and then import it again.
You require the marketing manager to approve all orders placed for a specific product.
Here is your approval rule:
● Any order for a specified product (e.g., "Large Format Poster") must be approved by Nick, the marketing department manager.
So you will need to set up a simple one-level approval process in MarketDirect StoreFront following these steps:
1. Open the downloaded template file in an application that can read .csv files (e.g., a text editor such as Notepad or a spreadsheet application such as Microsoft Excel) and enter or import data in the proper format as shown below:
● In Column D ("CatalogItemName"), enter the name of the product that requires approval.
Note:
This is the name of the product as it is set up in MarketDirect StoreFront.

● In Column G ("ApproverName"), enter the username of the approver.
Note: This is the username as it is set up in MarketDirect StoreFront.
● In
Column M ("ReasonNeeded"), enter the reason for the required
approval.

Note: Column K ("NotificationOnly") should be "FALSE."
2. Save the Approver Configuration Sample in csv file format and upload it (Import Template) on the Import tab.
Note: Please be sure to retain the format of the file. If you do not you will get an output error message.
3. Check the Upload Results below the import form. The results show how many records (i.e., approval rules or table rows) were successfully updated, how many records that have been added, and how many were found to be invalid. If the Invalid Records value is greater than 0, click the link and download a version of the template that contains the invalid rows along with an error message for each row. Correct any issues with the template and then import it again.
1. Go to Administration > Export / Import and open the Export tab.
2. Download the Approver Configuration Sample template.
3. Open the document in an application such as Microsoft Excel or Notepad and verify that the information it contains accurately represents your approval policy. If it doesn't, make any needed changes and then re-import the document on the Import tab.
Note: For information on reassigning Print Shop and company approvers (e.g., to prevent buyer orders pending approval from getting delayed indefinitely, for instance if an approver leaves your company), see Reassign Company or Print Shop Approver.
Approvers can always review entire orders. Depending on your organization, you may also be able to review the individual jobs that make up an order and approve or decline them. In this case, you can open the jobs and edit them by making some changes to them if necessary, for example, you can change the quantity, print options, type, and so on. (What you can change depends on the product being ordered; not all products can be edited.) If you end up with a mix of approved and declined jobs in an order, you can either decline the entire order or remove the declined jobs from the order and submit the order with just the approved jobs.
Products of the following types can be edited by approvers when job level approvals are enabled:
● Ad hoc
● SmartCanvas
● EFI VDP batch (including DirectMail workflows)
● Kit
● Non-Printed Product: approver can edit the quantity
● StaticVDP: FusionPro and XMPie (single-record and batch)
● Product Matrix*: Approver can edit the resulting product selected from a Product Matrix (if one of the product types listed above)
*Note
on Approver Editing and Product Matrix Products:
When
a product matrix product contains printable items (e.g., static product),
the individual products can be edited (i.e., using the Visual Product
Builder). Note that the product matrix attributes themselves cannot be
changed (i.e., the approver cannot reselect attributes using the matrix
selector but only the product that resulted from the buyers' selections). Editing a print product
in a product matrix will remove the association of the print product from
the matrix product.
To summarize approval workflow with product matrix products:
* If the matrix product contains only non-printed products (NPP), you can
change the product matrix attributes.
* If the matrix product contains only printable products (e.g., static
products), you can edit the products but not change the product matrix
attributes. The print product is treated like a standalone product.
* If the matrix product contains both NPP and printable products, editing
a print product item in the order will remove the association to the matrix
product.
The following products are not supported for approver editing:
● Cross Media Marketing (CMM)
● CMM
● Campaigns
● Documents
● SMS
● Product Matrix selector (see Note on Approver Editing and Product Matrix Products note above).
● Custom products (product types included only as a customization):
● HP Wall Art
● Chili publish
Approvers will be notified of orders awaiting their approval in two ways:
● Via
a Pending Approvals link beneath
the top navigation bar on the site.
● Via
an email notification when each order that requires price or product approval
is submitted.
1. To
view and approve / decline the order, click the link in the email or Pending Approvals on the home page
to open the Approvals page.
2. Click a link in the Order Number column to access the Approval area on the Order Confirmation page.
● To approve or decline an order, on the Approve / Decline Order tab.
● To
approve, decline, or adjust a job(s) within the order, open the Approve / Decline Jobs tab and click
the job name link.
3. Complete the following fields:
● Check Send e-mail notification to buyer that the approver has updated this order to send the approval update.
● Compose an optional message to buyer explaining the reason for your decision.
Note: The buyer will see this message in the email notification and also on the Order Detail page (accessed from the Order History). If you decline an order, it is best to give buyers a reason so they can address any issues when placing subsequent orders.
● Click Refresh to update the screen and check your order details.
4. For order-level approvals:
● Approve or Decline the order, which will update the Order Status (available to the buyer in the Order Details on the Order Confirmation page) and send an e-mail notification to the buyer (if the checkbox above is selected).
OR
4. For job-level approvals:
● To approve or decline the order, click Approve or Decline the order.
Note: The Order Status (available to the buyer in the Order Details on the Order Confirmation page) will be updated and an e-mail notification will be sent to the buyer (if the checkbox above is selected).
● If you decline one or more jobs within the order and approve one or more jobs within the order, the declined jobs will be removed from the order. The adjusted order containing only the approved job(s) will be processed, and the buyer will receive an email notification informing him/her of your approval decisions and the order status as well as the reason you declined certain items (if you provide one, which is strongly recommended). The declined job will be removed permanently from the order, meaning it will not show up in the buyer's order history.
● When you have a combination of approved and declined orders, you will have additional options:
● Reject ENTIRE order and let buyer resubmit a new, modified order: If you opt not to approve any jobs within the order, select this option. The buyer will then need to submit a new, modified order. You will typically want to add a note in the optional text fields to give the buyer direction to improve the chances of approval for a resubmitted order.
● Remove declined jobs and proceed with ONLY the approved jobs: If you opt to approve a job(s) and decline another job(s), select this option.
Important
Note: If an approver selects this option, removed jobs will be
removed permanently from the order and will not be listed in the buyer's
order history. This means that whenever an approver declines one or more
job(s) while approving one or more job(s) and allows the order to proceed
with only the approved jobs, the declined jobs will be listed only in
the Approver history. Thus, the buyer would have to begin creating the
declined job(s) from scratch to submit another order for approval.
Declined jobs will be shown in the buyer's order history only if the entire
order is rejected, which can occur if the approver: (1) uses order level
approval and rejects the order; (2) Uses job-level approval and approve
some jobs and rejects some jobs and selects the reject ENTIRE order job;
(3) uses job-level approvals and
rejects all jobs.
● To edit a job within the order:
Note: If an approver makes a change(s) to the order that causes the order total to exceed the buyer’s spending account limit, the approver will see the following message: "You have exceeded buyer's spending account limit." You can then make adjustments to the order to affect the order price.
Note: If an approver wants to change the EDDM Map selection specified by the buyer, the buyer's map selection will not be retained. Thus, the approver will have to make the map selection again. If the approver does not want to make any change to the datasource, he or she can proceed with the edit.
Note: If an approver makes a change(s) to the order that causes the order to "require quote" and then approves and submits the order, the site admin will be prompted to provide a quote. The provided quote will then be routed to the buyer for approval. After the buyer approves the quote, the approver will again be prompted to approve/decline the revised order with the new quote.
● Click the order name link in the Products column to open the product in the Visual Product Builder.
● Make any changes to the specifications of the job.
Note: Approvers can change the order quantities, but if multiple recipients are specified for the order, approvers cannot adjust each recipients’ quantity. Instead, this is handled as the Quote Editor does today, by prioritizing any changes to the first recipient. Thus, any quantity increases will go to the first recipient, and any decreases will be taken from the first recipient.
Note: As you are editing a job in the approval process, any buyer-uploaded image(s) (i.e., those not available in your image galleries or categories) that you remove from a job will not be retained in the system. This means that the buyer would have to upload the image again before using it in an adjusted job.
● Click Update.
● On the Approve / Decline Jobs tab, add any notes in the optional text field.
● Click Refresh to update the screen and check your order details before submitting.
● Click Submit.
Note: The Order Status (available to the buyer in the Order Details on the Order Confirmation page) will be updated and an email notification wlll be sent to the buyer (if the Send e-mail notification to buyer that the approver has updated this order checkbox is selected).
Note: For complete details on running queries with the Dynamic Query Tool, see Creating Query with the Dynamic Query Tool.
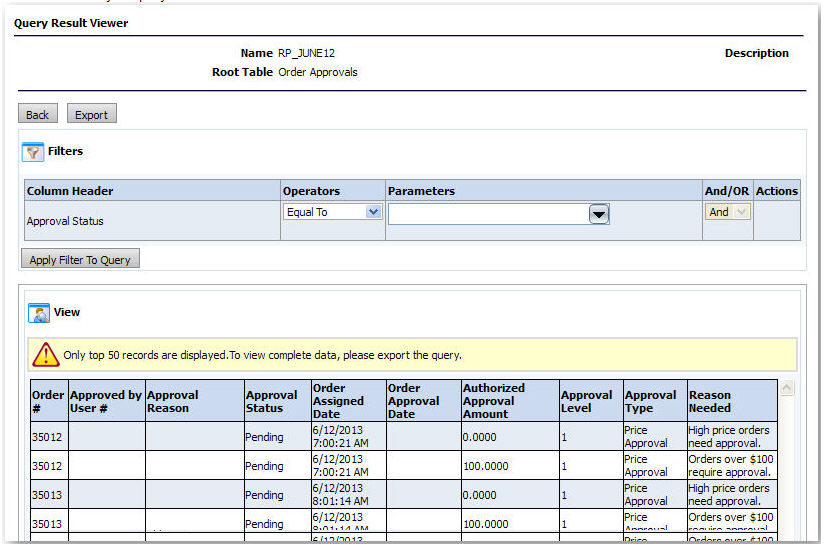
To collect data on Approvals using the Dynamic Query Tool
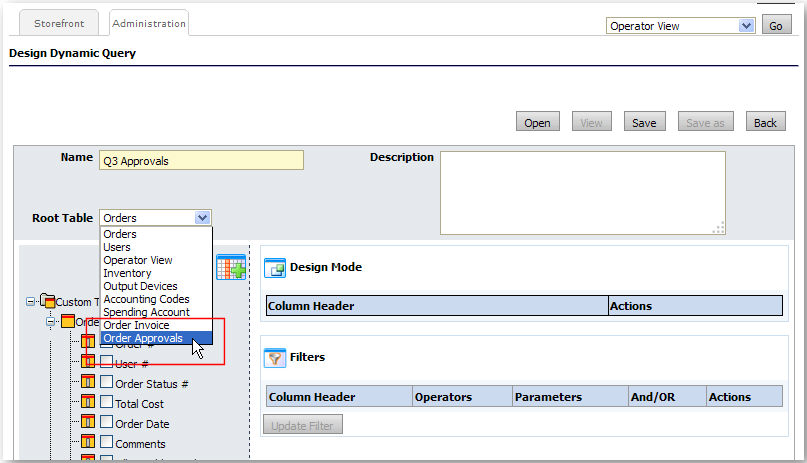
1. Go to Administration > Dynamic Query Tool.
2. On the Dynamic Query Tool page, click Add New.
3. Enter a descriptive name for the report in the Report Name field.
4. From
the Root Table pull-down menu,
select "Order Approvals."
.
5. After
selecting Root Table data, the
table tree will contain only the data fields for the selected root table.
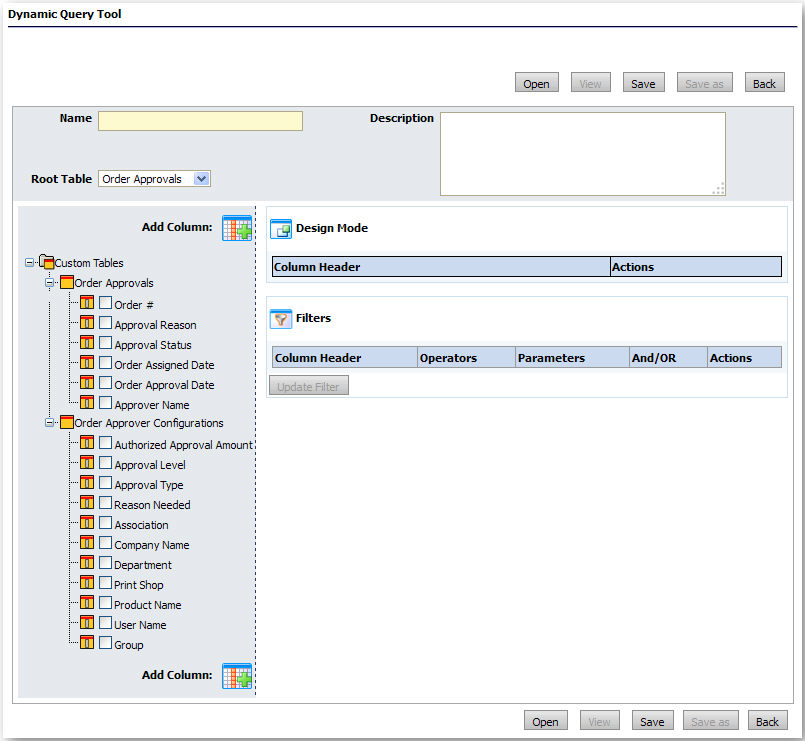
6. Click
the display icon ![]() to add columns to the Design Mode for the query.
to add columns to the Design Mode for the query.
7. In the Table Tree, check the boxes for each data type you want to include in the query. These will be column headers in your query.
8. Click
![]() to populate the Design
Mode grid with your selections.
to populate the Design
Mode grid with your selections.
9. Click Save.
Note:
—To apply filters
to your report, see Using
Report Filters with the Dynamic Query Tool.
—To export
and download your report so that you can format the data in a database
or spreadsheet application, see Viewing
& Downloading Data with the Dynamic Query Tool.
10. Click
View to run your query.