MarketDirect StoreFront supports two taxation models:
● Sales Tax: This is the taxation model most commonly used in the United States. You have two options for sales tax calculation:
● Built-in Sales Tax Model: The tax amount is based on the Print Shop and rudimentary tax rates. Click here for information on setting up your site on the sales tax model.
● CCH SureTax Sales Tax Model: Integration with a third-party dedicated tax system, which takes in account recipient addresses and buyer addresses. Click here for information on integrating your site with CCH.
Note: The CCH SureTax service supports U.S. and Canadian customers. SureTax supports U.S. addresses, U.S. territories, and Canadian provinces.
● VAT (Value Added Taxation): VAT/GST is the most common tax model around the world whereby VAT/GST is applied to goods and services. Click here to information on setting up your site on the VAT tax model.
Note: Please note that EFI is not responsible for any inaccuracies in your calculation of taxes. Please consult with a competent financial advisor to ensure that you are in compliance with all applicable tax regulations.
The built-in sales tax model is the standard tax implementation in the United States whereby tax is assessed at the order level (based on the order amount). Follow the steps in this section to configure your Sales Tax settings.
1. To enable the built-in sales tax model
1. Go to Administration > Taxes.
2. From the Taxation Model pull-down list, select Sales Tax.
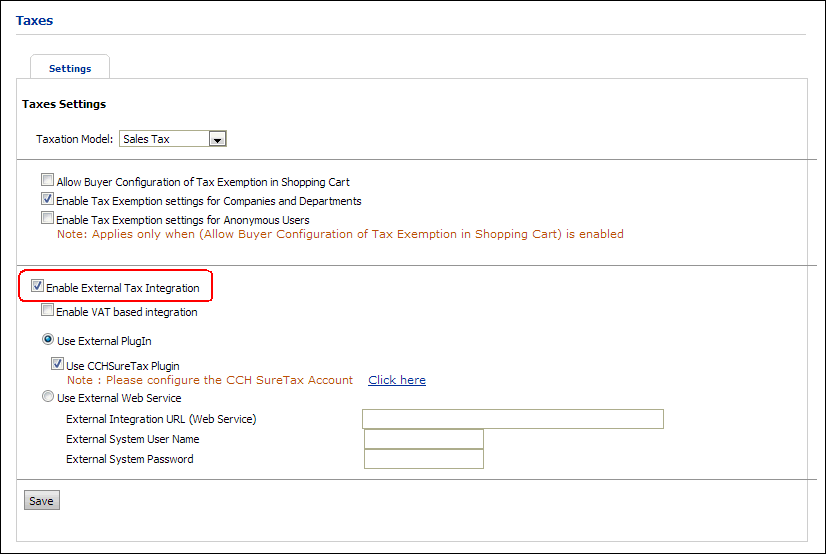
Note: To use the sales tax model, make sure the Enable External Tax Integration is not selected.
3. Click Save.
2. To configure tax settings for the built-in sales tax model
1. Go to Administration > Taxes.
2. Open the Settings tab.
3. In the Taxes Settings section:
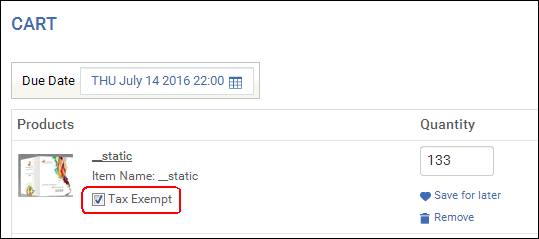
a. Allow Buyer Configuration of Tax Exemption
in Shopping Cart: Select this option to give buyers the option
of designating each line item in the shopping cart as Tax
Exempt.
Note:
This Tax Exempt checkbox will
be enabled only under following conditions:
- If the Anonymous user has a tax exemption claim
- If the Registered User’s Company or Department has a tax exemption claim
- If the particular product is exempted from tax
b. Enable Tax Exemption Settings for Companies and Departments (default): When this option is selected, the tax exemption settings in Manage Companies and Manage Departments will be available.
c. Enable Tax Exemption Settings for Anonymous
Users: When this option is selected, anonymous users in MarketDirect StoreFront will
get a prompt in the Shopping Cart to claim tax exemption.

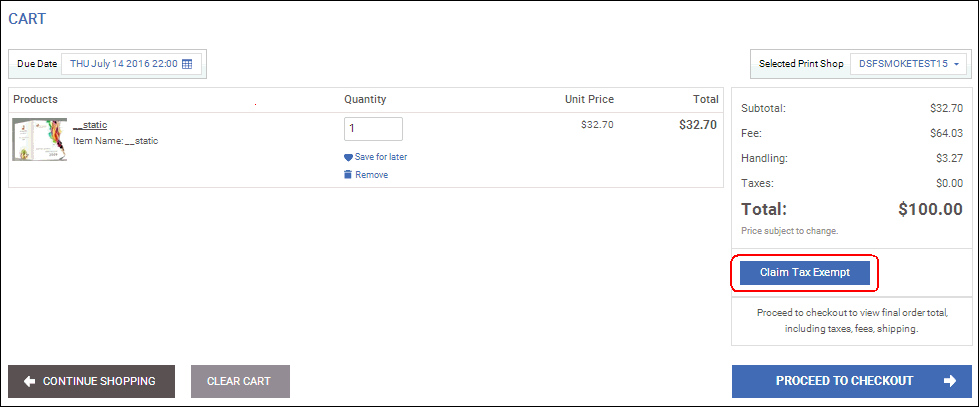
Note: During order checkout, the anonymous user will be required to login. Once logged in, the tax exemption status of the anonymous user (based on whether s/he clicked and provided details in the Claim Tax Exempt link) will be transferred to the logged in user. The logged in user then gets the same tax exemption status for all orders placed.
Note: When anonymous user claims tax exempt and the order becomes tax free, the operator can override this in the Quote Editor by changing the tax exempt status of the order. The Order Summary Page lets operators view an anonymous user’s tax exemption claim and view the uploaded certificate (PDF).
3. To configure Tax Authorities for the built-in sales tax model
● Click here to set up Tax Authorities.
4. To configure Tax Authority Groups for the built-in sales tax model
● Click here to set up Tax Authority Groups.
MarketDirect StoreFront enables integration with an external system for calculating taxes. The external system will calculate the tax based on the details of the order, such as order gross amount, products, and the local tax governing authorities for the shipping origin and destination.
What is external tax system integration for? |
When should you use it? |
Using a third-party taxation engine rather than MarketDirect StoreFront’s built-in tax engine. |
To connect to a third-party tax engine that might better suit your organization’s taxation needs (e.g., for accounting and reporting purposes). |
MarketDirect StoreFront provides support for CCH SureTax, an external tax system that calculates, tracks, and verifies all sales transactions on your site.
Note: CCH CorpSystem Sales Tax Online was discontinued as of September 29, 2016. Customers who were using this system are required to migrate to CCH SureTax prior to this date. Contact Wolters Kluwer CCH customer support to arrange migration of an existing CCH CorpSystem Sales Tax Online account to a CCH SureTax account.
1. Establish a new merchant account with CCH
● You must establish a merchant account with
CCH before you attempt to integrate an external tax system with MarketDirect StoreFront.
Contact Wolters Kluwer CCH customer support for information on establishing
a new CCH SureTax account or migrating your existing CCH Sales Tax Online
account to SureTax.
Melissa
Bakay, Client Solutions Consultant, US Corporate Software,
Tax and Accounting
346.267.0747
melissa.bakay@wolterskluwer.com
Note: |
Please note: MarketDirect StoreFront Technical Support does not provide support for CCH. For any problems or questions regarding your CCH account please contact your account manager or Wolters Kluwer CCH customer support:
All taxation information is collected and monitored in the CCH web site. |
You will need to configure your CCH account on the Configuration tab on the CCH web site to ensure that the integration with MarketDirect StoreFront works smoothly:
● Location Information (on the Locations page in your CCH merchant account page on the CCH web site):
● Create a location for each of your company's physical locations including distribution centers, warehouses, etc.
● Designate one location as the default location for calculating taxes if no other location (such as the Print Shop address) is sent to CCH for a taxable transaction.
● Business Rules (on the Business Rules page in your CCH merchant account page on the CCH web site):
● Make sure that the Tax Calculation Method is set to "Calculate using Line Items."
● SKU (on the SKU page in your CCH merchant account page on the CCH web site):
● You must map your product SKUs to the SKUs (product categories) in CCH.
You must create a default SKU / Product Mapping
value of -1 so that all
MarketDirect StoreFront
products without a recognized SKU will be mapped to the Transaction Type
Code "990101 - General Sales."
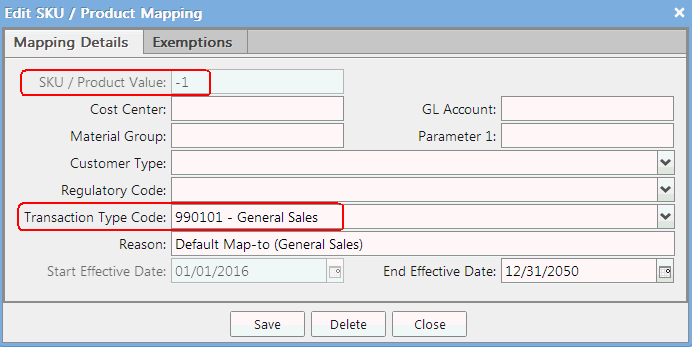
Note: For assistance with mapping
your product SKUs from MarketDirect StoreFront
to CCH, contact your CCH sales representative or contact CCH customer
support.
2. To enable CCH Tax Model in MarketDirect StoreFront
1. Go to Administration > Taxes.
2. From the Taxation Model pull-down list, select Sales Tax.
3. Click Save.
3. To integrate MarketDirect StoreFront with CCH
1. Go to Administration > Taxes.
2. On the Settings tab, in the Taxes Settings section:
a. Allow Buyer Configuration of Tax Exemption
in Shopping Cart: Select this option to give buyers the option
of designating each line item in the shopping cart as Tax
Exempt.

Note:
This Tax Exempt checkbox will
be enabled only under following conditions:
- If the Anonymous user has a tax exemption claim
- If the Registered User’s Company or Department has a tax exemption claim
- If the particular product is exempted from tax
b. Enable Tax Exemption Settings for Companies and Departments (default): When this option is selected, the tax exemption settings in Manage Companies and Manage Departments will be available.
c. Enable Tax Exemption Settings for Anonymous
Users: When this option is selected, anonymous users in MarketDirect StoreFront will
get a prompt in the Shopping Cart to claim tax exemption.
Note: During order checkout, the anonymous user will be required to login. Once logged in, the tax exemption status of the anonymous user (based on whether s/he clicked and provided details in the Claim Tax Exempt link) will be transferred to the logged in user. The logged in user then gets the same tax exemption status for all orders placed.
3. Select Enable External Tax Integration to enable the CCH SureTax third-party tax calculation system to calculate taxes for MarketDirect StoreFront orders.
Important
note for sites integrated with CCH Sales Tax Online prior to September
29, 2016: If your site was set up for integration with CCH Sales
Tax Online prior to the upgrade to MarketDirect StoreFront
v. 9.4, please note that although the option Use
CCH PlugIn will still be selected, as of September 29, 2016, the
CCH Sales Tax Online service no longer works (because Wolters Kluwer has
discontinued that service in favor of the new service CCH SureTax).
So if you were using this system you must migrate to CCH SureTax. Contact Wolters Kluwer CCH customer
support to arrange migration of an existing CCH CorpSystem
Sales Tax Online account to a CCH
SureTax account. Once your account is migrated, you are ready to
follow the steps below (selecting CCH
SureTax PlugIn option).
Note: When External Tax Integration is enabled, the MarketDirect StoreFront taxation system is disabled completely and the Tax Authorities and Tax Authority Groups tabs are no longer visible.
4. Enable VAT based integration: Please disregard this field.
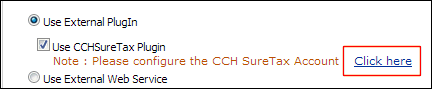
5. Use External Plugin: Select this option to integrate your site with CCH.
6. Select Use CCH SureTax Plugin.
Note: Make sure you have established a merchant account as described in the 1. Establish a merchant account with CCH section above.
● Click Click Here.
● On the Manage Tax PlugIns page, click Add New Account.
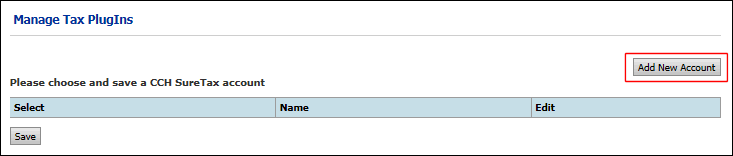
● On the CCH account setup page:
● CCH Account Details
● Client Number: Enter your CCH account client number that you obtained from CCH.
● Validation Key: Enter your account validation key that you obtained from CCH.
● Client Tracking: Enter a client tracking value to track client tax usage on the current MarketDirect StoreFront site.
● Business Unit: Enter a business unit value to track the business unit associated with the current MarketDirect StoreFront site.
Note: The Client Tracking and Business Unit fields are especially useful for organizations with multiple digital and/or non-digital storefronts where buyers can purchase products. For example, a company has a brick-and-mortar retail location and a separate online storefront both using CCH. The administrators of each location can supply their own tracking and business unit codes to generate independent or combined reports on the CCH web site.
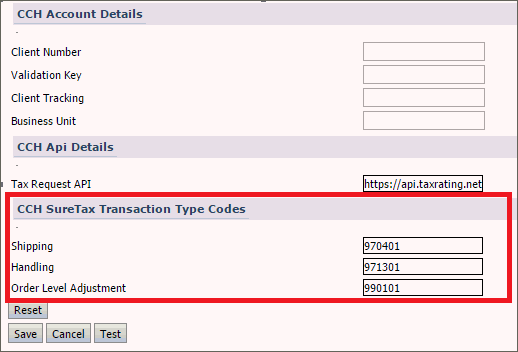
● CCH API Details
● Tax Request API: Enter the following URL: https://api.taxrating.net/Services/General/V01/SureTax.asmx/PostRequest
● CCH SureTax Transaction Type Codes
● This section specifies the transaction type codes for shipping, handling, and order adjustment:
● Shipping: default code is 970401
● Handling: default code is 970301
● Order Level Adjustment: default code is 990101
Note: You should not change these default codes unless directed to do so by CCH to meet the needs of your business.
● Click Save.
● Click Test to verify your connection to CCH.
Note: Make sure you save any changes you have made to your account settings before testing.
● Return to the Tax Settings page (go to Administration > Taxes).
● Scroll down and click Click Here.
● Select the radio button for the ParentOrganization.
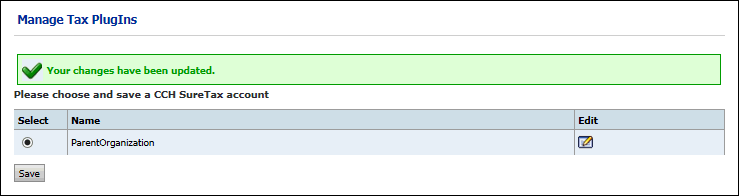
● Click Save.
Note: Once your account is live on SureTax, change the default URL https://testapi.taxrating.net/Services/General/V01/SureTax.asmx/PostRequest to https://api.taxrating.net/Services/General/V01/SureTax.asmx/PostRequest
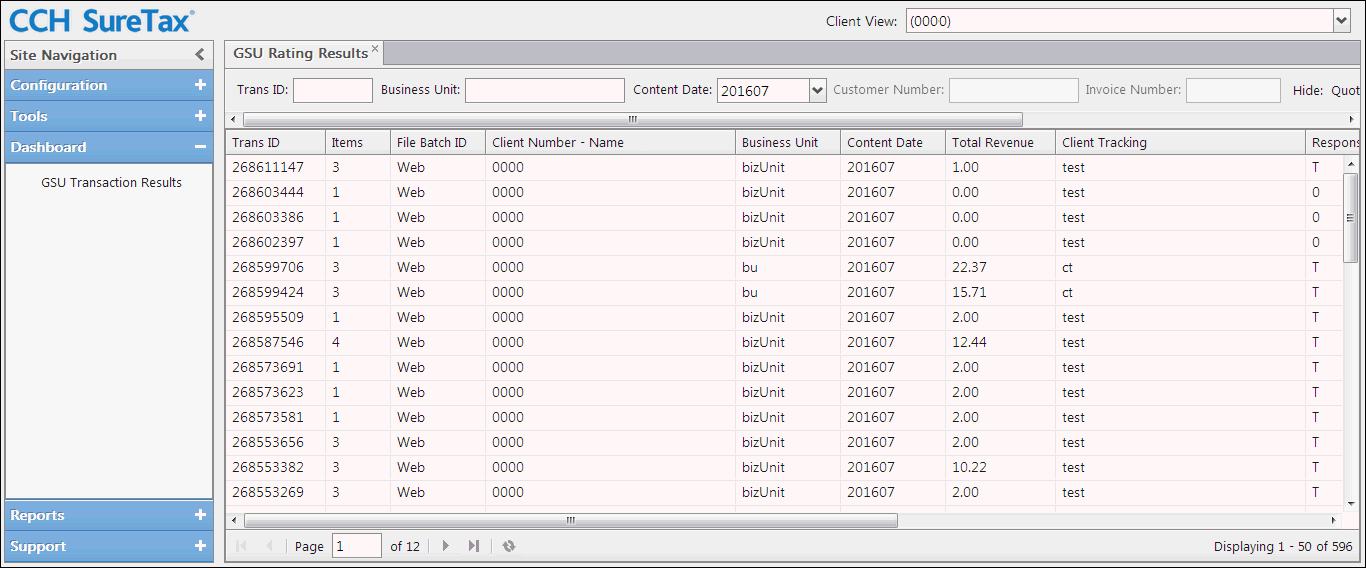
Note:
MarketDirect StoreFront
does not maintain transaction data on taxation. To see the CCH SureTax
information for MarketDirect StoreFront
transactions, log on to your CCH SureTax account and open the Dashboard
to view your transaction data. You can click Export
to export your transaction
data or reports.
7. Use External Web Service: Please disregard the fields in this section.
The VAT taxation model supports multiple tax rates for buyers in the different countries to which you conduct business. For instance, many European countries have multiple VAT rates. Thus, there might be a general tax rate of 20% and a reduced VAT rate of 6% for products such as books and educational materials.
Follow the steps in this section to configure both basic and advanced VAT settings.
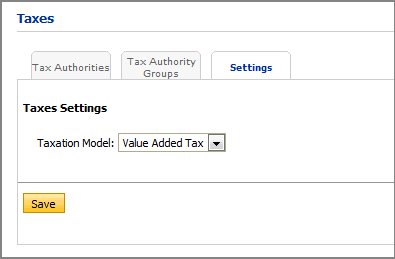
1. Go to Administration > Taxes.
Note: After the VAT Taxation Model is enabled, the link on the Administration home page will change from Taxes to VAT.
2. From
the Taxation Model pull-down list,
select Value Added Tax.
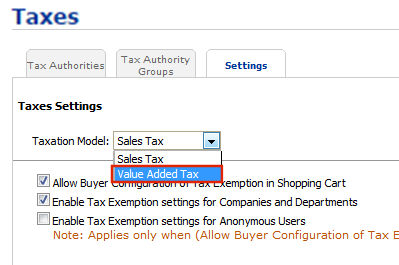
3. Click Save.
4. Click
Save again.
The next step is to define the VAT/GST rates.
1. Go to Administration > VAT.
2. On the VAT Rates tab, click Create New.
3. Create a VAT rate:
● In
the Description text box, specify
a descriptive name for the VAT rate.
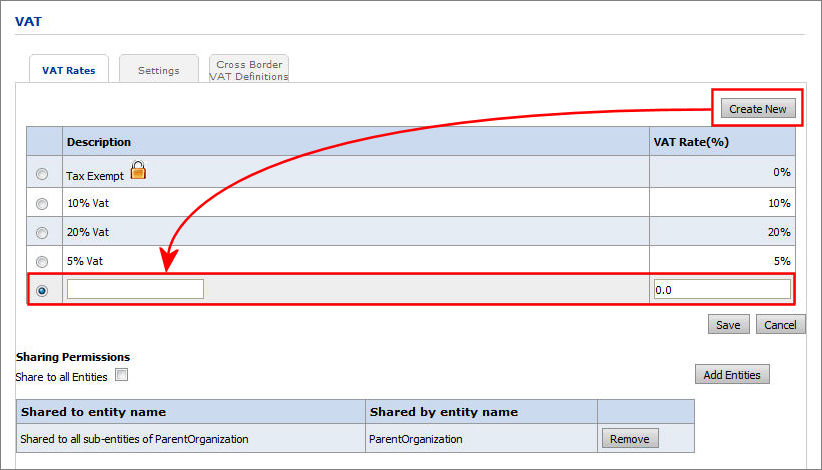
● In the VAT Rate(%) text box, specify a rate such as “12.”
● Click Save.
Enterprise Model Note: If you want to share the VAT settings with other entities, in the Sharing Permissions section, select the Share to all Entities check box if you want to share the VAT rates with all entities, or click Add Entities to specify the entities to which you want to share the VAT rates.
The next step is to specify the general rate(s) to be applied to products for a Print Shop on the Print Shop page.
1. Go to Administration > Print Shops.
2. On the Print Shops page, open the Print Shop you want to edit.
3. Scroll down to the Shopping Cart Settings section and choose which Taxation Model to use for the Print Shop:
● Select Cross Border VAT Definition: Associates a Cross Border VAT definition with the Print Shop. Cross Border Definitions are described in the advanced setup section in this help topic.
● Fixed Rate: Select a fixed rate
to apply to products ordered through this Print Shop.
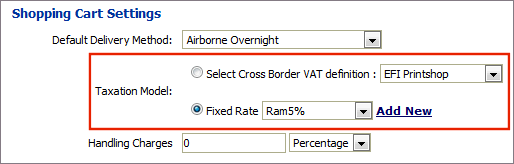
4. Click Save to save the Print Shop.
The next step is to configure VAT for pricing settings.
1. Go to Administration > Pricing.
2. Select the target price sheet.
3. Open the Settings tab.
4. Configure
VAT settings:
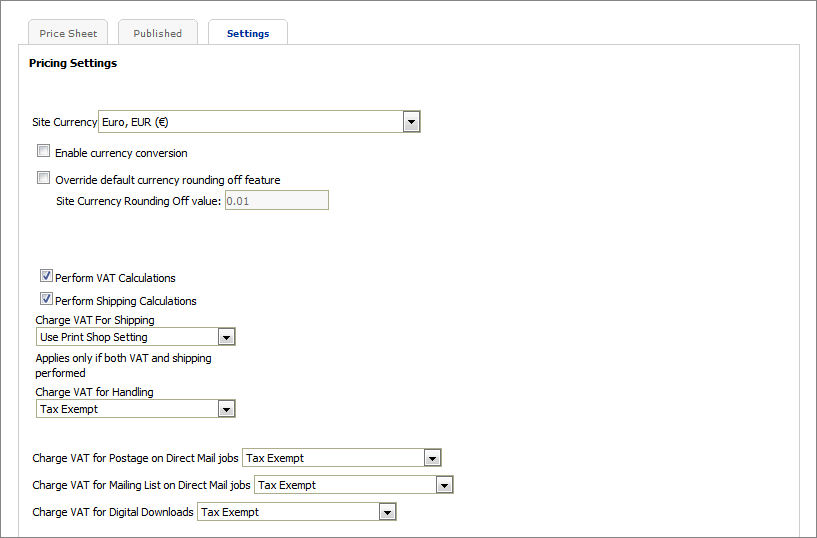
● Perform VAT Calculations: Check if you want VAT amounts to be shown in the shopping cart or clear the box to prevent VAT amounts from displaying in the shopping cart.
● Perform Shipping Calculation: Check if you want shipping charges to be calculated or clear the box to omit them.
● Charge VAT For Shipping: Specify the VAT rate to use for shipping charges.
Note: Applies only if both VAT and shipping calculations are performed.
● Charge VAT for Handling: Specify the VAT rate to use for handling charges.
● Charge VAT for Postage on Direct Mail jobs: Specify the VAT rate to use for direct mail jobs.
● Charge VAT for Mailing List on Direct Mail jobs: Specify the VAT rate to use for mailing lists on direct mail jobs.
● Charge VAT for Digital Downloads: Specify the VAT rate to use for digital download products.
5. Click Save.
The next step is to assign a seller VAT number for the Print Shop. The seller VAT number (associated with the Print Shop) is primarily for invoicing purposes. The number specified here is shown on the Contact Us page, the Order Confirmation page, and in email notifications.
1. Go to Administration > Print Shops.
2. On the Print Shops page, open the Print Shop you want to edit.
3. Scroll down and click Contact Information.
Note: The primary Print Shop VAT number is set on the Contact Information page. You can specify additional VAT numbers in the Configure Print Shop VAT Numbers section of the Print Shop page (described below).
● On
the Contact Information form, scroll down to the VAT
Number field and enter the primary VAT number for the Print Shop.
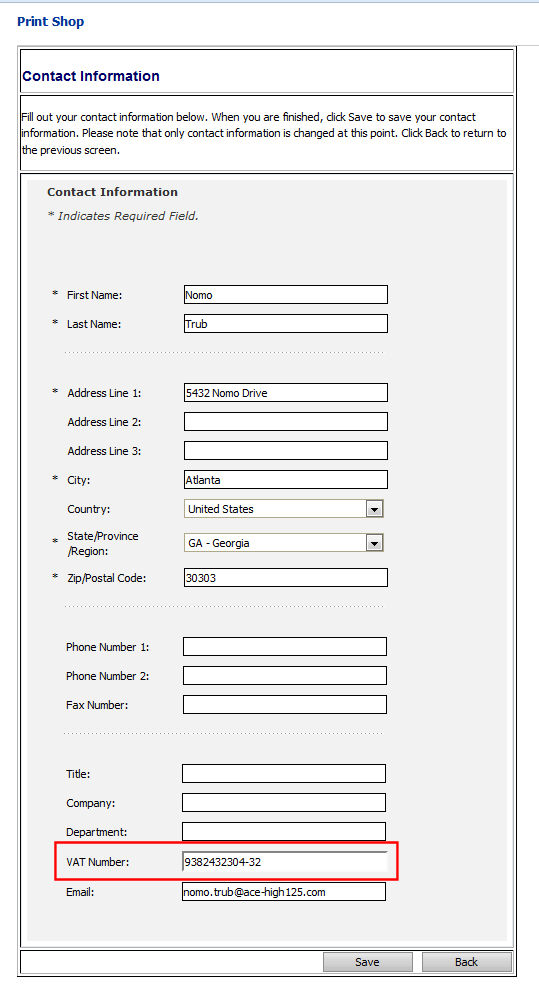
● Click Save.
4. Click Save to save the Print Shop.
1. Go to Administration > Print Shops.
2. On the Print Shops page, open the Print Shop you want to edit.
3. (Optional) Scroll down to the Configure Print Shop VAT Numbers section to configure the VAT numbers for the Print Shop:
● Click View/Manage VAT Numbers.
● On the Configure Print Shop VAT
Numbers dialog, click Add
New to add more VAT
numbers for the Print Shop.
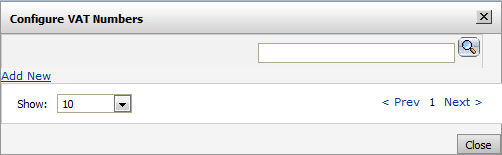
● Select
a Country and add the VAT
Number.
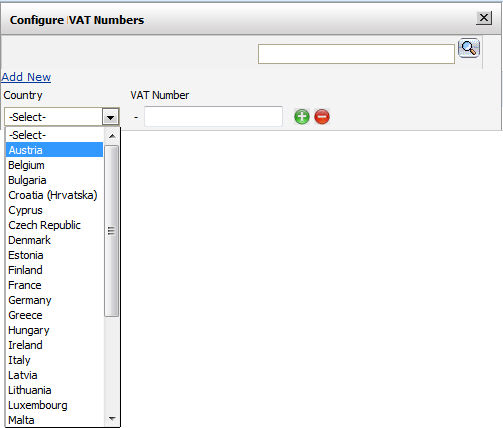
● Click
 to save and add another country/number pair.
Note that VAT numbers will be validated before saving. Invalid VAT numbers cannot be added.
● Click Close when you are finished.
4. Click Save to save the Print Shop.
The seller VAT number will be shown on the Contact Us page:
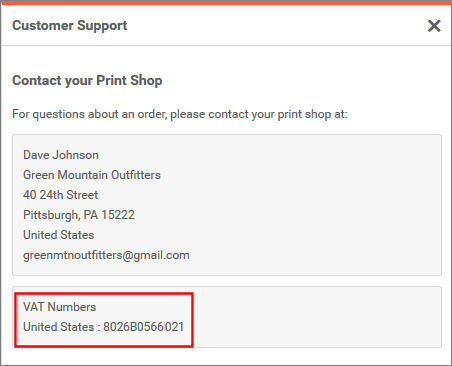
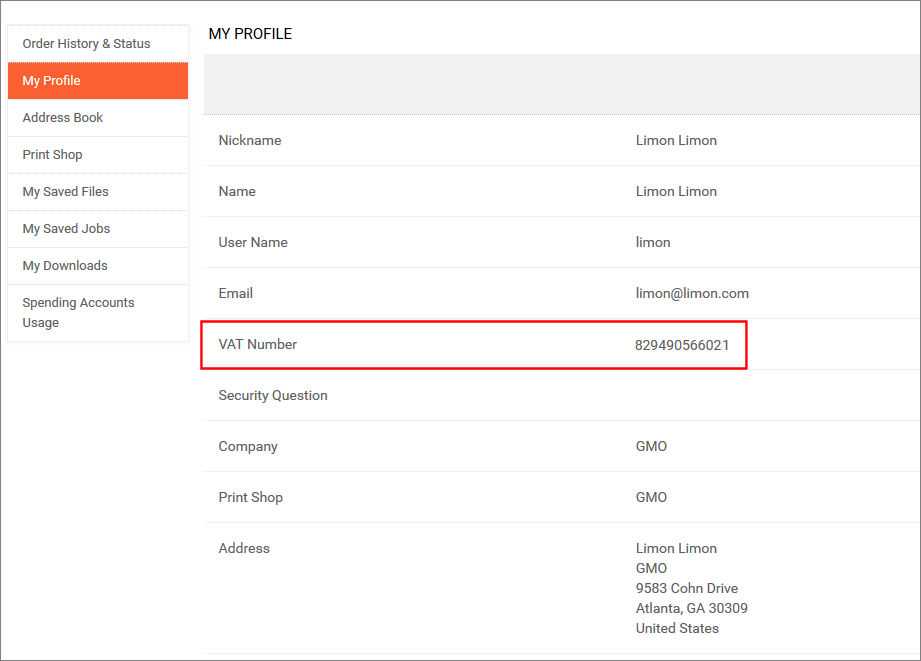
Display of Buyer VAT Numbers
The VAT number will be shown on the My Profile page:
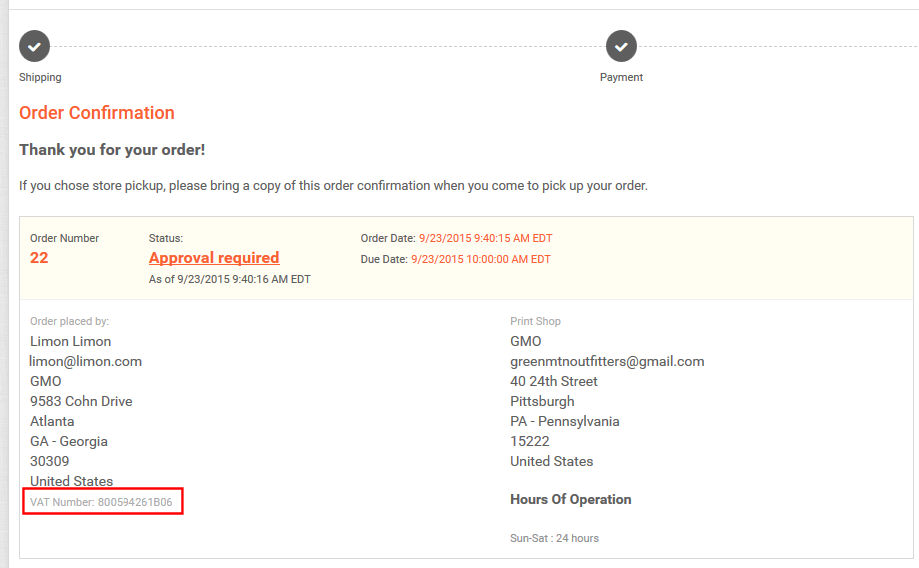
The VAT number will be shown on the Order Confirmation page:
Note: The buyer VAT number shown on the Order Confirmation page is the number the buyer entered at the point of sale.


Notes on VAT numbers
● You can include the VAT number for buyers and sellers in dynamic queries (to the Orders and Contacts root tables) using the Dynamic Query Tool. For more information on the Dynamic Query Tool, see Dynamic Query Tool.
● VAT numbers are not mappable in Variable Data Product (VDP) forms. For more information on variable data products (VDP), see Variable Data Products - VDP.
The next step is to configure VAT settings on the Company page.
1. Go to Administration > Companies.
2. Click the link to open the target company for VAT configuration.
3. Scroll
down to the VAT Settings section and configure:
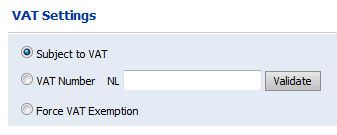
● Subject to VAT: This is the default setting that applies VAT to all buyers associated with the company.
● VAT Number: Select this option if you want to use one number for all products sold through the company. Enter a VAT country code number in the text box.
Note: For member states of the European Union the country code will correspond with the country specified in the Print Shop contact information.
● Validate: Click to validate the number.
● Force VAT Exemption: Select this option if you want all users associated with the company to be exempt from VAT.
Note: Companies with valid VAT numbers will always be charged VAT during checkout.
4. Click Save.
If you want to enable the VAT number to be visible or required (for self-registering buyers) follow these steps:
1. Go to Administration > Site Settings.
2. Open
the User Profile Fields tab.
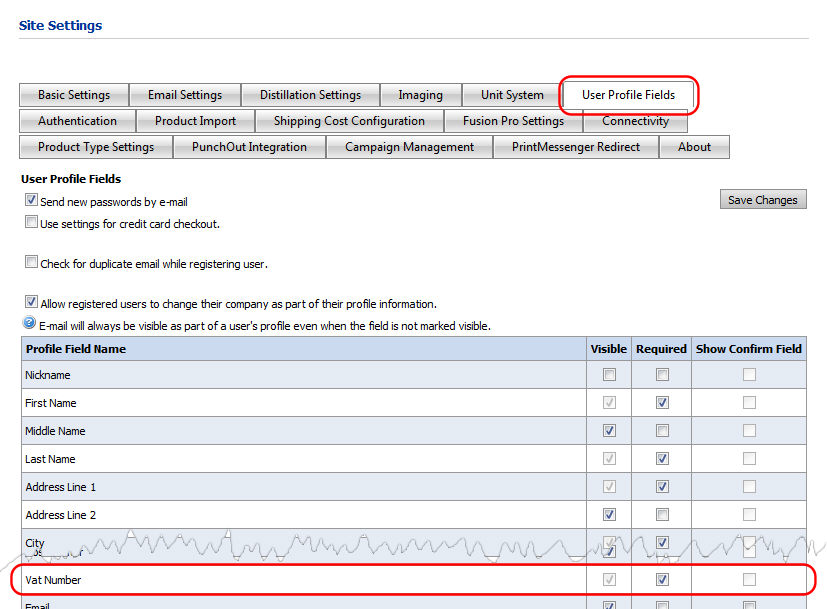
3. Scroll down to the VAT Number row:
● Check the Visible checkbox if you want to allow buyers to opt into providing a VAT number.
● Check the Required checkbox if you want to require self-registering buyers to enter their VAT number as part of their profile.
4. Click Save Changes.
5. Go to Administration > Storefront Customization.
6. Select the target storefront.
7. For SmartStores:
● Click 5: Edit Page Elements & Styles.
● In
the VAT SETTINGS section, select the Allow
users to enter VAT number option to allow buyers
who self-register on the site to enter their VAT numbers and have them
associated with their profile and utilized during the ordering process.
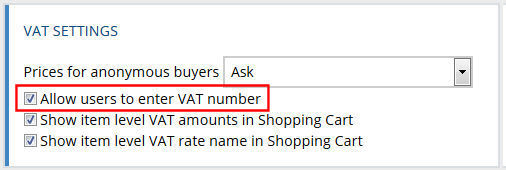
Note: To allow buyer VAT numbers, you must select the Allow users to enter VAT number and set the VAT Number field on Site Settings | User Profile Fields page to Visible.
For classic storefronts:
● In the VAT Settings section, select the Allow users to enter VAT number option to allow buyers who self-register on the site to enter their VAT numbers and have them associated with their profile and utilized during the ordering process.
8. Click Save.
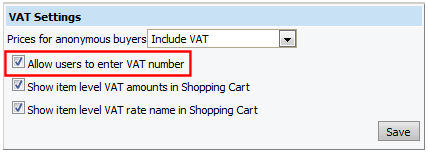
1. Go to Administration > Storefront Customization.
2. Click the link to open the target SmartStore.
3. For SmartStores:
● Click 5: Edit Page Elements & Styles.
● In
the VAT SETTINGS section:
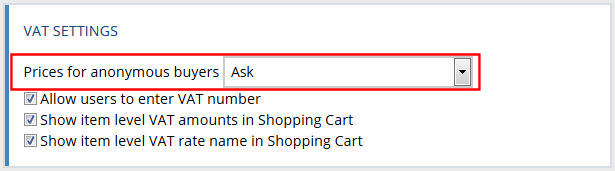
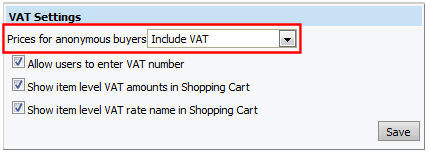
● Price for anonymous buyers:
● Ask:
Select this option to ask anonymous
buyers whether to show prices including or excluding VAT in prices.
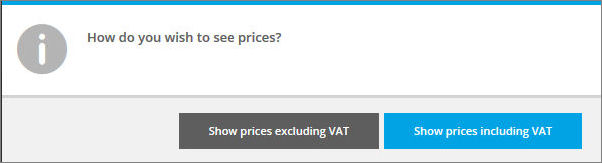
Note: For example: “Consumer” buyers will likely opt to show prices with VAT whereas “business” buyers will not.
Note: Note that for anonymous (pre-login) buyers, the Print Shop location is used to calculate the VAT rate.
● Include VAT: Select this option to include VAT in pricing shown to buyers.
● Exclude VAT: Select this option to exclude VAT in pricing shown to buyers.
Note: Please note that the VAT will be charged even if you opt not to have it displayed to buyers.
● Show
item level VAT amounts in Shopping Cart: Select
this option to show the actual calculated VAT amounts at the item level
in the Shopping Cart.
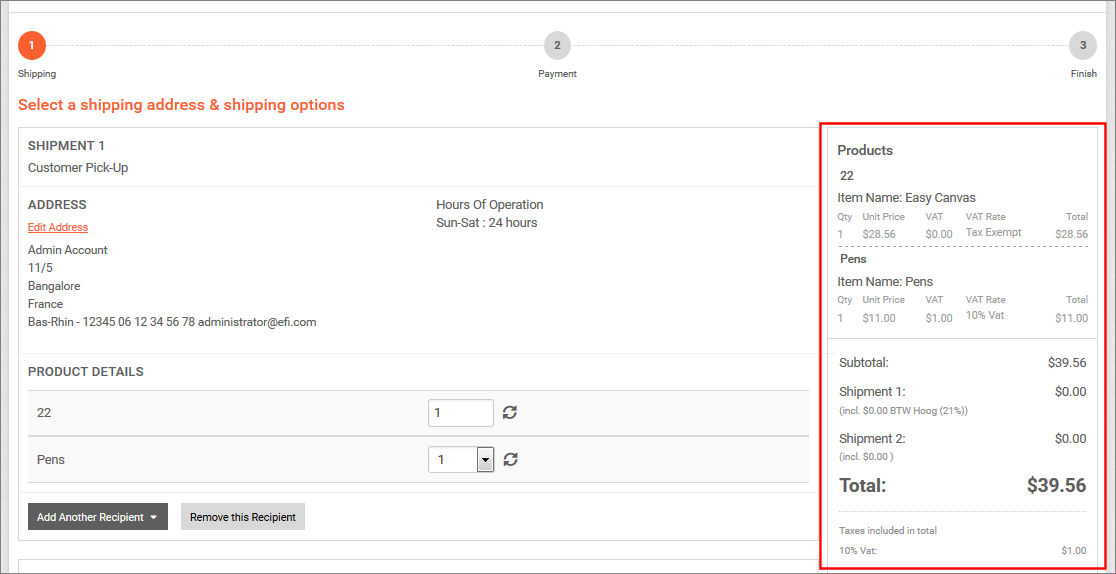
● Show item level VAT rate name in Shopping Cart: Select this option to show the VAT rate at the item level in the Shopping Cart.
Note: In the case of kits, combined printed and digital deliveries, and cross border split shipments, multiple VAT rate may be shown for one product.
For
classic storefronts:
● Price for anonymous buyers:
● Include VAT: Select this option to include VAT in pricing shown to buyers.
● Exclude VAT: Select this option to exclude VAT in pricing shown to buyers.
Note: Please note that the VAT will be charged even if you opt not to have it displayed to buyers.
● Show item level VAT amounts in Shopping Cart: Select this option to show the actual calculated VAT amounts at the item level in the Shopping Cart.
● Show item level VAT rate name in Shopping Cart: Select this option to show the VAT rate at the item level in the Shopping Cart.
Note: In the case of kits, combined printed and digital deliveries, and cross border split shipments, multiple VAT rate may be shown for one product.
4. Click Save.
5. Go to Administration > VAT.
6. Open the Cross Border VAT Definitions tab.
7. Click to open the appropriate VAT definition.
8. From the Show Price Excluding VAT pull-down list, select whether to show prices without VAT charges if the VAT number matches the country format or never to show prices with VAT charges included.
9. Click Save.
Note: Important note: By default prices shown to registered buyers will be shown including VAT. Buyers who have provided a valid VAT number or belong to a company with a valid VAT number will be shown prices excluding VAT.
● All prices specified in the price sheets are excluding VAT. For more information on price sheets, see Create Price Sheets.
● All promo code amounts are excluding VAT. For more information on promo codes, see Promotional Codes.
● You can include VAT-specific variables in email notifications. For more information on email notifications, see Email Notifications.
Note:These product-level VAT settings should be considered as overrides to VAT rates set at the Print Shop level. For example, a common use case would cover cases in which certain products (such as educational materials) are subject to a lower VAT rate.
1. Go to Administration > Products.
2. On the Manage Products page, double-click the name of the product to edit.
3. On the Information | Settings page:
● In the Shipping Charges section, check the Exempt Shipping Charges check box if you want to exempt shipping charges.
● In
the VAT section, scroll down to the
Shopping Cart Settings section and choose which Taxation
Model to use for the Print Shop:
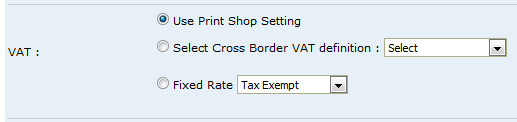
● Use Print Shop Setting: Select this option to use the VAT settings in use at the Print Shop level.
Note: For more information on VAT settings at the Print Shop level (i.e., on the Print Shop) page, see Taxation Model at Print Shop Level.
● Select Cross Border VAT Definition: Associate a cross border VAT definition (i.e., VAT tax sheet) with the product.
● Fixed Rate: Select a fixed rate to apply to the product.
4. Click Save.
Cross Border definitions accommodate the need to have different VAT rates for different countries (i.e., cross border VAT). Within the European Union the VAT number is validated against the European Commission Web Service. For other countries the VAT number can be validated against a regular expression set at the countries level. You can define cross border VAT definitions that let you define rates based on the country to which a product is shipped at the Print Shop, product, or delivery method level.
Note: For digital download products, the VAT rate will always be based on the country specified in the buyer's profile.
1. Go to Administration > VAT.
2. Open the Cross Border VAT Definitions tab.
3. Click Add New.
4. Specify
a Name and Description
for your new cross border definition.
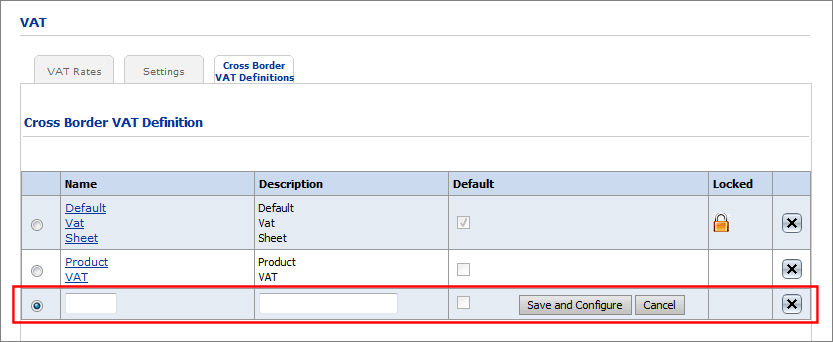
5. Click
Save and Configure.
6. The Default check box is a read-only field that displays the name of your default cross border definition.
7. The Locked check box is a read-only field.
8. In the Sharing Permissions section, you can opt to share the cross border definition with all entities, or click Add Entities to select the entities to which you want to share it.
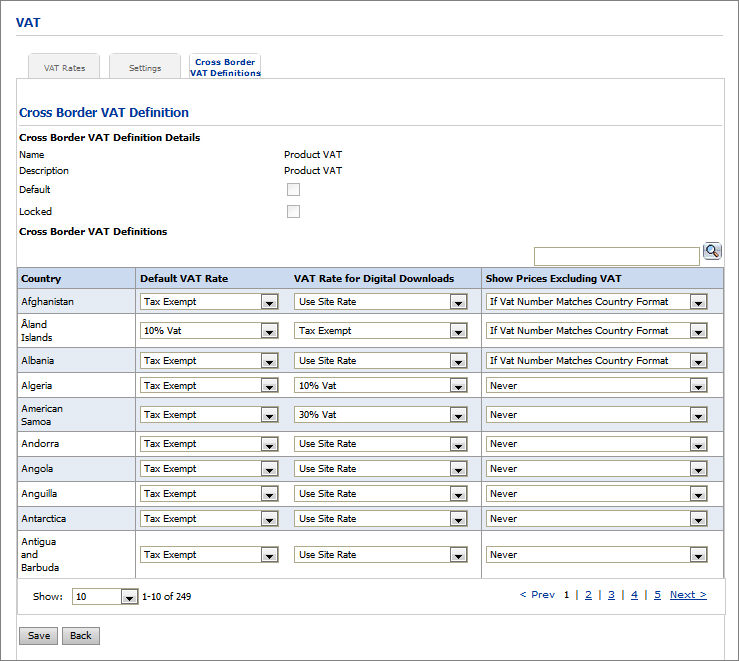
9. Define the VAT rates for each country governed by the cross border definition:
● From the Default VAT Rate pull-down list, select the desired rate from the available rates for standard products.
● From the VAT Rate for Digital Downloads pull-down list, select the desired rate from the available rates for digital download products.
● From the Show Price Excluding VAT pull-down list, select whether to show prices without VAT charges if the VAT number matches the country format or never to show prices with VAT charges included.
10. Click Save.
Specify the Cross Border VAT definition for Shipping (Delivery Methods)
You can specify the VAT rate sheet to use for shipping on the Delivery Methods page.
1. Go to Administration > Delivery Methods.
2. On
the Delivery Methods page, click  to edit a delivery
method.
to edit a delivery
method.
3. From
the Select Cross Border VAT definition
pull-down list, select the Cross Border VAT definition to use for the
delivery method.
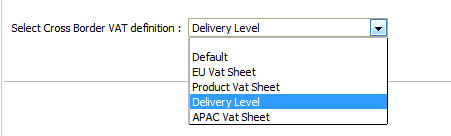
4. Click Save.
Within the European Union the VAT numbers are validated against the European Commission Web Service. For countries that are not members of the European Union, the VAT number can be validated against a regular expression set at the country level. You can set the regular expression for the VAT number in various countries on the Countries page.
1. Go to Administration > Countries.
2. In the table, locate the country.
3. Click Edit.
4. In
the text entry box in the VAT Number
Pattern column, enter the regular expression for the VAT number.
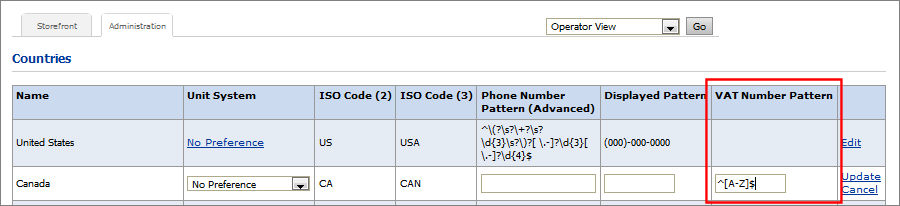
Note: For help determining the VAT number pattern for a particular company, please consult a competent financial advisor. EFI's MarketDirect StoreFront Support Team cannot assist you with this.
Note: Please note that you will not be able to modify the VAT number pattern for European Union member states.
5. Click Update.
● To create a new tax authority
● To modify properties of existing tax authorities
● To create tax authority groups