
The MarketDirect system ships with a default Print Shop that takes its name from the server on which MarketDirect software is installed. This Print Shop is simply a placeholder in the system. You can rename this default Print Shop with a descriptive name for one of your production shops. If you have more than one physical Print Shop or shop that produces jobs, you will need to create a “Print Shop” in MarketDirect for each of them.
For example, if your company is “PrintCo” and you have three production shops—one in Baltimore, one in Sacramento, and one in Chicago, you will need to create and configure three Print Shops in the system (e.g., PrintCo-Baltimore, PrintCo-Sacramento, PrintCo-Chicago).
Tip: To edit an existing Print Shop, open the Print Shop and follow the instructions in this section (minus, of course, the steps for adding new Print Shops).
On the Print Shop page, add or change the following information.
1. Print Shop Name—specify a unique name for the Print Shop. Assign each Print Shop a meaningful descriptive name.
Tip: The Print Shop name is not localizable (i.e., it will remain constant across all languages).
2. Store Number (optional)—the name of the store associated with this Print Shop. Checking the Disable Print Shop box will remove it from the list of Print Shops available for a user to choose when self-registering.
Tip: Disabling a Print Shop will also make it unavailable for buyers to select when changing Print Shops during checkout, on the home page, or in their My Account page. Disabling a Print Shop does not, however, affect an operator’s or administrator’s ability to view the Print Shop nor prevent rerouting an order to the disabled Print Shop.
3. Copy Payment and Delivery options from Print Shop—this enables you to copy the configuration of an existing Print Shop to streamline the process of creating a new Print Shop.
4. Initial group access—specifies the user group that can initially access the Print Shop.
5. Supported Payment Methods—specifies the forms of payment you will accept for customer jobs submitted to the Print Shop: Accounting Codes, Cost Center, Credit Card, Other Account, Pay At Store, PayPal, PO Number.
Tip: An item must be checked (enabled) in order for the payment method to be displayed for a buyer’s account. Note that the labels Accounting Codes and Cost Center are correct even if they have been assigned different names in the account-level management (because these settings are for a Print Shop and are conceptually separate from the renaming that is done at the company level).
6. Default Payment Method—select the default payment method for the Print Shop: Accounting Codes, Cost Center, Credit Card, Other Account, Pat At Store, PayPal, PO Number.
Tip: Only those methods you selected in the Supported Payment Methods section above will be available as a default payment method option.
7. Credit Card Merchant—specifies the default merchant account that will govern all credit card payments made to companies associated with the Print Shop that do not have another merchant account specified in the Credit Card Merchant field on the Company or Department page.
Note: For instructions on setting up merchant accounts in MarketDirect, see Managing Merchant Accounts.
Note: To accept credit cards, the system requires that digital server certificates (SSL, or Secure Socket Layer certificate) are installed on your site (see Digital Server Certificates).
● Paypal Merchant Account ID—will show only if PayPal is a supported payment method.
● From the pull-down list, select the PayPal option that will serve as the default PayPal option for companies associated with the Print Shop that do not have another PayPal account specified in the PayPal Merchant Account ID field on the Company or Department page.
Note: If you are using Payflow Pro be sure it is configured to use PayPal transactions. Contact PayPal Payflow Pro Customer Support for more information. For details on setting up a PayPal account in MarketDirect, see Managing Merchant Accounts.
8. Validate Other Account
Note: This field will show only if you select Other Account as a supported payment method. Checking this box will cause the MarketDirect systemt to validate the account during the checkout process when a buyer selects the account as a payment method for an order.
9. Enable Zero Payment: Check the box Enable Zero Payment if the Print Shop offers one or more products that have a cost of $0 so that buyers are not required to enter a payment method.
Note: If the Zero Payment Method is enabled and the buyer order has a price of zero he or she is not prompted for a payment method and it is set to “Zero Payment.” If the Zero Payment Method is not enabled, the buyer will see the payment methods as they normally appear.
11. Supported Delivery Methods
a. Click Assign/Edit Delivery Methods to assign an existing delivery method to this Print Shop.
Note: For detailed instructions on adding delivery methods, see Delivery Methods.
b. Add Delivery Method—click to set up delivery method/s for the Print Shop.
12. Buyer
Order Permissions—Buyer order permission
settings let you specify the conditions under which buyers who purchase
products from the Print Shop
will be able to re-order products or cancel orders from their Order History
& Status page on the buyer side. The column on the left is the order
status.
a. Re-Order: Select the order statuses in which buyers can re-order products on the Order History & Status page on the buyer side (e.g., if you check User Approved, buyers will be permitted to place a re-order for all orders in the status User Approved).
b. Cancel: Select the order statuses in which buyers can cancel an order on the Order History & Status page on the buyer side (e.g., if you select only In Production buyers will be permitted to cancel orders only when they are in the In Production status, whereas if you select only User Approved, buyers will be able to cancel orders only at this stage/status and would not be permitted to cancel orders in the Approved or In Production statuses).
Note:
Note that buyers cannot cancel orders that have shipped or previously
been cancelled; thus these options are grayed out and cannot be selected.
Buyer order cancellation is available only for entire orders, not for
line items in multi-item orders (for more information see Status
changes for Jobs and Multipart Orders). After a buyer cancels an order
on his/her My Order History page,
a message will show at the top informing that the order was cancelled
but that cancellation charges may apply.

After an order is cancelled, a hyperlink will be displayed at the top of
the Order View "There are [n] orders that have been cancelled by
the buyer." Clicking that link will show the orders. For more information
on discharging cancelled orders on the Order View, see Order
View.
Note: You can override these buyer order permission settings at the company level; for more information see Add or Edit a Company.
Note:
Important Note on Buyer Canceled Orders
and MIS:
When a buyer cancels an order on your site, the order status change is
not communicated to the MIS because a buyer-cancelled order is not actually
cancelled until a site administrator marks it "Cancelled" from
the Order View. This is by design. This allows the administrator, not
the buyer, to determine how to handle the buyer cancellation request.
For instance, by the time the buyer cancels an order, the Print Shop might have processed part
of the job and will thus want to charge the buyer appropriately. After
a buyer cancels an order, it is up to the administrator to choose how
to dispose of the order in the Order View:
1. Cancel the order with no charge to the buyer by clicking Cancel, which will set the status to "Cancelled" and send the status update to the MIS.
2. Change the status of the order to "In Production" if it is too late in the production process to allow the cancellation.
3. Charge the buyer an appropriate cancellation fee, i.e., that covers the cost of partial production, by editing the quote in the Quote Editor and clicking Finalize Quote. The latter option will change the order status to "Completed" rather than "Cancelled" so that the amount charged can be captured for credit card payment.
13. Contact Information—click the link to open the Contact Information page.
Tip:
Use the ![]() and
and ![]() button to show and hide the contact
information.
button to show and hide the contact
information.
a. Fields marked with an asterisk (*) are required.
b. After completing this page, click Save to return to the Print Shop page.
14. Remote Print Center Enablement—To set up a remote file system (i.e., remote print center), click Install in the File System field on the RPC machine.
Note: For instructions on setting up a remote print center, see Enable Remote Print Center. After RPC is set up, there will be an Edit link (instead of an Install link).
15. Default Output Device—To configure output devices for the Print Shop, select the appropriate device that will serve as the default output device, or select Unassigned.
Note:
The default output device is automatically assigned to produce all jobs
for the associated Print Shop
unless the operator manually assigns another device on the Operator
View page.
The Manage Output Devices link,
which opens the page where you will add output devices, will not appear
until the Print Shop profile
is saved and reopened.
If the New output link is in the
Default Output Device field, no
device is automatically assigned to process jobs. On the Operator
View page, all jobs for this Print Shop
will appear as “Unassigned.” The operator will then need to assign the
appropriate output device manually for each job.
If no output devices are available for selection, you need to add them.
See Add Output Devices.
16. MIS System—If you set up a management information system (MIS, such as Monarch, Logic, Pace, or PrintSmith) that you want to associate with this Print Shop, select it from the list in the MIS field. To view, edit, or remove an MIS system, click Manage MIS Systems.
Note: For more information on managing MIS systems for your site, see MIS Systems
17. Enable Shop Notification—check this box to enable the system to send email notifications to an email address (which you specify in the next step) whenever an order reaches the “Print Shop Approved” status, which indicates that a buyer either placed an order with a fully automated quote or accepted a manual quote on an order.
Warning: It is very important for MIS Print Shops to enable shop notification because email notifications are also used to report critical events to the Print Shop.
18. E-Mail—type an email address or email group alias to specify the email address of a Print Shop employee to whom urgent notifications should be sent.
Warning: It is also strongly recommended that you supply a site contact email address (which can be to a single recipient or to a mailing list) for the entire site.
19. Language Preference—select the default language for the Print Shop. This sets the language used for ticket data, MIS/External System Connector, and quote storage.
20. Time Zone—select an international time zone for the Print Shop.
Note: The Time Zone field will not appear until the Print Shop profile is saved and reopened.
21. Unit System—Select the unit system (measurement standard) to use for the Print Shop. For more information on unit systems, see Unit System.
● Amount—specify an amount to charge (above and beyond the cost of shipping) for each order processed by the Print Shop.
● Percentage—specify a percentage of the order subtotal for each order processed by the Print Shop.
22. Print Shop Order Type—Click View/Manage to modify the estimated order completion times and adjust the extra charge associated with order types such as rush jobs.
Note: The Print Shop Order Type field will not appear until the Print Shop profile is saved and reopened.
a. Click Edit.
b. In
the Rush and Regular Jobs panel:
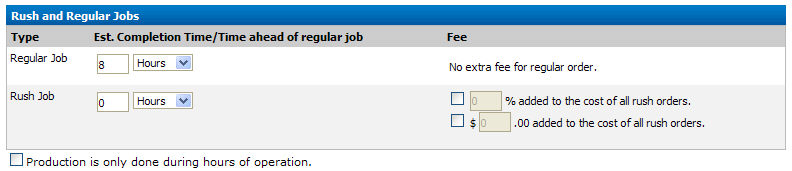
● In the Estimated Completion Time/Time ahead of regular job section: Change the hour/days values as needed or Regular Jobs and Rush Jobs. For instance, you can define the time to process a regular job 3 days/72 hours and a rush job 1 day/24 hours. See the Important Note in step iii.below about using Hours rather than Days to correctly calculate estimated production times if you select the Production is only done during hours of operation option.
Note:
If
you have selected the option Rush
job delivery date is based on the regular job delivery date on
the Site Settings | Basic Settings tab (for information see Calculate
rush jobs) the rush order due time will be calculated as time off
of the regular order time (i.e., a 24 hour value will mean that the rush
order will be due 24 hours before the regular (i.e., non-rush) job delivery
date).
If a regular job takes 8 days, a 3 day rush job would mean the job
is due on day 5 (8-3) from the day the order is placed, not on day 3.
The rush delivery date is 3 days ahead of the regular delivery date, not
3 days from when the order is placed.
Note: Products can be assigned a turnaround time as well. When a buyer places an order, the product turnaround time will be used unless it is sooner than the Print Shop turnaround. In those cases, the Print Shop turnaround time will be used.
● In the Fee section: Assign the extra charge associated with an order type such as rush job. For instance, you might enter a flat fee value of $10 for processing a rush job and/or a surcharge of 10% based on the cost of the order.
Note:
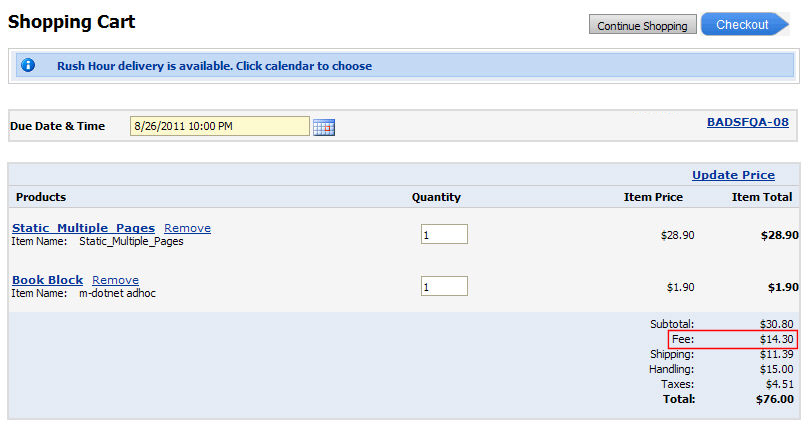
If you select the % added to the cost
of all rush orders option, the rush fee will be the specified percentage
of the order Subtotal, Shipping charge, and Handling fee. Thus, if you
specified a 25% rush order, the rush order fee (Fee line item in the Shopping
Cart, as shown below) would be 30.80 + 11.39 + 15.00 / .25 = $14.30.
● Production is only done during hours of operation: This option adjusts due dates based on the hours of operation set for the Print Shop (i.e., when production will be taking place).
Note:
IMPORTANT NOTE: If you select
the Production is only done during hours
of operation option, be sure to select Hours
rather than Days in the Est. Completion Time/Time ahead of regular
job field (in step 1. above).
-- Selecting the Days option for
the will base the production time and completion date on calendar days,
regardless of the Print Shop's policy to produce jobs
only during work hours.
-- Selecting the Hours option,
however, will calculate the production time based on the Print Shop's hours of operation (accounting
for weekends, holidays, and hours the shop is closed).
● Click Save to save your changes.
● Click Back to return to the Print Shop page.
c. Hours of Operation—Click View/Manage to modify the Print Shop's business hours and holiday schedule. These values communicate your business hours and holiday closings to your customers.
Note:
The Hours of Operation field will not appear until the Print Shop profile is saved and reopened.

● On the Hours of Operation page select the days whose open and close times you want to change, then click Edit and modify as needed, and click Update when you are finished.
● In the Holidays section, click Add Holiday.
● On the Holiday Schedule page:
(1) Enter a Title of the holiday you are adding.
(2) Enter either a fixed date for holidays that occur on the same date each year (such as Christmas, which is observed each year on December 25) or a varying day for holidays that fall on varying dates (such as the United States’ Thanksgiving, which is observed on the third Thursday in November each year).
(3) Click Save to save your changes.
(4) Click Back to return to the Hours of Operation page.
(5) Click Back to return to the Print Shop page.
23. Handling Charges: Specify a value for handling charges for items that are either shipped or held for pickup.
Note: By design, direct mail pieces are never subject to handling fees. They are governed by postage and postage markup and fees you specify.
Note: If you are using shipping cost callculation service (AccuZip), this handling charge will augment AuctionInc shipping cost calculation.
● From the pull-down menu, select an option:
● Percentage: adds a handling fee as a percentage of the line item amount (i.e., for items that are either shipped or held for pickup). Specify the percentage in the text box.
● Amount: adds a specified handling fee to each line item (i.e., that is either shipped or held for pickup). Specify the amount in the text box.
24. View shipment provider configuration steps—Click Expand to see a wizard of steps for configuring shipping provider. See Shipping Cost Configuration.
Note:
For detailed instructions on configuring AuctionInc, see Shipping
Cost Configuration.
Note:
The settings in this section apply to those sites with mailing service
providers (e.g., AccuZIP) set up for their buyers who order direct mail
campaign products (i.e., EFI VDP).
Note that these three default shipping
methods will never be available as selections in the cart; they are used
“behind the scenes” to support the MIS order workflow for digital downloads
and direct mail. You can also set the default shipping methods for digital
downloads and direct mail at the company and department level.
Please note that at the present time mailing service provider integration
will work only with the EFI VDP products).
-- For more information on mailing service providers, see Mailing
Service Providers.
-- For additional guidelines on setting up direct mail pieces for your
site, see Direct
Mail Guidelines.
-- For more information on EFI VDP, see Create
an EFI VDP Product.
● Mailing Service Provider Account: If you have set up a mail service providers, select it from the pull-down list.Mail Payment Method: From the pull-down list, select the appropriate payment method for mail delivery charges incurred from the mail service provider for orders placed in this Print Shop:
● IMPRINT: Select this permit imprint option if you will be imprinting the "indicia" containing postage information (e.g., in the upper right corner of the mailing piece) for bulk direct mail products ordered through this Print Shop.
● METER: Select this option if you will be printing the postage indicia (containing postage information) with a postage meter for bulk direct mail products ordered through this Print Shop.
● STAMP: Select this option if you will be using precanceled stamps for bulk direct mail products ordered through this Print Shop.
● Default Shipping Method for Digital Download: From the pull-down list, select the default shipping method to use for digital download products ordered through this Print Shop.
Note:
Selecting a default shipping method for Digital Download and Direct Mail
(Standard and First Class) products will cause the shipping method section
of the shopping cart not to be shown.
Please note: For direct mail products,
AccuZIP communicates to MarketDirect the class of postage based
on the attributes of the job – size, weight, quantity. If the attributes
qualify it for First-Class rates, AccuZIP prices as such; if not, it is
assessed Standard rate.
For additional guidelines on setting up direct mail pieces in MarketDirect,
see Direct
Mail Guidelines.
● Default Shipping Method for Direct Mail (Standard): From the pull-down list, select the default shipping method to use for standard direct mail products ordered through this Print Shop.
Note:
Note that buyers must send a minimum of 200 valid addresses that are deliverable
(ZIP+4 coded after CASS), and preferably 300 or more, to qualify for automation
discounts for Standard Mail.
Please note: For direct mail products,
AccuZIP communicates to MarketDirect the class of postage based on the
attributes of the job – size, weight, quantity. If the attributes qualify
it for First-Class rates, AccuZIP prices as such; if not, it is assessed
Standard rate.
For additional guidelines on setting up direct mail pieces in MarketDirect,
see Direct
Mail Guidelines.
● Default Shipping Method for Direct Mail (First Class): From the pull-down list, select the default shipping method to use for first class direct mail products ordered through this Print Shop.
Note:
Note that buyers must send a minimum of 500 valid addresses that are deliverable
(ZIP+4 coded after CASS) to qualify for automation discounts for First
Class Mail.
Please note: For direct mail products,
AccuZIP communicates to MarketDirect the class of postage based on the
attributes of the job – size, weight, quantity. If the attributes
qualify it for First-Class rates, AccuZIP prices as such; if not, it is
assessed Standard rate.
For additional guidelines on setting up direct mail pieces in MarketDirect,
see Direct
Mail Guidelines.
a. Default Delivery Method—the default delivery method for the Print Shop. (If you are using the Sales Tax model, not the VAT model.)
b. Default Tax Group/Authority—the default tax group/authority for the Print Shop. (If you are using the Sales Tax model, not the VAT model.)
Note:
The Default Tax Group pull-down
list will not be available when external tax integration is selected for
the site. For more information on external tax integration, see External
Tax System Integration.
You can add a new tax authority by clicking Add
New (e.g., if you have enabled product level taxation to accommodate
multiple taxes for products, such as VAT tax and regular tax, you can
define the various tax rates to be levied against orders placed in the
Print Shop. Note that adding
new tax authorities is used only for setting up multiple tax rates (e.g.,
VAT and regular taxes) and for simple tax configuration. To set up a tax
authority when multiple tax authority groups are involved, such as state
and local, see Standard
Tax Configuration (Built-in) .
● Select Cross Border VAT Definition: Associate the cross border VAT definitions (the VAT tax sheet) with the Print Shop. Select the general tax rate (VAT tax sheet) that products ordered through this Print Shop will use by default (e.g., General VAT Rate).
Note:
If you do not specify a VAT definition at the Print Shop
level, the system will check to see if you specified a default VAT sheet
at the site level (i.e., on the VAT page) and apply the rate from the
specified tax sheet.
Note: For information on setting
up VAT taxation, see VAT
Taxation Model.
● Fixed Rate: Select a fixed rate
to apply to products ordered through this Print Shop.
● Handling Charges:
● Display handling charges as separate item in shopping cart—causes handling charges to be listed as a separate line item in the shopping cart.
● Display turnaround time at each line item in shopping cart—causes the turnaround time for each item in the order to be displayed to buyers in the shopping cart (at the line item level).
Note:
The turnaround time for products is set in the Turnaround
Time field on the Settings tab of the Manage Products page.
● Calendar Date:
● Preselect earliest date in the calendar—this option causes MarketDirect to automatically set the due date and time as the earliest regular (i.e., non-rush) time available based on the turnaround time you specified in the Turnaround Time field on the Settings tab of the Manage Products page.
Note: This option prevents the buyer from having to select a due date on the calendar before proceeding with checkout.
● Force user selection of date in calendar—this option requires the buyer to select a due date on the calendar before proceeding with checkout. This option lets buyers see the turnaround time for each product (e.g., in a multi-product order) and then choose whether to accept the default date calculated (based on the turnaround time you specified in the Turnaround Time field on the Settings tab of the Manage Products page) or to specify an earlier date and on the calendar and see the applicable rush hour charges for expediting the order.
● Do not display due date to buyer—this option prevents the due date and time from being shown to buyers in the shopping cart.
27. Estimated Pricing Policy: In some cases, MarketDirect is not able to calculate the actual tax and shipping charges for an order. Thus, the order prices in the shopping cart are estimated rather than actual. Configuring an estimated pricing policy will help you manage how this "subject to change" information is communicated to buyers in the shopping cart to prevent unexpected discrepancies between the estimated price quoted in the shopping cart and the actual price charged to the buyer's account when enough data is available to render actual amounts.
Note: You can also set an estimated pricing policy at the site level so that it will be applied to all orders placed on your site (for more information, see the topic Configuring Estimated Pricing Policy) or at the company level (for more information, see the topic Estimated Pricing Policy - Company Level).
You can communicate estimated pricing for the following types of charges:
● Shipping
● Handling
● Tax
● Subtotal
Note: For sites integrated with an MIS: If you want to use the estimated pricing feature, make sure that your MIS supports receiving buffer values. If it does not, do not use estimated pricing because doing so could result in errors during the order process.
Note:
If you do not want to communicate that prices for any of the order elements
(shipping, handling, tax, subtotal) are estimated rather than actual,
you do not need to do anything. By default, MarketDirect does not communicate
to buyers that amounts are estimated rather than actual. If you want to
override this default and communicate that prices in the shopping cart
are estimated rather than actual following the steps below.
Note that the estimated values are labeled "Estimated" and prefixed
with an asterisk that directs buyers to a message stating that the final
charges will be calculated when the order is completed: "Your order
contains estimated amounts; final charges will be calculated upon completion
of your order. If paying by Credit Card, the initial authorization may
not reflect the final total. You will only be charged for the final amount."
The buffer applied to the subtotal will have the label "Subtotal
Adjustment." Please note that the message and labels are customizable
using MarketDirect's Language Management string customization tools (for
more information see the topic Language
Management - Customize Strings).

Note: Note that the estimated pricing policy settings place at the time an order is placed will be retained even if the estimated pricing policy settings are changed after the order is placed (i.e., the buffered amounts will be retained for a specific order as they were calculated at order placement).
a. Check
the Estimated Pricing Policy box
to open the pricing policy table.
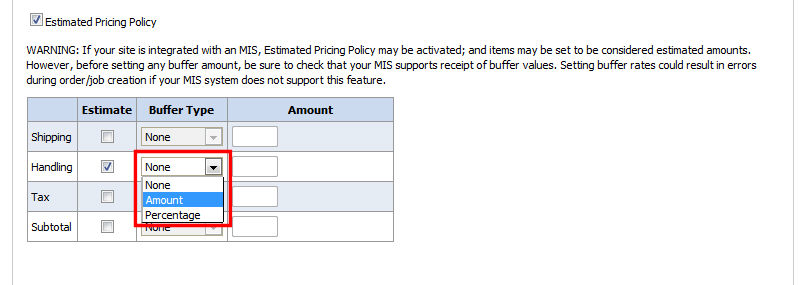
b. Check the Estimate box for each order element whose price you want to designate as estimated.
● Shipping: This is the shipping charge for delivering the order.
● Handling: This the handling charge you assess for the order (picking, packing, packing materials).
● Tax: This is the tax assessed on the order.
● Subtotal: The price of the order before shipping, handling, and tax charges are added.
c. After you select an element, the Buffer Type pull-down list becomes active. Specify the buffer type:
Note:
The buffer is the amount to add to the estimated price in the shopping
cart. You can set a buffer as a fixed amount or a percentage of the estimated
price.
Note that Shipping and Handling buffers are combined and reflected in the
Shipping line item in the Shopping Cart.
● None: Select this option to have the calculated amount for the element considered as estimated (and communicated to buyers via a message).
● Amount: Select this option to have the estimated price of the element increased by a fixed amount that you specify in the Amount field as a "buffer."
● For example, if you select the Amount Buffer Type and specify an Amount of 5.00, a fixed amount of $5.00 (or 5 units in the selected currency) will be added to the estimated order total in the shopping cart.
● Percentage: Select this option to have the estimated price of the element increased by a percentage that you specify in the Amount field as a "buffer."
● For example, if you select the Percentage Buffer Type and specify an Amount of 5, a percentage amount of 5% will be added to the estimated order total.
Note: Note that the buffer percentage is calculated before taxes and any other buffered amount is added to the order subtotal.
d. After you select an Amount or Percentage buffer type, specify an amount in the Amount field as a numeric (decimal) value such as 5, 5.0, or 5.5.
a. Click View/Manage.
Note: The Print Shop Approvers field will not appear until the Print Shop profile is saved and reopened.
Note: An approver is a representative of the Print Shop who is designated to approve the purchase of orders submitted by users associated with this Print Shop. Check the Disable Approvals box to disable approvals for this Print Shop.
i. On the Manage Print Shop Approvers page, click Add Approver to add a new approver.
ii. Click a radio button to select one user from the list to serve as the Print Shop approver.
iii. Click Add to add the approver.
iv. To change the status of a Print Shop approver, click Edit and select a status from the Status pull-down menu. The following describe available status options:
(i) Active: Approver is active and can take approvals. Orders await approval and s/he can reject/accept the approval.
(ii) AutoApprove: Any order assigned to this approver will be automatically approved.
(iii) Disabled: Disables approver’s status so s/he will not be used for further approvals.
v. Click Update to save or Cancel to disregard your changes.
vi. Click Back to return to the Print Shop page.
b. Automatic Approval Limit—Enter a currency amount below which approval is automatic (also called a “floor limit”).
Note: The Automatic Approval Limit field will not appear until the Print Shop profile is saved and reopened.
29. Price Sheet Management—This section enables you to specify the default price sheet to use for this prints shop. Note that this price sheet management utility at the Print Shop level is intended for entering a few adjustments to an existing price sheet; it is not intended for massive pricing data entry. You can use only one active price sheet per Print Shop.
Note: The Price Sheet Management section will not appear until the Print Shop profile is saved and reopened.
Note: You should complete the Price Sheet Management section of the Print Shop page only after setting up your price sheets. See Overview of the Pricing Model for more information on pricing.
Note: See Define Special Pricing for more information on setting up special pricing for a Print Shop.
a. Select
to use either (1) Company or Default site pricing or (2) a special price
sheet for this Print Shop.
● If you do not want to use special pricing for this Print Shop, select Use Company or Default site pricing. This will cause the system to use the price sheet for the company or, if no special pricing is selected at the Company level, to use the default site price sheet.
● If you want to use special pricing for the Print Shop:
Note: Special pricing is pricing that has one or more components priced differently from the published price sheet (for the company or site).
● Select This Print Shop uses special pricing.
● Select the published price sheet to use from the Base Price Sheet pull-down list.
● Exceptions to the Base Price Sheet: You can make pricing exceptions for the specified Print Shop. The hyperlinked number displays the number of exceptions to the base price sheet in use for the Print Shop. To add an exception (for instance if you want to give buyers for this Print Shop a special price on Green paper):
● Click the exception number (e.g., 0) to open a copy of the base price sheet you selected in the previous step.
● On the Pricing page, select the component category filter (Print Services, Media, Impressions, Products, Shipping) whose price you want to review from the pull-down list.
● Scroll down to view the price sheet.
● To edit the price of a component, click Edit for it to open the price sheet editor. The price sheet editor is arranged into 6 tabs:Price Sheet Details, Print Services, Media, Impressions, Products, Shipping.
● Click the tab for the component whose price you want to edit.
● From the [component] Type (e.g., Impression Type, Media Type) pull-down list select the item to edit.
● Range Unit used in pricing the component. The range unit enables administrators to set price breakpoints at which pricing for the component will increase or decrease.
● Billing Unit used in pricing the component. The billing unit is independent of the range unit (which is used for establishing price breakpoints) and specifies the unit of the component that is priced.
Note: Only site administrators can edit the range and billing units. For more information on how to edit price sheets, see Edit Price Sheets.
(1) When finished, click Save And Go Back.
(2) Click Done to return to the Print Shop page.
Note: If a particular company associated with the Print Shop has special company pricing applied, the special company pricing will override pricing at the Print Shop or site level.
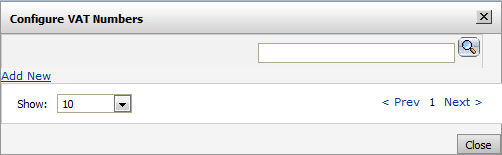
30. Configure the VAT numbers for the Print Shop:
Note: These settings will be available only if you are using the VAT taxation model. For more information on VAT taxation model in MarketDirect, see VAT Taxation Model for Cross Border VAT Taxation.
● In the Configure Print Shop VAT Numbers section, click View/Manage VAT Numbers.
● On the Configure Print Shop VAT Numbers dialog, click
Add New.
● Select
a Country and add the VAT
Number.
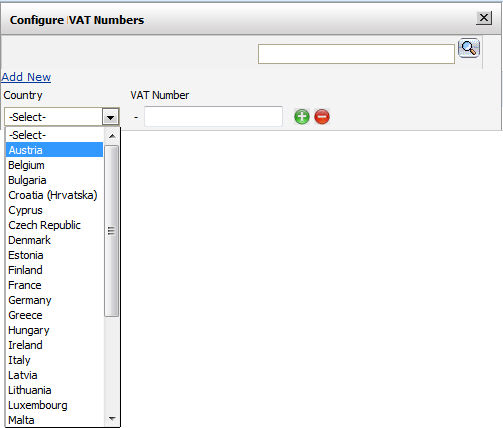
● Click
 to save and add another country/number pair.
● Click Close when you are finished.
31. Click Save.