What are Shipping Cost Configuration settings for? |
When should you use them? |
Calculating shipping costs using AuctionInc, Correios, DHL, FedEx, or UPS Connect shipping cost calculator. |
To calculate shipping prices close to the actual cost of the shipment based on different carrier charges and different delivery methods, factoring in destination, lot size, and product weight. |
Note: You can calculate shipping for your site without using the third-party calculators. For more information on setting up and pricing delivery methods, see Delivery Methods.
● Correios
● DHL
● FedEx
AuctionInc is a shipping cost calculator designed to enable buyers to compare shipping rates and choose the method that best suits their needs. AutionInc’s shipping cost calculator provides site administrators with an accurate means of calculating shipping prices close to the actual cost of the shipment based on different carrier charges and different delivery methods, taking destination, lot size, and weight of the product into consideration. This will minimize the risk of overcharging for shipping (a reason for lost sales) or losing money by charging your buyers less than actual shipping charges.
Note: For more information about AuctionInc visit www.auctioninc.com.
Warning: Please note that AuctionInc can calculate shipping charges to destinations throughout the world but only if the sender's (ship from) address is in the United States. AuctionInc cannot calculate shipping costs for deliveries that originate outside the United States.
To enable AuctionInc for shipping cost calculations
1. Go to Administration > Site Settings.
2. Open the Shipping Cost Configuration tab.
3. Click Add New.
4. Check the box Use EFI Account ID if you do not already have an AuctionInc account.
Note: You can use your own AuctionInc ID (create a new one or use your existing AuctionInc ID). If you opt to use EFI AuctionInc account you will have to check the box Use EFI Account ID. When you check this option an email will be generated and sent to technical support. Contact EFI Technical Support at md.support@email.com or (800) 649-5819 to get your AuctionInc Account ID number.
a. Shipment Account Name: Enter a name for the AuctionInc account.
b. Enter AuctionInc Account ID: Enter your AuctionInc Account ID.
5. Click Save to save the configuration.
6. Click Expand in the “View Auctioninc Configuration Steps” field.
7. Click Configure shipment provider settings for delivery methods to open the “Delivery Methods” page.
a. To configure AuctionInc for any of the delivery methods, click the edit icon.
b. Check the Use Auctioninc box.
c. Select the shipping Carrier to use for the delivery method.
d. Configure pricing for the delivery method as needed.
Note: For more information on configuring pricing of shipping/delivery methods, see Pricing.
e. Click Save.
Note: To configure another delivery method, click Back and repeat the procedure in this step (step 7).
8. Click Expand in the View shipment provider configuration steps field.
9. Click Configure entry points for all delivery methods assigned to Print Shops to open the Print Shops page.
a. Check
the Auctioninc Config. Status
column to see which Print Shops
still need to be configured for AuctionInc (i.e., those marked with ![]() rather than
rather than ![]() ).
).
b. Open the target Print Shop.
c. Assign any of the available delivery methods to this particular Print Shop.
● Click Assign/Edit Delivery Methods.
● Select the delivery methods from the list.
Note:
This will make the delivery
methods available to customers when ordering products from this Print Shop. The delivery methods available
to the user are based on the following rules: if the department to which
the user is associated has no delivery methods assigned then the company-level
delivery methods are applied. If there are no company-level delivery methods
assigned then the Print Shop-level
delivery methods are applied. So the rule is: department > company
> Print Shop: the lowest
level that has shipping will be applied. See the box below for information
on the MarketDirect StoreFront
model for shipping and payment methods.
Note: DHL Delivery: When using AuctionInc,
if you select any DHL delivery method, you will be prompted to enter the
following information
:
Enter your DHL Account ID and Postal Code.
d. Click Save.
10. Click Expand in the View shipment provider configuration steps field.
11. Click Configure entry points for all delivery methods assigned to company to open the Manage Company page.
a. Check
the Auctioninc Config. Status
column to see which Print Shops
still need to be configured for AuctionInc (i.e., those marked with ![]() rather than
rather than ![]() ).
).
b. Open the target Company.
c. Click Assign/Edit Delivery Methods.
d. Select the delivery methods from the list that will be available to users associated with this company.
Note: The selected delivery methods will be available to customers associated with the company when placing orders.
e. Click Save.
12. Click Expand in the View shipment provider configuration steps field.
13. Click Configure entry points for all delivery methods assigned to departments to open the Departments page.
a. Check
the Auctioninc Config. Status
column to see which Departments still need to be configured for AuctionInc
(i.e., those marked with ![]() rather
than
rather
than ![]() ).
).
b. Open the target department.
c. Click Assign/Edit Delivery Methods.
d. Select the delivery methods from the list that will be available to users associated with this department.
Note: The selected delivery methods will be available to customers associated with the department when placing orders.
e. Click Save.
14. Click Expand in the View shipment provider configuration steps field.
15. Click Configure shipment box dimensions for all products to open the Manage Products page.
Note: For orders with multiple items packaged together, the AuctionInc engine will calculate shipping based on the ship from/ship to addresses, services applied, and package weight.
a. Check
the Auctioninc Config. Status
column to see which products still need to be configured for AuctionInc
(i.e., those marked with  rather than
  ).
).
b. Open the target product.
c. On the Settings page, in the Shipping Subcontainer fields, you will provide values for each product to get AuctionInc shipping calculations:
Note:
To use AuctionInc: If
you use a subcontainer (a box that encloses the ordered material but is
not necessarily the sturdy outer box used for shipping), specify the dimensions
for a single box that will serve as the “subcontainer” and specify the
maximum number of copies/quantity of this product that can fit inside
it). For instance, say you ship business cards in a 7 x 31/2 x 2 card
box that you place in a larger box for shipping (the latter will vary
based on the number of subcontainers are to be shipped in it).
If you do not use a subcontainer, enter the dimensions of the product itself
and then set the quantity to 1.
● Ship item separately: Check this option to prevent exceeding the maximum package weight.
Note: This control is to help you prevent exceeding the maximum package weight for the product. If packing multiple subcontainers in the larger shipping container will exceed the maximum package weight, you should check the Ship item separately box to prevent exceeding the maximum package weight. For example, say the product is a lamp that weighs 100 pounds. The maximum package weight for shipping is 150 pounds. You would want to ship each lamp separately to prevent exceeding the maximum weight (i.e., if you ship two in a single box, it would be 200 pounds). Thus the weight determines how many packages will be created.
● Enter the dimensions of the sub-carton in which the product will be packed for shipping:
● Width of the subcontainer
● Length of the subcontainer
● Height of the subcontainer
● Max Quantity per Subcontainer: maximum number of items to include in each sub-container.
Warning: If you are not using a subcontainer, the information should reflect the dimensions of the shipping container to ship a single piece.
d. Click Save & Exit.
16. Go to Administration > Site Settings.
a. Open the Shipping Cost Configuration tab.
b. Check the box Use Auctioninc For Shipping Cost Calculation.
c. From the pull-down menu, select the AuctionInc account to use for AuctionInc shipping cost calculation.
d. Click Save.
The system supports integration with Brazilian carrier Correios for calculating shipping costs.
To enable Correios for shipping cost calculations
1. Go to Administration > Site Settings.
2. Open the Shipping Cost Configuration tab.
3. From the Add New pull-down list, select Correios and then click Add New.
4. In the Correios parameters section, enter values in the following fields:
5. 
● Shipment Account Name: You can use any name you choose for the account name.
● Administrative Code (optional): You can enter your administrative code for Correios, but it is not required.
● Password (optional): If you enter your administrative code, enter your password in this field.
6. Click Expand in the “View shipment provider configuration steps” field.
7. Click Configure shipment provider settings for delivery methods to open the “Delivery Methods” page.
a. To configure Correios for any of the delivery methods, scroll down to the delivery method. The four delivery methods SEDEX 10 Retail (SEDEX 10 Varejo in Portuguese), SEDEX Retail (SEDEX Hoje Varejo in Portuguese), and SEDEX Today Retail (SEDEX Varejo in Portuguese) are Correios delivery methods.
b. Click
the edit icon.

c. On the Edit Delivery Method page, configure the method as needed.
d. Select the shipping Carrier to use for the delivery method.
e. Configure pricing for the delivery method as needed.
Note: For more information on configuring pricing of shipping/delivery methods, see Pricing.
f. Click Save.
Note: To configure another delivery method, click Back and repeat the procedure in this step.
8. Click Expand in the View Shipment Provider Configuration Steps field.
9. Click Configure entry points for all delivery methods assigned to Print Shops to open the Print Shops page.
a. Open a Print Shop that is not yet configured for Correios.
b. Assign any of the available delivery methods to this particular Print Shop.
● Click Assign/Edit Delivery Methods.
● Select the delivery methods from the list.
Note:
This will make the delivery
methods available to customers when ordering products from this Print Shop. The delivery methods available
to the user are based on the following rules: if the department to which
the user is associated has no delivery methods assigned then the company-level
delivery methods are applied. If there are no company-level delivery methods
assigned then the Print Shop-level
delivery methods are applied. So the rule is: department > company
> Print Shop: the lowest
level that has shipping will be applied. See the box below for information
on the MarketDirect StoreFront
model for shipping and payment methods.
c. Click Save.
10. Click Expand in the View Shipment Provider Configuration Steps field.
11. Click Configure entry points for all delivery methods assigned to the company to open the Manage Company page.
a. Check
the Correios Config. Status column
to see which Print Shops still
need to be configured for Correios (i.e., those marked with ![]() rather than
rather than ![]() ).
).
b. Open the Company that is not configured for Correios.
c. Click Assign/Edit Delivery Methods.
d. Select the delivery methods from the list that will be available to users associated with this company.
Note: The selected delivery methods will be available to customers associated with the company when placing orders.
e. Click Save.
12. Click Expand in the View Shipment Provider Configuration Steps field.
13. Click Configure entry points for all delivery methods assigned to departments to open the Departments page.
a. Open the department that is not configured for Correios.
b. Click Assign/Edit Delivery Methods.
c. Select the delivery methods from the list that will be available to users associated with this department.
Note: The selected delivery methods will be available to customers associated with the department when placing orders.
d. Click Save.
14. Click Expand in the View Shipment Provider Configuration Steps field.
15. Click Configure shipment box dimensions for all products to open the Manage Products page.
a. Open the product to configure for Correios.
b. In the Sub Container Dimension fields, you will provide values for each product to get Correios shipping calculations:
Note:
You can always get the current maximum values from the Correios web site.
If you specify values outside the minimum - maximum range set by Correios,
you will see a red exclamation point icon ![]() on in the
Correios Configuration Status column on the Manage Products page. Otherwise,
a green check mark
on in the
Correios Configuration Status column on the Manage Products page. Otherwise,
a green check mark ![]() will be shown.
will be shown.
● Weight: For non-printed products, the weight of the individual item is also required to get the shipping charge.
● Width: Type a value for the width and select the appropriate unit of measurement.
● Length: Type a value for the length and select the appropriate unit of measurement.
● Height: Type a value for the height and select the appropriate unit of measurement.
● Max Qty per Subcontainer: Enter the maximum quantity of the product to ship in each subcontainer.
c. Click Save & Exit.
16. Go to Administration > Site Settings.
a. Open the Shipping Cost Configuration tab.
b. Check the box Use Correios For Shipping Cost Calculation.
c. From the pull-down menu, select the Correios account to use for Correios shipping cost calculation.
d. Click Save.
The system supports integration with DHL's shipping cost calculator, which enables customers to compare shipping rates and choose the method that best suits their needs. DHL's shipping cost calculator provides site administrators with an accurate means of calculating shipping prices close to the actual cost of the shipment based on different shipping options. This will minimize the risk of overcharging for shipping (a reason for lost sales) or losing money by charging your customers less than actual shipping charges.
Note:
Integration with DHL is available as a licensable option. For
more information about DHL and to establish your DHL account, you can
call DHL at 1-800-805-9306, visit www.dhl.com,
or send e-mail to gmus-contact@dhl.com.
To verify that you are licensed for DHL integration, go to Administration
> License, scroll down to the SCALE OPTIONS section, and ensure
that the Shipping Providers box
is checked.
You can set up DHL at the site level or at the company level (i.e., each
company can have its own DHL account).
To enable DHL for shipping cost calculations
1. Go to Administration > Site Settings.
2. Open the Shipping Cost Configuration tab.
3. From the Add New pull-down list, select DHL and then click Add New.
4. In the DHL Parameters section, enter the values you receive from DHL in the following fields:
● Shipment Account Name
● DHL Site ID
● DHL Password
● DHL Shipper account number
5. Click Expand in the “View shipment provider configuration steps” field.
6. Click Configure shipment provider settings for delivery methods to open the “Delivery Methods” page.
a. To
configure DHL for any of the delivery methods, click the edit icon.
b. Check the Use DHL box.
c. Select the shipping Carrier to use for the delivery method.
d. Configure pricing for the delivery method as needed.
Note: For more information on configuring pricing of shipping/delivery methods, see Pricing.
e. Click Save.
Note: To configure another delivery method, click Back and repeat the procedure in this step.
7. Click Expand in the View Shipment Provider Configuration Steps field.
8. Click Configure entry points for all delivery methods assigned to Print Shops to open the Print Shops page.
a. Check
the DHL Config. Status column
to see which Print Shops still
need to be configured for DHL (i.e., those marked with ![]() rather than
rather than ![]() ).
).
b. Open the Print Shop that is not yet configured for DHL.
c. Assign any of the available delivery methods to this particular Print Shop.
● Click Assign/Edit Delivery Methods.
● Select the delivery methods from the list.
Note:
This will make the delivery
methods available to customers when ordering products from this Print Shop. The delivery methods available
to the user are based on the following rules: if the department to which
the user is associated has no delivery methods assigned then the company-level
delivery methods are applied. If there are no company-level delivery methods
assigned then the Print Shop-level
delivery methods are applied. So the rule is: department > company
> Print Shop: the lowest
level that has shipping will be applied.
Note: DHL Delivery: When using DHL,
if you select any DHL delivery method, you will be prompted to enter the
following information
:
Enter your DHL Account ID and Postal Code.
d. Click Save.
9. Click Expand in the View Shipment Provider Configuration Steps field.
10. Click Configure entry points for all delivery methods assigned to the company to open the Manage Company page.
a. Check
the DHL Config. Status column
to see which Print Shops still
need to be configured for DHL (i.e., those marked with ![]() rather than
rather than ![]() ).
).
b. Open the Company that is not configured for DHL.
c. Click Assign/Edit Delivery Methods.
d. Select the delivery methods from the list that will be available to users associated with this company.
Note: The selected delivery methods will be available to customers associated with the company when placing orders.
e. Click Save.
11. Click Expand in the View Shipment Provider Configuration Steps field.
12. Click Configure entry points for all delivery methods assigned to departments to open the Departments page.
a. Check
the DHL Config. Status column
to see which Departments still need to be configured for DHL (i.e., those
marked with ![]() rather than
rather than ![]() ).
).
b. Open the product that is not configured for DHL.
c. Click Assign/Edit Delivery Methods.
d. Select the delivery methods from the list that will be available to users associated with this department.
Note: The selected delivery methods will be available to customers associated with the department when placing orders.
e. Click Save.
13. Click Expand in the View Shipment Provider Configuration Steps field.
14. Click Configure shipment box dimensions for all products to open the Manage Products page.
a. Check
the DHL Config. Status column
to see which products still need to be configured for DHL (i.e., those
marked with rather
than ).
b. Open the product that is not configured for DHL.
c. In the Sub Container Dimension fields, you will provide values for each product to get DHL shipping calculations: :
● Width: Type a value for the width and select the appropriate unit of measurement.
● Length: Type a value for the length and select the appropriate unit of measurement.
● Height: Type a value for the height and select the appropriate unit of measurement.
● Qty/Pack: Enter the default quantity/number of packages for the product.
● Weight: For non-printed products, the weight of the individual item is also required to get the shipping charge.
d. Click Save & Exit.
15. Go to Administration > Site Settings.
a. Open the Shipping Cost Configuration tab.
b. Check the box Use DHL For Shipping Cost Calculation.
c. From the pull-down menu, select the DHL account to use for DHL shipping cost calculation.
d. Click Save.
The system supports integration with FedEx's shipping cost calculator, which enables customers to compare shipping rates and choose the method that best suits their needs. The FedEx shipping cost calculator provides site administrators with an accurate means of calculating shipping prices close to the actual cost of the shipment based on different shipping options. This will minimize the risk of overcharging for shipping (a reason for lost sales) or losing money by charging your customers less than actual shipping charges.
Note:
Integration with FedEx is available as a licensable option. For
more information about FedEx and to establish your FedEx account, you
can call FedEx at 1-800-463-3339
or visit www.fedex.com.
To verify that you are licensed for UPS Connect integration, go to Administration > License, scroll
down to the SCALE OPTIONS section, and ensure that the Shipping
Providers box is checked.
You can set up FedEx at
the site level or at the company level (i.e., each company can have its
own FedEx account).
To enable FedEx for shipping cost calculations
1. Go to Administration > Site Settings.
2. Open the Shipping Cost Configuration tab.
3. From the Add New pull-down list, select FedEx and then click Add New.
4. In the DHL Parameters section, enter the values you receive from FedEx in the following fields:
● FedEx Rate Service Test URL
● FedEx Rate Service Live URL
● Shipment Account Name
● FedEx Account Number
● FedEx Meter Number
● UserCredential Key
● UserCredential Password
5. Click Expand in the “View shipment provider configuration steps” field.
6. Click Configure shipment provider settings for delivery methods to open the “Delivery Methods” page.
a. To configure FedEx for any of the delivery methods, click the edit icon.
b. Check the Use FedEx box.
c. Select the shipping Carrier to use for the delivery method.
d. Configure pricing for the delivery method as needed.
Note: For more information on configuring pricing of shipping/delivery methods, see Pricing.
e. Click Save.
Note: To configure another delivery method, click Back and repeat the procedure in this step.
7. Click Expand in the View Shipment Provider Configuration Steps field.
8. Click Configure entry points for all delivery methods assigned to Print Shops to open the Print Shops page.
a. Check
the FedEx Config. Status column
to see which Print Shops still
need to be configured for FedEx (i.e., those marked with ![]() rather than
rather than ![]() ).
).
b. Open the Print Shop that is not yet configured for FedEx.
c. Assign any of the available delivery methods to this particular Print Shop.
● Click Assign/Edit Delivery Methods.
● Select the delivery methods from the list.
Note:
This will make the delivery
methods available to customers when ordering products from this Print Shop. The delivery methods available
to the user are based on the following rules: if the department to which
the user is associated has no delivery methods assigned then the company-level
delivery methods are applied. If there are no company-level delivery methods
assigned then the Print Shop-level
delivery methods are applied. So the rule is: department > company
> Print Shop: the lowest
level that has shipping will be applied.
Note: DHL Delivery: When using DHL,
if you select any DHL delivery method, you will be prompted to enter the
following information
:
Enter your DHL Account ID and Postal Code.
d. Click Save.
9. Click Expand in the View Shipment Provider Configuration Steps field.
10. Click Configure entry points for all delivery methods assigned to the company to open the Manage Company page.
a. Check
the FedEx Config. Status column
to see which Print Shops still
need to be configured for FedEx (i.e., those marked with ![]() rather than
rather than ![]() ).
).
b. Open the Company that is not configured for FedEx.
c. Click Assign/Edit Delivery Methods.
d. Select the delivery methods from the list that will be available to users associated with this company.
Note: The selected delivery methods will be available to customers associated with the company when placing orders.
e. Click Save.
11. Click Expand in the View Shipment Provider Configuration Steps field.
12. Click Configure entry points for all delivery methods assigned to departments to open the Departments page.
a. Check
the FedEx Config. Status column
to see which Departments still need to be configured for FedEx (i.e.,
those marked with ![]() rather than
rather than
![]() ).
).
b. Open the product that is not configured for FedEx.
c. Click Assign/Edit Delivery Methods.
d. Select the delivery methods from the list that will be available to users associated with this department.
Note: The selected delivery methods will be available to customers associated with the department when placing orders.
e. Click Save.
13. Click Expand in the View Shipment Provider Configuration Steps field.
14. Click Configure shipment box dimensions for all products to open the Manage Products page.
a. Check
the FedEx Config. Status column
to see which products still need to be configured for FedEx (i.e., those
marked with rather
than ).
b. Open the product that is not configured for FedEx.
c. In the Sub Container Dimension fields, you will provide values for each product to get FedEx shipping calculations: :
● Width: Type a value for the width and select the appropriate unit of measurement.
● Length: Type a value for the length and select the appropriate unit of measurement.
● Height: Type a value for the height and select the appropriate unit of measurement.
● Qty/Pack: Enter the default quantity/number of packages for the product.
● Weight: For non-printed products, the weight of the individual item is also required to get the shipping charge.
d. Click Save & Exit.
15. Go to Administration > Site Settings.
a. Open the Shipping Cost Configuration tab.
b. Check the box Use FedEx For Shipping Cost Calculation.
c. From the pull-down menu, select the FedEx account to use for FedEx shipping cost calculation.
d. Click Save.
UPS Connect is UPS' shipping cost calculator that enables customers to compare shipping rates and choose the method that best suits their needs. UPS Connect's shipping cost calculator provides site administrators with an accurate means of calculating shipping prices close to the actual cost of the shipment based on different shipping options. This will minimize the risk of overcharging for shipping (a reason for lost sales) or losing money by charging your customers less than actual shipping charges.
Note:
Integration with UPS Connect is available as a licensable option. For more information about UPS CONNECT
and to establish your UPS CONNECT account, you can call UPS at 1-800-711-5914,
visit www.upsconnect.com, or send
e-mail to connect@ups.com.
To verify that you are licensed for UPS Connect integration, go to Administration > License, scroll
down to the SCALE OPTIONS section, and ensure that the Shipping
Providers box is checked.
You can set up UPS Connect at the site level or at the company level (i.e.,
each company can have its own UPS Connect account).
Note on the UPS Delivery Method: Consult the table below for details on UPS delivery method support for order shipments originating in the United States and Canada. If a buyer chooses a non-supported delivery method, the order will require a manual quote (i.e., the requires quote workflow).
Delivery Methods |
Within Canada |
Canada to US |
US to Canada |
UPS Next Day Air® Early A.M. SM |
û |
ü |
û |
UPS Saver |
û |
ü |
ü |
UPS Saver SM |
ü |
û |
û |
UPS Second Day Air® |
ü |
û |
û |
UPS Standard |
ü |
ü |
ü |
UPS Three-Day Select® |
û |
ü |
û |
UPS Express Plus |
û |
ü |
û |
UPS Worldwide ExpeditedSM |
û |
ü |
ü |
UPS Worldwide ExpressSM |
û |
ü |
û |
UPS ExpeditedSM |
û |
ü |
ü |
UPS Express |
ü |
ü |
û |
UPS Express Early A.M. SM |
û |
ü |
û |
UPS Express Plus |
û |
ü |
û |
UPS Ground |
û |
ü |
û |
UPS Next Day Air Saver |
ü |
û |
û |
UPS Next Day Air® |
ü |
ü |
û |
To enable UPS Connect for shipping cost calculations
1. Go to Administration > Site Settings.
2. Open the Shipping Cost Configuration tab.
3. From the Add New pull-down list, select UPS and then click Add New.
4. In the UPS Parameters section, enter the values you receive from UPS in the following fields:
● UPS Auth Key
● UPS Username
● UPS Password
5. Click Expand in the “View shipment provider configuration steps” field.
6. Click Configure shipment provider settings for delivery methods to open the “Delivery Methods” page.
a. To
configure UPS Connect for any of the delivery methods, click the edit
icon.
b. Check the Use UPS Connect box.
c. Select the shipping Carrier to use for the delivery method.
d. Configure pricing for the delivery method as needed.
Note: For more information on configuring pricing of shipping/delivery methods, see Pricing.
e. Click Save.
Note: To configure another delivery method, click Back and repeat the procedure in this step.
7. Click Expand in the View Shipment Provider Configuration Steps field.
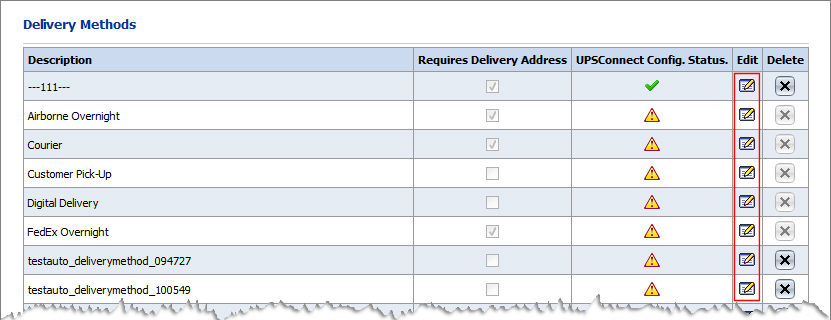
8. Click Configure entry points for all delivery methods assigned to Print Shops to open the Print Shops page.
a. Check
the UPS Connect Config. Status
column to see which Print Shops
still need to be configured for UPS Connect (i.e., those marked with ![]() rather than
rather than ![]() ).
).
b. Open the Print Shop that is not yet configured for UPS Connect.
c. Assign any of the available delivery methods to this particular Print Shop.
● Click Assign/Edit Delivery Methods.
● Select the delivery methods from the list.
Note:
This will make the delivery
methods available to customers when ordering products from this Print Shop. The delivery methods available
to the user are based on the following rules: if the department to which
the user is associated has no delivery methods assigned then the company-level
delivery methods are applied. If there are no company-level delivery methods
assigned then the Print Shop-level
delivery methods are applied. So the rule is: department > company
> Print Shop: the lowest
level that has shipping will be applied. See the box below for information
on the MarketDirect StoreFront
model for shipping and payment methods.
Note: DHL Delivery: When using UPS
Connect, if you select any DHL delivery method, you will be prompted to
enter the following information
:
Enter your DHL Account ID and Postal Code.
d. Click Save.
9. Click Expand in the View Shipment Provider Configuration Steps field.
10. Click Configure entry points for all delivery methods assigned to the company to open the Manage Company page.
a. Check
the UPS Connect Config. Status
column to see which Print Shops
still need to be configured for UPS Connect (i.e., those marked with ![]() rather than
rather than ![]() ).
).
b. Open the Company that is not configured for UPS Connect.
c. Click Assign/Edit Delivery Methods.
d. Select the delivery methods from the list that will be available to users associated with this company.
Note: The selected delivery methods will be available to customers associated with the company when placing orders.
e. Click Save.
11. Click Expand in the View Shipment Provider Configuration Steps field.
12. Click Configure entry points for all delivery methods assigned to departments to open the Departments page.
a. Check
the UPS Connect Config. Status
column to see which Departments still need to be configured for UPS Connect
(i.e., those marked with ![]() rather
than
rather
than ![]() ).
).
b. Open the product that is not configured for UPS Connect.
c. Click Assign/Edit Delivery Methods.
d. Select the delivery methods from the list that will be available to users associated with this department.
Note: The selected delivery methods will be available to customers associated with the department when placing orders.
e. Click Save.
13. Click Expand in the View Shipment Provider Configuration Steps field.
14. Click Configure shipment box dimensions for all products to open the Manage Products page.
a. Check
the UPS Connect Config. Status
column to see which products still need to be configured for UPS Connect
(i.e., those marked with rather than ).
b. Open the product that is not configured for UPS Connect.
c. In the Sub Container Dimension fields, you will provide values for each product to get UPS Connect shipping calculations: :
● Width: Type a value for the width and select the appropriate unit of measurement.
● Length: Type a value for the length and select the appropriate unit of measurement.
● Height: Type a value for the height and select the appropriate unit of measurement.
● Qty/Pack: Enter the default quantity/number of packages for the product.
● Weight: For non-printed products, the weight of the individual item is also required to get the shipping charge.
d. Click Save & Exit.
15. Go to Administration > Site Settings.
a. Open the Shipping Cost Configuration tab.
b. Check the box Use UPS Connect For Shipping Cost Calculation.
c. From the pull-down menu, select the UPS Connect account to use for UPS Connect shipping cost calculation.
d. Click Save.