The Basic Settings tab is where you will configure:
● Site Administrative Address—specifies administrative information about the site.
● Session TimeOut—to specify how long a user’s login session will remain open after the last user activity.
● File Expiration—to specify how long files remain in the system.
● Auto-completion—to enable/disable MarketDirect StoreFront to remember previously type user names on the login screen.
● Non-PDF Job Submission—to permit users to upload files in their original format (without automatic PDF conversion).
● Add Middle Name to Welcome Text—to configure the site to include a middle name in the “Welcome” message (e.g., Welcome Sue Anne Lundy) as well as for order recipients.
● Select Cloud Providers—to enable buyers to upload files to products from cloud file repositories.
● PDF Job Submission—to specify whether original files will be shown in the production job ticket.
● Background Upload—to send an email notification to customers when a large file has finished uploading to the site.
● External System Connector—to specify the URL of the external web service for ESC communication.
Note: For more information on setting up and using the External System Connector (ESC), see the MarketDirect StoreFront External System Connector Guide installed in the Documentation folder for MarketDirect StoreFront.
● MicroPress Support—to install output device support. If installed, MicroPress will report job status back to the system.
● Enable Other Account Validation—to validate the account number a buyer enters when paying for an order with the Payment Method option “Other Account.”
● Show Default Print Shop to Anonymous Users—to allow/not allow anonymous users to see details about the default Print Shop.
Warning: If the Show Default Print Shop to Anonymous Users option is not checked (i.e., anonymous users are not allowed to see Print Shop details in the Shopping Cart), for the functionality to work as designed make sure that the "Everyone" group does not have Print Shops access on the Page Access page. This option will either allow or not allow anonymous users to see Print Shop details in the Shopping Cart. For more information on setting page access, see Managing Groups and Page Access.
● Credit Card Pricing Configuration—to set the amount (in percentage of order total or a flat amount) for credit card authorization.
● Status Changes for Jobs and Multi-part Orders—to set MarketDirect StoreFront to change the status of a multi-part order to "In Production" once the status of any job in the order is changed to "Printing" or "In Production."
● Show What's New in Admin Home—to provide a link to the What's New page that provides information on software version and updates.
● Enable Relational Branding Category Security—to enable the category security feature that limits category view and purchase permissions to users associated with a particular company (either as company users or as site visitors to company-branded sites).
● Product Search Settings—to make all products (by default) searchable by buyers even when they are not published in a category.
● Calculate rush jobs as time ahead of the standard delivery date for a regular job—to calculate the rush order job delivery date as time ahead of the regular (non-rush order) delivery date.
● Company Branded Pricing for Anonymous Buyers—to show anonymous users the pricing associated with the company branded site they are visiting (instead of the default pricing).
● Mixed (Color and BW) Impressions—to enable mixed mode printing (i.e., color on one side of a sheet and black-and-white on the other).
● Reorder File Behavior—to specify the site-level setting for how the system handles reordered static products that have changed since they were last ordered.
● Maximum Number of Jobs allowed—to specify the maximum number of jobs allowed in an order.
1. Click Contact Information.
2. Enter the Business Administrative Address for the site. If filled out, this address will be used in places where the Administrative Address is required (for example, this address is used when MarketDirect StoreFront communicates with an external tax application in which case the address is sent in external tax requests).
3. Click Save.
1. In the Session TimeOut section, enter the number of minutes after which the site should time out for this site.
Note: Note that this site-level configuration overrides the value in the web.config file.
2. Click Save Changes.
Note: Session timeout can also be set for groups. Administrators can specify a session timeout for a group that is different from the site session timeout (see Managing User Groups). The value set for the group will override the time out value set on the Site Settings page. For example, you might use the group session timeout to set a longer timeout value for Operators, who are typically on the site throughout the day. If a user belongs to several groups—each with a different session timeout setting—the timeout value that is greatest will be active. If User A belongs to both the CSR group with a session timeout of 30 minutes and the Operator group with a session timeout of 60 minutes, his session will timeout at 60 minutes (the greater of the two timeout settings).
Specify how long customer-uploaded files (i.e., the document/image files buyers submit when ordering a product that are stored in buyers' My Account | Files and My Account | Saved Jobs) will remain in the system before they are deleted. This setting lets you set up MarketDirect StoreFront to (a) automatically delete files based upon the age of the file or (b) delete the files manually. Use the settings below to manage how long files remain in the system.
The file expiration settings on this page are site-level settings that apply across the entire site.
Warning: The accumulation of customer-uploaded files can deplete your system resources (hard drive space). Over time, these job files need to be deleted to free up disk space. The accumulation of files can deplete your system resources and impair performance. It is recommended that you set a reasonable time limit for storing files in your system and specify when they should be deleted automatically. If you need to archive your files, consider a backup option that will preserve your data but free up system resources.
Note: You can also set file expiration settings at the company level and override these settings. For information on how to configure file expiration settings at the company level, see File Expiration - Company Level.
1. In the File Expiration: Delete Files After section, enter the number of minutes after which this site should time out.
Warning:
Changing this setting will affect the shopping cart and buyers’ saved
jobs, and, if set too low, can cause the system to delete job files unexpectedly.
File expiration should be long enough to provide customers with enough
time to place orders with the uploaded file.
Please note that any changes you make to the file expiration settings will
take effect for new files and will not affect existing files.
● Files: These are files buyers upload when creating products (ad hoc, VDP). These files include images, text documents, CSV data list files, images saved to galleries, etc. and both the original files and converted PDF files.
● Job Files: These are the files MarketDirect StoreFront generates in the process of producing jobs.
Note: Please note that FusionPro job files are not automatically cleaned up using this file expiration setting.
● Saved Files: These are files buyers have saved for later use.
● Credit Card Transactions: These are files associated with credit card order transactions stored in the transactions table in the database.
Note: Periodically purging these files will cause the Credit Card Transaction page to load faster.
2. To set MarketDirect StoreFront to automatically delete files after a given time:
a. Enter a number to specify the number of minutes, hours, days, or years after which MarketDirect StoreFront will delete files.
b. Specify the interval (in minutes, hours, days, or years) from the pull-down menu.
c. Click Save Changes.
Note: Recommended values: It is recommended that you set 6 months as the file expiration period. If you select this option—automatic deletion of files—buyers will have a Reset link corresponding to their uploaded files that enables them to reset the expiration time to prevent losing files they will use for reorders.
OR
2. To disable automatic deletion of jobs and allow only manual deletion:
a. From the pull-down list, select Never.
b. Click Save Changes.
● In the Auto-Completion section, check the box Turn on Autocomplete to enable auto-completion/remembering of user names and passwords or leave unchecked (default) to disable auto-completion/remembering of user names and passwords.
Note: Disabling auto-completion provides better security to prevent unauthorized logins.
This setting allows users to submit non-PDF (native) files for printing (i.e., without converting the files to PDF format).
1. In the Non-PDF Job Submission section, check the box Permit users to leave file(s) in original format (only transfer file).
2. Click Save Changes.
This setting will include a middle name in the “Welcome” message (e.g., "Welcome Sue Anne Lundy") as well as for order recipients.
1. Check the Add Middle Name to Welcome Text box.
2. Click Save Changes.
This setting enables buyers to upload files to products from cloud file repositories.
1. Select the file repository service(s) you want to let buyers upload files from when they are ordering products:
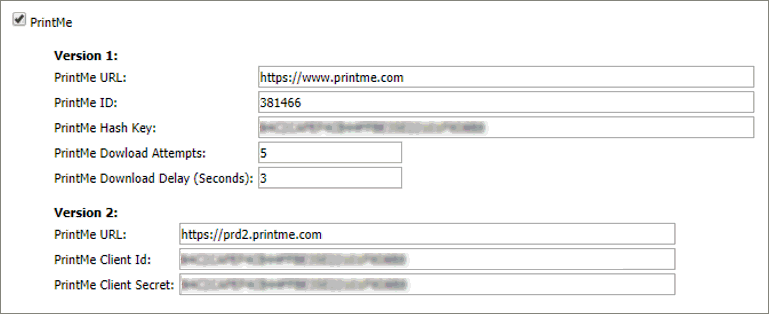
● PrintMe
● PrintMe
configuration settings are pre-populated by default. Do not
change these values unless directed to do so (e.g., by EFI customer support).
● Google Drive (Click here for the steps for integrating MarketDirect StoreFront with Google Drive.)
Note: No conversion of Google documents is performed in MarketDirect StoreFront. Native Google files are available only as PDF files. All conversion is done in Google, and MarketDirect StoreFront merely exposes the document.
2. Specify how the cloud documents will be shown to buyers:
● Enter the Number of files to show buyer per page in a single row per file view.
● Enter the Number of files to show buyer per page in a 4x3 thumbnail grid view.
3. Click Save Changes.
This setting preserves the original PDF files included in a job that contains two or more PDF files. This enables operators to view/download the original PDF files (before they were merged) from the production job ticket in the Operator View. The merged file will be available for viewing as well.
1. In the PDF Job Submission section, check the box Show original files in Production Job Ticket (for merged PDFs).
2. Click Save Changes.
This setting sets MarketDirect StoreFront to automatically send an email notification to customers when a large file has finished uploading to the site via the Background Uploader.
1. In the Background Upload section, check the box Send Email To Buyer On Upload Completion.
2. Click Save Changes.
1. Scroll down and click External System Connector.
2. The External System Connector page has a table of all installed ESCs. If no ESC is installed, click Configure.
3. Type the URL of the External Web Service for ESC Communication in the Web Service URL field.
4. Click Save to save the ESC configuration.
5. Click Test to test the ESC configuration.
Note: For more information on the External System Connector, see the document MarketDirect StoreFront External System Connector Guide available from the customer support team..
Installing the EProve module on the MicroPress server enables job information to be sent from MicroPress to MarketDirect StoreFront.
● Install the appropriate version of the MicroPress connector (eProve).
Note: For more information, see Output Device Support.
● Click Save Changes.
● Check this box to cause MarketDirect StoreFront to validate the account number a buyer enters when paying for an order with the Payment Method option Other Account.
● Click Save Changes.
● Check this box to allow/not allow anonymous users to see details about the default Print Shop.
Note: If the Show Default Print Shop to Anonymous Users option is not checked (i.e., anonymous users are not allowed to see Print Shop details in the Shopping Cart), for the functionality to work as designed make sure that the "Everyone" group does not have Print Shops access on the Page Access page. This option will either allow or not allow anonymous users to see Print Shop details in the Shopping Cart. For more information on setting page access, see To manage a group's page access.
● Click Save Changes.
Click Credit Card Management and Configuration to open the Credit Card Management and Configuration page. Click Credit Card Transactions o view all of the credit card transactions that have been processed. (For more information, see the topic Credit Card Transactions.) Click Merchant Accounts to add or edit merchant accounts that enable your business to accept debit or credit card payments. (For more information, see the topic Merchant Accounts.)
● Enable Demo/Test Mode: To be able to test your credit card merchant account, the site must be running in Demo/Test mode. Check this box and click Save Changes to put your site in Demo/Test mode to test your merchant account from the “Merchant Accounts” page as well as use test credit card numbers while placing orders. Be sure to uncheck the box and click Save Changes when you are ready to begin accepting credit card orders.
Note: Notes on the fields below: For orders where the buyer pays with a credit card, MarketDirect StoreFront will take the order total and add an additional amount to the credit card authorization—either the Pricing Percentage or the Pricing Minimum Amount, whichever is greater. This allows you to make adjustments to the order or add shipping costs to the order. When the order is marked as shipped, the order’s actual (final) total is the amount that will be processed. If you do not require an additional amount added to the authorization, change both values to 0 (zero) and click Save Changes.
● Credit Card Estimated Pricing Percentage: This is a percentage added to credit card orders to raise the authorization amount for the order, for instance to cover shipping charges or adjustments to the order. This prevents the transaction from being declined (in CyberSource transactions) or billed as two separate charges (in PayPal PayFlow Pro transactions) because the actual order charge is higher than the initial authorized amount (e.g., for the product only) without shipping charges.
● Credit Card Estimated Pricing Minimum Amount: This sets a minimum amount to add to the actual order price for an order (for authorization purposes). For instance, let's say an order was placed for a product that cost $5. If the estimated shipping cost for the order was $.50 (based on the way shipping fees were set up in a site), and the actual shipping cost was $2.50, the authorized amount ($5.50) for the credit card order would not be sufficient to cover the total actual cost. If the minimum in the Credit Card Estimated Pricing Minimum Amount field was 15 then $20 would be authorized instead of $5.50 (the $5.00 + $15.00) so the actual order total of $7.50 would be covered and charged).
Note: MarketDirect StoreFront will use whichever value is higher (the percentage or the amount) as the ceiling for the authorization.
Note: With
PayPal Payflow Pro: If the order amount is changed (i.e., increased
so that it is greater than what was authorized), a reauthorization does
not occur. Rather, when the order is marked Shipped
Payflow Pro captures the authorization amount and then captures the rest
in a second transaction.
With CyberSource: If the order
amount is changed (i.e., increased so that it is greater than what was
authorized), the capture will fail. For example, if $10 was authorized
and you adjust the order total to $12.50 to cover actual shipping costs,
the capture will fail, the transaction will be declined, and the order
will have to be canceled and re-ordered.
With Ingenico: Set both of the
fields above to 0. Failure to
set these values to 0 will cause an additional amount to be added to the authorization
and the capture will be for the wrong amount.
● Changing status of FIRST
job in Multipart order to "In Production” changes status of the entire
order:
Choose this option to change the status of a multi-part order to "In
Production" once the status of any
job in the order is changed to "Printing"
or "In Production."
● Changing status of LAST
job in Multipart order to "In Production” changes status of the entire
order:
Choose this option to not change the status of a multi-part order to "In
Production" until the status of all
jobs in the order have changed to "In Production."
For example, if the first two parts of a three-part job were printing
and the third had not yet begun printing, the status would be reported
as “User Approved” or some other status until the third part was in the
"Printing" or "In Production" status.
● Click Save Changes.
● Check
this box to add the What's New
icon![]() and link at the top of the main Administration
page and a What's New link on
the About tab (see Site
Settings - About Tab for more information).
and link at the top of the main Administration
page and a What's New link on
the About tab (see Site
Settings - About Tab for more information).
Note: If your site does not have access to the Internet (e.g., if it is a self-contained intranet or local network), do not check this box because it polls a designated EFI site to check for available updates and upgrades.
● Mousing over the What's New icon will open a flyout box that displays information about the current version of MarketDirect StoreFront (the version that is currently running) and the latest upgrade (indicating whether a newer version is available).
● Clicking What's New on the About tab will open the Versions of MDSF page.
Note: The Versions of MDSF page displays version information and links to available software updates and upgrades and their the corresponding release notes (in PDF format). Note that the link to the release notes will be active only if you are not on the latest version of the MarketDirect StoreFront system software.
● Click Save Changes.
● Check this box to enable a category security feature that lets administrators limit permissions (to view a product category) to users who are associated with a particular company—either as company users or as site visitors to company-branded sites. This is most relevant for sites that use relational (pre-login) branding. For more information on relational, or pre-login, branding see Relational (or Pre-Login) Branding.
Note: If you use
relational branding, please read the following note carefully.
For example, say
you have two relational branded sites—one for Company A and another for
Company B. Each company has different product offerings. You do not want
customers of Company A to see products offered to customers of Company
B (and vice versa). The remedy is to restrict product category access
(e.g., Purchase Items permissions) to members of the appropriate company
so that Company A members can see only those product categories intended
for Company A customers (and likewise for members of Company B).
Checking the box Enable
Relational Branding Category Security will
ensure that access to a product category is restricted to the appropriate
group by requiring the administrator to specify which companies' users
can view a particular product category (i.e., whether visitors to a company-branded
site are logged in or not).
For more information on setting category
security, see Creating
and Editing Product Categories (i.e., the section on how to set security
on categories).
Note: This security safeguard applies
only to Categories and not to other entities in MarketDirect StoreFront
(e.g., ticket templates).
● Only applies to anonymous users: Check this box to limit the scope of the Enable Relational Branding Category Security to anonymous users or users who have not logged in.
Note:
So if this checkbox is selected,only anonymous users (those who
have not logged in) who visit a company's (e.g., Company A's) company
branded URL will be able to see all the products and categories published
to the Company A storefront, whereas users who have logged in to Company
A will be able to see only the products/categories based on their user
level settings.
If this checkbox is not checked,
all users who visit Company A's company branded URL will be able to see
all the products and categories published to the Company A storefront
(whether they are logged in or not).
● Click Save Changes.
● By default, allow the products to always be searchable by the buyer, even when it is not published in a category: Select this option to make all products (by default) searchable by buyers even when they are not published in a category or as featured products.
Note: If a product is not published to a category and if you enable the option to make it searchable, it will only show in search results if the user performing the search has purchase permissions at the product level (see Product Security for details on setting product-level permissions).
Note: So, if the product name is "8-Page Booklet," it will show up in the search results when a buyer includes the term "booklet" in a search query.
Note: You can override this setting at the product level. For more information, see Product Security.
● Click Save Changes.
● Rush job delivery date is based on the regular job delivery date: Select this option to calculate the due date of a rush order job based on the regular (i.e., non-rush) delivery date.
Note:
If a regular job takes 8 days, a 3 day rush job would mean the job is
due on day 5 (8-3) from the day the order is placed, not on day 3.
Thus, the rush delivery date is 3 days ahead of the regular delivery date,
not 3 days from when the order is placed.
● Click Save Changes.
● Check this box to show anonymous users the pricing associated with the branded company they are visiting. If unchecked, anonymous users will be shown pricing for the default (or None) company.
● Click Save Changes.
● Check
this box to enable mixed mode printing (i.e., color on one side of a sheet
and black-and-white on the other).

● If
enabled, the Mixed Impressions
field will be shown on the Products | Settings page that you can activate
to allow mixed impression mode printing for a product..

Note:
Note on Mixed Impressions:
When the Mixed Impressions option
is enabled, ensure that you have enabled the Special Pages option for
the required on the Ticket Template page.
1. Go to Administration > Ticket Templates.
2. Open the target ticket template.
3. On the print service panel, click Configure.
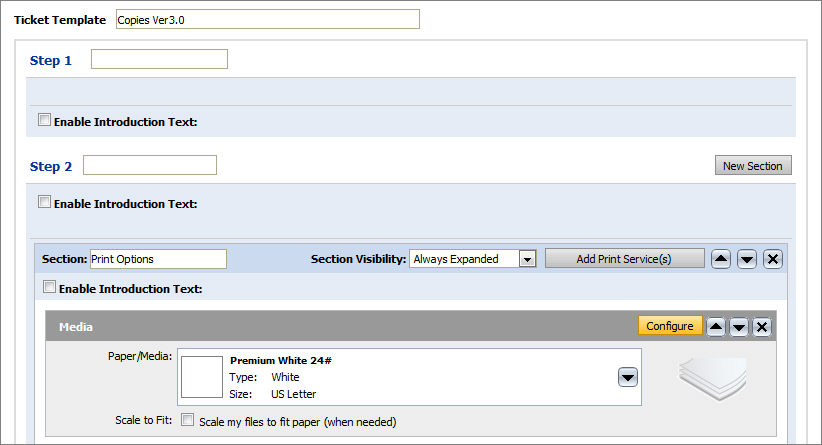
4. Select the option Enable this Print
Service in Special Pages.
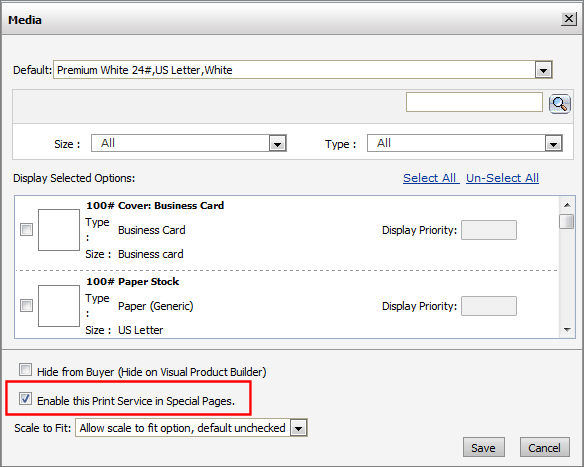
5. Select the required and Save
the ticket template.
Note: Now when buyers are configuring
the product in the product builder window, a special pages option will
be enabled that lets buyers select required pages as needed.
● Click Save Changes.
The reorder file behavior setting lets you specify the system's default behavior for handling reordered products of the Static Document type whose files have changed since the buyer last ordered.
Note: This option applies only to Static Document products.
Note: For information on specifying how reorders are handled when the ticket template associated with a product has changed since the buyer last ordered the product, see Reorder - Ticket Templates.
Note: This setting specifies the site-level default behavior for handling reordered Static Document products at the Site level. The setting can be overridden at the Product level (a setting on the Progress 2: Upload files screen of the product page lets you specify the behavior for the particular product; for more information, see Reorder File Behavior - Product Level). This option affects only products that are assigned the value Inherit.
● Use Buyer File(s): This is the default option. If you choose this option, the reorder will be processed with the same file(s) that were in the static product when the buyer last ordered it.
● Use Current Product File(s): If you choose this option, the reorder will be processed with the current version of the file(s) in the static product.
Note:
This
is useful, for instance, if your site’s static products
contain primarily time-sensitive material that is updated regularly.
For instance, if your site primarily offers
catalogs, and you want a user reordering a catalog in spring to receive
the current
spring catalog (instead of last fall’s catalog that they ordered earlier),
then you can set this to Use Current
Product File(s) at the
site level. Then for the few products that you wish for the buyer
to get the older content when they reorder, you can select Use Buyer File(s)
as a product-level exception.
Which option is right for you?
If most of the static document products on your site contain time-sensitive
material subject to periodic change (e.g., quarterly product catalogs,
course materials that change each semester, seasonal sales collateral),
you might want to set the Use Current
Product File(s) option at the site level and override the exceptions
at the product level (following the steps in Reorder
File Behavior - Product Level).
● Click Save Changes.
You can specify the maximum number of jobs a buyer can place in the shopping cart (including the jobs that a buyer has saved for later). You might want to consider doing so if your site typically processes complex products (such as kits with many VDP components) or there are delays with larger orders during order placement.
● Unlimited: Places no restrictions on the number of items a buyer can place in the shopping cart.
● Limit to this many jobs: Places a restriction on the number of items a buyer can place in the shopping cart.
Note:
If you specify a value of, say, 50,
buyers can have only 50 jobs in the cart including the jobs in the "Save
For Later" section (i.e., if you have the save for later option enabled).
When the job count reaches 50 (cart + save for later), if buyer tries
to add additional jobs, the following message will be shown:
"You have exceeded the maximum number of jobs allowed. You can proceed
with checkout this time, but will not be able to exceed the maximum number
of jobs in the future."
● Click Save Changes.