Create & Format an EFI VDP Product
A
variable print
product
is
a print template for a document such as a postcard, business card,
or flyer that can be either generic (not personalized) or personalized
(for example, with the recipient's name, address, and targeted marketing
messages). Variable print products can contain both static
content (i.e., boilerplate text, logo, images) and variable
fields (i.e., placeholders for the recipient's name, address, etc.).
EFI VDP is MarketDirect StoreFront's
native VDP template designer and artwork generation engine that enables
you to create variable data products your buyers can use to reach their
own customers with personalized direct mail campaigns. Combining EFI VDP
with image personalization and AccuZIP direct mail services results in
a true end-to-end solution for direct mail marketing campaigns.
Note:
Spot Colors: Note that MarketDirect StoreFront supports
all Pantone® spot
color values. The spot colors must be defined in the variable template.
Note:
Note that EFI VDP products will work properly only on SmartStore storefronts
not on classic storefronts.
Note:
EFI VDP is available as a licensed option. For more information on obtaining
a license for EFI VDP, contact your EFI sales representative, call (800)
875-7117), or fill in the Web form at http://w3.efi.com/WebToPrint/Contact-Us.
Image Personalization
An image personalization option lets you create templates with personalized
images (images in which you can embed text but as clip fonts so that they
appear fully involved and integrated with the image).

Direct Mail Service
For more information on setting up and managing mailing service providers
such as AccuZIP, see the topic Mailing
Service Providers.
Please note that at the present time mailing service provider integration
will work only with the EFI VDP products).
For additional guidelines on setting up direct mail pieces in MarketDirect StoreFront, see
Direct Mail Guidelines.
This help topic will assist you in setting
up your site and creating an EFI VDP product to offer to your buyers.
● Step
1: Verify that you are licensed for EFI VDP.
Note:
For self-hosted (standalone) installations only. You only have to do this
once.
For more information about obtaining a license for EFI VDP, please contact
your EFI sales representative, call (800) 875-7117), or fill in the Web
form at http://w3.efi.com/WebToPrint/Contact-Us.
● Step
2: Integrate your site with EFI VDP.
Note:
You only have to do this once.
● Step
3: Design and properly format the printed piece:
Design and properly format the printed piece using
EFI VDP and Adobe In Design. Please consult your MarketDirect EFI VDP
documentation for complete details on creating your template.
● Step
4: Associate the Print Template with a VDP Print Product
Step
1: Verify that you are licensed for EFI VDP
Note:
Please note that this step is for self-hosted (standalone) installations
only.
1. Go to Administration
> License.
2. Scroll down to
the PRODUCT OPTIONS section and verify that the option "VDP Products:
EFI VDP" is selected.
Note: If one or more of the VDP Products: EFI VDP boxes are
not checked, please contact your EFI sales representative, call (800)
875-7117), or fill in the Web form at http://w3.efi.com/WebToPrint/Contact-Us
for more information on obtaining a license for EFI VDP.
Step
2: Integrate your site with EFI VDP
Once you have verified that you are licensed for EFI VDP, your next
step is to set up the integration between MarketDirect StoreFront
and MarketDirect EFI VDP.
1. Go
to Administration > EFI VDP Configurations
(under the Platform Settings heading).
2. On the EFI VDP
Configuration page, Configurations
tab, configure the following settings:
● EFI
VDP Server Address: This is the address
(URL) to the EFI VDP server.
● If you are an EFI-hosted (cloud) customer:
All hosted customers will get access to a hosted EFI VDP server in the
production environment. You do not have to do any configuration.
● If you are a self-hosted (standalone) customer:
Enter the address to the your EFI VDP server (MarketDirect StoreFront
technical support or professional services will assist you with this,
as needed).
● Conversion
Timeout: Specifies the length of time
in seconds that the EFI VDP job is allowed to be in the process of converting
before the operation times out and an error is shown to the buyer.
● Batch
Record Limit (Advanced): Specifies
the maximum number of records an EFI VDP product can contain.
3. Click Test
to test the connection with the EFI VDP server.
4. Click
Save.
Step
3: Design and properly format the EFI VDP template in EFI VDP Studio and
InDesign
Once you have set up the MarketDirect StoreFront
- EFI VDP Studio integration, your next step is to design an EFI VDP template
if you have not already done so. EFI VDP templates are
created using in Storefront Studio (using Adobe InDesign, which you must
purchase separately). Please consult the StoreFront Studio documentation
that was bundled with your EFI VDP / StoreFront Studio software
for complete details on creating and formatting your template. You will
need the compiled template (a zip file) to import to MarketDirect StoreFront
in Step 4 below.
Note:
AccuZip mailing lists contain an extensive array of data on mail recipients.
See the List
Codes (PDF) for a comprehensive list of all available data
that you can use when creating templates. See the SampleOutput
(CSV) for a sample output file.
Step
4: Create the EFI VDP Product in MarketDirect StoreFront
Once you have designed your template and generated the zip file for
processing, your next step is to create the product in MarketDirect StoreFront and
associate the EFI VDP template with it and then publish the product on
the storefront to make it available for buyers to order.
1. In
MarketDirect StoreFront,
go to Administration > Products.
2. Click Create
Product.
3. On the Create New
page:
● Enter a Product
Name.
● From the Type pull-down list, select EFI VDP Templates.
● Click Next.
4. On
the Progress 1: Information page: Specify the brief description
and thumbnail images (as you would for a product of any other type).
5. On
the Progress 1: Details page: Specify the long description and
product details image (as you would for a product of any other type).
Note:
For information on all fields in the Create Product pages, see the topic
Create Products.
6. On
the Progress 1: Settings page: Configure the product as needed
(and as you would for any other product) except for the following settings
specific to VPrint VDP products:
● Display
Priority—Select a priority for the product from the pull-down list.
Note:
This will specify the order from top to bottom in which the product will
be displayed on the storefront, from Highest
to Lowest; higher priority will
cause the product to display higher on the storefront product page. If
two or more products have the same display priority, they will be sorted
alphabetically.
● Valid
Dates
● Active:
Specifies whether the product status is active (available now or, for
instance, is created now to be made active at a later time, such as when
a sales promotion begins).
● Start
Date: Use the calendar tool to specify the date on which
the product should start being displayed on the buyer storefront.
● End
Date: Use the calendar tool to specify the date on which the product
should no longer be displayed on the buyer storefront.
● Select Never
if you do not want the product display to expire on a specified date.
● Turn
Around Time—If you want to specify a turnaround time for the product
(when it will be prepared and ready for pick-up or delivery), type a number
and time interval, else select None.
Note: You can choose whether to show buyers
the turnaround time for each product in an order in the Shopping Cart
at the Print Shop (see Shopping
Cart Settings for more information) or the Company level (see Shopping
Cart Settings for more information).
● Preview
DPI—From the pull-down menu, select
the resolution for preview of the EFI VDP product.
● Shipping
& Taxes:
● Exempt
Shipping Charges—No shipping calculations will be made on the product.
Note:
These settings are available for all product types (except Kits). For
Kit products, the configuration of the items the kit contains will govern
taxes and shipping exemptions. These settings are available for all product
types (except Kits). For Kit products, the configuration of the items
the kit contains will govern taxes and shipping exemptions.
● Exempt
Taxes—No tax calculations will be made on the product.
● Taxes—(This
field will be available only if you have enabled product level taxation,
e.g., to accommodate multiple tax levels, such as VAT and regular taxes.
● From
the Tax pull-down menu, select
the tax to assess on the selected product.
Note:
Available options will include Use Print Shop Setting, Tax
Exempt, and the various tax rates you defined on the Print Shop page.
● Supported
Print Shops: If
you want to restrict availability of the product to a specified Print Shop(s), click Add Supported
Print Shops and
then select the Print Shops
that will support the product on the Assign/Edit Print Shops
window.
● Record
Entry Mode:
● Single—This
option is for EFI VDP products that use a single record (e.g., a single
buyer's business card).
Note:
If you select both
Batch Mode and
Single Mode this is a hybrid mode
for VDP that enables buyers
to order the product either as a single job or a batch job. Single mode
will be the default on the buyer side, but buyers can select batch. Buyers
will be prompted to upload a CSV file. The file’s records are viewable
and a preview document (showing the user’s personalized data on the document)
can be generated to spot check each record’s content. This is useful for
preventing printing a job that has formatting issues, such as a name too
long for the allotted space.
● Batch—This
option will prompt buyers to upload a multiple record data file (in comma
separated value, CSV, format) or to use multi-column data sets (pre- created
in the system; for more information, see Multi-Column
Data Sets). For instance, batch would be used if a customer wanted
to order business cards for all members of a department.
Note:
Notes on Batch Mode: Buyers will be prompted to upload a CSV file
with multiple records for their VDP product on the storefront. MarketDirect StoreFront will
create a sample CSV file for the template that you can use to format the
CSV you use to port data to the system. A “Sample.csv” file link will
appear. Buyers will be able to open the document in a text editor such
as NotePad or WordPad and save it with a name of their choice. This sample
document, created on the fly, serves to show users what data and in what
format it is needed for the selected variable template.
Note that the first line is the header line and is mandatory, meaning it
must be the first line in the CSV file because it establishes the format
for the table. An hourglass icon will indicate that the operation is in
process. An exclamation point icon will indicate any errors that occurred
during the mapping process.
Note: EFI VDP Templates Products: Combo
Mode
A batch VDP product in MarketDirect StoreFront
can have both common (single) and versioned (batch) data. The term "combo"
(combination) refers to a mix of common and versioned data in a VDP job.
For example, a batch of postcards that a realtor distributes can combine
common elements (all the postcards have the realtor's photo and address
or a photo a property for sale; same for all records) and versioned elements
(recipient customers' names and addresses; unique for all records). The
buyer experience has the buyer entering the common information into form
fields (i.e., the web form) and assigning a data source for the versioned
information.
IMPORTANT
Please note that it may take 10 minutes or so for the MarketDirect server
to generate the EFI VDP artwork and make it available for processing via
the job ticket. The length of time will be based on a number of factors,
including the record count, complexity of the template (number of variables
and rules), use of image personalizations, number of jobs awaiting artwork
generation, etc.
● Direct
Mail Jobs:
● Support
Direct Mail: Select this option to
enable buyers to order a direct mail campaign featuring the personalized
product. Buyers will be presented with options for procuring and maintaining
a mailing list with the mailing service providers you have set up on the
Mailing Service Providers page.
● Support
EDDM: Select this option if you want
to support Every Door Direct Mail (EDDM) services for the product mailings.
Note:
For information on EDDM, visit https://www.usps.com/business/every-door-direct-mail.htm.
● Support
List Purchase: Select this option if
you want buyers to be able to purchase a mailing list for the product.
Note:
AccuZIP mailing lists contain an extensive array of data on mail recipients.
See the List
Codes (PDF) for a comprehensive list of all available data.
See the SampleOutput (CSV)
for a sample output file.
Note: For more information on setting up and managing mailing service
providers such as AccuZIP, see the topic Mailing
Service Providers.
IMPORTANT
The direct mail automation workflow is optimized for 50,000 records or
fewer.
● Allow
Opt-Out of Direct Mail: Check this
box to give buyers the option of not using a direct mail provider to provide
mailing service (e.g., bulk mail) to recipients (and instead have all
copies shipped to the buyer who will then handle mailing and distribution
to recipients).
● Override mailing service class: Select
this option if you want to allow buyers to override the default mailing
service class for the product.

● FIRST CLASS: Select this option
if you want to allow the buyer to choose First Class for the product.
● STANDARD MAIL: Select
this option if you want to force the buyer to choose Standard Mail for
the product.
● Default Mailing Service Class: Select
the default mailing service class for the product.
Note:
You will probably want to allow buyers to override mailing service class
only if the default mailing service class is Standard; buyers would thus
be able to upgrade from Standard to First Class for better service at
a higher cost. If the mailing service class is First Class, allowing buyers
to override with Standard would result in lower cost but slower service,
which would be a downgrade.
● Sample VDP Data: Check
this box to show default sample data settings (in the default file you
will upload below) to the buyer.
● Default File: Click
Browse... and select a file (in csv
format) with sample data to populate the template and then click
Upload.
● Default Encoding: From
the pull-down list, select the default encoding for the data: Western
European (Windows), Unicode
UTF-8, or Unicode.
● Default Delimiter: From
the pull-down list, select the default delimiter for the data:
,, I,
Tab, ;.
● Use
MCD: Check this box to enable multi-column data sets with this
template and to let the company address book be available for buyers to
map fields to.
Note:
How buyers will use multi-column data sets: Buyers can also use
an MCD along with an uploaded CSV data file. The buyer can select the
Select Data & Create Data Source option then choose which records
in the MCD should be used in the VDP job.
● Enable
Low Resolution PDF: Allow buyers the
option of viewing and downloading a low resolution PDF (of diminished
file size and quality compared to the production PDF).
● Enable
Imposition: Select this option if you
want to specify how the printed pages are imposed.
● Imposition: Select
an imposition option (if any) from the pull-down list.
Note:
Imposition settings are defined in
the EFI VDP Storefront Studio and are included as DIMP files in the product
template zip file that you will upload to MarketDirect StoreFront
on the Progress 2: EFI VDP Web Form page
(discussed later in this help topic). If no imposition options were defined
for the product, this list will be empty.
● Dynamic
Preview—Select to enable or disable a dynamic preview of the product.
A dynamic preview provides buyers with a virtual display of the product
based on the print and finishing options and features they select.
● N-Up—N-up
stands for Number of pages up (2-up, 3-up, 4-up, etc.) printing.
N-up printing is printing multiple buyer-submitted pages onto a single
physical sheet and then cutting them to a specified finished size. For
example, instead of using letter paper (8 1/2 by 11-inch paper), a job
can be printed with a left-side page and a right-side page on tabloid
(11 by 17-inch paper) and then cut down the middle with an industrial
paper cutter.
Note:
N-up printing accommodates your production processes that print multiple
pages on a single sheet then cut to final size (the “cut and stack” model).
The savings can thus be passed on to the buyer as the MarketDirect StoreFront
pricing engine will take into account the number of sheets and impressions
involved in printing N-up. For example, say a buyer orders 400 copies
of a 16-page document. Without N-up, the pricing would be calculated on
400 x 16 = 6,400 impressions and 400 x 16 (simplex sheets per job) = 6,400
sheets. But if the product is set up for 2-up printing, only 3,200 impressions
and 3,200 sheets are used (i.e., the number of sheets and impressions
is halved). The model indirectly correlates the product cost to your cost
of production with N-up capabilities (e.g., where lower impression cost
is passed on to the buyer).
Note:
N-up outputs the N-up information to Hagen, Logic, Pace, and the External
System Connector (ESC).
Note:
N-up should only be used for products that are very well-defined, i.e.,
those that have only one choice of size and a known finished size.
● Enabled: Check the box to activate
N-up printing for the product (catalog item).
● Type: Select an option:
● Booklet
(2-up across, duplex): A Booklet
is a multi-page document with a wraparound cover that is typically printed
2 pages-up per side, folded in half, and saddle-stitched. An N-Up
job is typically a document printed with two or more pages per side, cut,
and stacked.
Warning:
Ticket Template Requirements for Booklet
Products: "Rules for Booklets"
For a booklet product to work properly, the ticket template on which it
is based must meet very specific conditions.
1. The ticket template cannot contain
special pages.
2. The ticket template must have
duplex option selected. No simplex.
3. All must be of the same physical
size (e.g., for an 8.5 x 11 booklet, the interior and cover would all
need to be at least 11 x 17; they could be 12 x 18 if, for example, the
pages had full bleeds and the final booklet product will be trimmed).
4. The ticket template cannot use
tabs/tabbed .
5. The ticket template must be
set up for a wraparound cover
if you want to give buyers the option of having a separate cover for the
booklet. Cannot have front or
back cover options, only wraparound cover option.
● N-Up Preview Size: Select a preview
size from the pull-down list; can be set to None or to any of the standard
final sizes as defined on the Administration
> >Standard Final Width and Height page. For example, the
width and height of a single finished and cut business card.
Note:
For more information on defining standard final width and height dimensions
for a product, see Setting a Final
Width and Height for Printed Products and Dimensions
below.
● Mobile
Supported:
● Select
Yes if you want the
product to be shown / available to buyers accessing the storefront on
a mobile device.
● Select
No if you want the product
to be hidden / not available to buyers accessing the storefront on a mobile
device.
● Pre-Selected
Services—(For Ad Hoc Products
only) Pre-selected services are those that have been set as non-configurable
options for the product (e.g., print services with only one option on
the ticket template): Show / Hide.
Note:
Selecting to show pre-selected services will let buyers see all options
(e.g., for features and services), including those that they cannot change.
● Manage
Inventory
Note:
MarketDirect StoreFront
provides a simple product quantity / reorder point to manage inventory
of non-print-related (e.g., Non Printed, Static).
● Enabled: Enabling inventory management
lets you manage non-printed and static product inventory (e.g., finished
goods).
● Inventory: Set the initial inventory
of the product.
● Threshold: Sets the reorder point
(i.e., when inventory level reaches 10, send email notification to recipient
specified below). This number must be smaller than the Inventory value
you entered above.
● Notification Email ID: Specifies
recipients to be notified by email when the inventory threshold is reached.
You can enter multiple recipient email addresses separated by a semi-colon
( ; ).
● Order
Quantities—Specifies the quantities of the product buyers can order:
● Any quantity: Lets buyers order
any quantity of the product.
● Fixed quantities: Specifies the
fixed quantities of the product that buyers must order. For example, you
might offer the product only in the fixed quantities 100, 200, and 300.
● Use the fixed
quantity editing tools to set up your fixed quantities:

|
Lets you enter a fixed quantity in an entry
box:  . After entering
a fixed quantity, click Update. . After entering
a fixed quantity, click Update. |

|
Removes
the fixed quantity. |

|
Adds
another fixed quantity. Click to add an additional fixed quantity.
Edit the quantity using the quantity editor
if needed. |
● Example:
If you set up the fixed quantities 100, 200, and 300, your fixed quantities
will appear as follows:

● This will present
the buyer with a quantity pull-down list containing the options 100, 200,
and 300 on the storefront.
● Click Update.
● By Multiples:
● Allow
buyer to edit quantity: Check this box to allow buyers to override
the specified quantity for the product.
Note:
For products set up to use the Classic HTML Interface, if you select By Multiples for Order Quantities,
check the Allow buyer to edit quantity
checkbox, and enter quantities in the Mininum,
Maximum, and Multiple
fields, the buyer will be presented with a pull-down list of quantities
not a text entry field to enter desired quantities.
For example if you specify Minimum = 1, Maximum = 800 and Multiple = 50,
the buyer would be presented with the following Quantity
pull-down list:
The same values for a product using the Visual Product Builder would result
in the buyer's being presented with a Quantity
text entry field:
● Minimum:
Specify the minimum number of the product that buyers must order.
● Maximum:
Specify the maximum number of the product that buyers can order.
● Multiple:
Specify the multiples in which the product must be ordered. For instance,
you might only want to sell the product in sets of two, so you would set:
Minimum = 2 and Multiple = 2, allowing buyers to order 2, 4, 6... of the
product.
● Advanced:
Enables you to specify a more complex quantity option, for instance to
match a pricing structure for the product. This calls for using regular
expressions. Enter the quantity pattern using regular expression (or regex)
recipes.
Note:
For more information on
regular expressions, see Quick
Reference on Regular Expressions.
Example: You want to let buyers
order the following quantities of the product: 1, 2, 3, 4, 5, 10, 20,
50, 1000, 2000, 3000, 4000, 5000. So you want quantities for 1 to 5, then
10, 20 and 50, and finally 1000 to 4000 in steps of 1000. The Advanced
quantity tool enables you to do this by entering the following rule in
the entry box: 1..5-10|20|50|100-1000..4000[1000]
which is a combination of three simple syntaxes.“1..5” is the Begin..End[Step]
syntax, followed by “10|20|100” which is a Values syntax, followed by
another Begin..End[Step] syntax.
This will present the buyer with a quantity pull-down list containing the
options on the storefront.
● Click
Done.
● Multiple Recipients (SmartStores only): This setting determines how the total
quantity is handled for split orders buyers place in SmartStore storefronts.
Note:
Please note that you do not need to enable multiple recipients for products
that will use Direct Mail because Direct Mail jobs do not include a shipping
step (because they are mailed not shipped to the buyer.
This setting will be available only if you selected one of the following
order quantity options above: Fixed, Multiple, or Advanced.
● Each
recipient set to a valid quantity: Choose
this option if you want the minimum order quantity to apply to each recipient.
For example, if the product has a minimum order quantity of 100, each
recipient in a split order (one with multiple recipients) must be set
to receive a minimum of 100 units of the product. Thus, this option enforces
the minimum order quantity for each recipient in the order.
● Total
quantity must add up to a valid quantity: Choose this option if
you want to enforce the minimum order quantity only for the total order
amount for a split order. For example, if the minimum order quantity for
the product is 100, as long as the total units of the product shipped
meets or exceeds the minimum quantity, all is well. Thus, for an order
with two recipients, if recipient one receives 25 units of the product
and recipient two receives 75 units of the product, the order will be
acceptable because the minimum order quantity of 100 was met.
● Production
Notes—Enter any production notes for the operator who will produce
the job. These notes will be displayed on the production job ticket when
the product order is ready for production and on tickets sent to output
devices.
● Keywords—Enter
any descriptive keywords that will help buyers searching for the product
to find it.
Note:
Separate keywords with a
comma ( , ), spaces are not necessary, and note that your total character
count for keywords cannot exceed 500.
● Dimensions:
Note:
To ensure that the product previews correctly, it is strongly recommended
that you associate the product with ticket template that includes the
Final Width and Height print service and also specify a default size in
the Settings on this page. If you do not do this, the preview will likely
show the document on the wrong size (e.g., a business card or postcard
on a 8.5 x 11 document will have too much white space).
Note: If you are using direct mail
with AccuZIP, see Direct Mail
Guidelines for additional guidelines on setting up direct mail pieces
in MarketDirect StoreFront.
● Standard
Final Width and Height: You can set a standard final width and
height dimensions for the product by selecting a standard final width
and height based on the options in the catalog that you want to use for
this product.
Note:
For more information on defining standard final width and height for ,
see Setting
a Final Width and Height for Printed Products. This feature will work
only if the product is associated with a ticket that uses the final width
and height option.
● Check
the boxes for each standard final width and height option you want to
offer for the product. (You do not have to offer any pre-defined sizes.)
● Default: Select the standard final
width and height option to use for the product.
● Custom Width and Height:
● Allow
Buyer to Enter Custom Sizes: Select if you want to enable buyers
to specify custom sizes for the product.
Note:
Optional Fields: Use
the fields below to restrict the range of values buyers can enter when
specifying custom sizes during the order process. If you do not limit
the values, buyers will be able to define products of any size.
Please be aware that the information you supply here will define minimum,
initial, or maximum permitted sizes using a unit of measure that you choose.
This information will be used to control the buyer experience and will
be converted to equivalent sizes for any of the buyer’s units in their
unit system. This allows administrators who prefer to use metric to enter
sizes in a unit that they are most comfortable with (such as meters or
centimeters). The choice of unit that a buyer will see is evaluated based
on other settings and may not be the one shown here in this product setting.
For example, a buyer who may be using a non-metric (e.g., US) system
will be given equivalent choices in their set of available units (inches,
feet, and yards). So the information that you supply here does
not
in any way establish a default
choice of units for buyers.
● Units:
Select the unit of measure that you wish to enter the size information
in.
Note:
Note that this does not imply
any default setting to buyers or other users; this is simply your choice
based on what you are most comfortable for entering any widths or heights.
● Width
(optional): Type values for Lowest, Highest, and Default for the
unit you have chosen for data entry.
● Height
(optional): Type values for Lowest, Highest, and Default for the
unit you have chosen for data entry.
Note:
Products
that will use direct mail services (i.e., AccuZIP) should be set up so
that the shortest dimension is used as the height of the mail piece. This
is important because when the label is affixed to the mail piece it needs
to be oriented lengthwise so that the bar code can be read automatically.
● Weight
(single copy or item):
● Optional:
Before
checking this box, be aware that the system will automatically compute
an estimated weight based on (type, size, and weight), finished size,
simplex/duplex, special pages, tabs, and printed covers. To override this
calculation with a specific weight value, enter the weight here.
● Weight:
MarketDirect StoreFront
will automatically calculate a weight estimation for the product based
on the (weight, size), finished size, tabs, printed covers, finished size,
etc. Check this box and enter a weight for the product if you want to
override the automatically-calculated weight with a specific weight value
for the product (note that you should enter the weight of each unit that
goes in a sub-container; for example, the weight of each business card
in a set of 250 or 500 business cards).
Note:
Important Notes: This is not used
in calculating weight for direct mail postage.
If you do not specify a weight, the shipping cost will be determined from
the weight of the but will not include the weight of any non- components
(such as binding coils and cover materials) in the product, so you might
want to specify a “per unit” weight to cover non- elements in the product.
7. On
the Progress 1: Pricing page: Enter pricing for the product as
you would for a product of any other type with the following exception
for postage.
● If you are using
AccuZIP mailing service, you can now specify Additional
Charges (e.g., to cover handling and materials) when pricing any
product set up for direct mail.
● You can choose
from the following options to mark up or mark down the AccuZIP-calculated
postage:
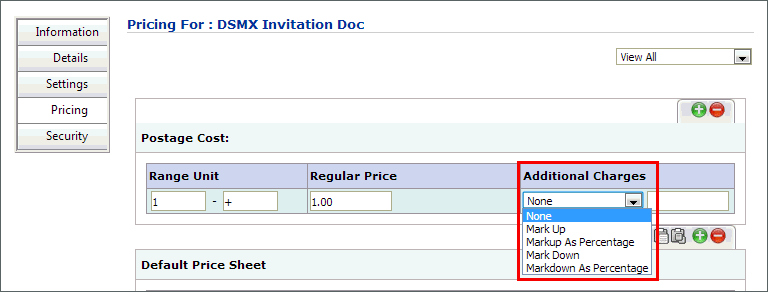
Note: If you are using AccuZIP,
any value in the Postage Cost:
Regular Price field will be disregarded (i.e., only the Additional
Charges field will be used) in the postage calculation.
● Mark
Up: Specify a specific amount to add to the regular price for each
piece.
● Markup
As Percentage: Specify a percentage to add to the regular price for
each piece.
● Mark
Down: Specify a specific amount to deduct from the regular price for
each piece.
● Markdown
As Percentage: Specify a percentage to deduct from the regular price
for each piece.
Note:
By design, direct mail pieces are never subject to handling fees. They
are governed by Postage and any postage markup fees you specify on the
Product | Pricing page.
8. On
the Progress 1: Security page: Configure security rights and permissions
for the product as needed (and as you would for a product of any other
type).
9. Click Next.
10. On
the Progress 2: EFI VDP Web Form page:
● Click Browse...
and select your EFI VDP template zip file (i.e., created in Storefront
Studio) and then click Upload.
● Associate fields
on the template with User Profile
fields.
● Click Click
to expand to show all elements that will appear on the page.
● For each item,
define the formatting options by completing the steps below:
Note:
Click  to expand each field.
● Required
Item: Check this box to force a buyer input in this field.
● Show
to Buyer On:
● Check Single
Record Jobs box to make the field visible to buyers ordering a
single (one record) VDP
product on the storefront.
● Check Batch
Record Jobs box to make the field visible to buyers ordering a
batch (multiple record) VDP product on the storefront and enable buyers
to enter data into the editable field.
● VDP
Field Type: Specify whether the field type is Versioned
or Common.
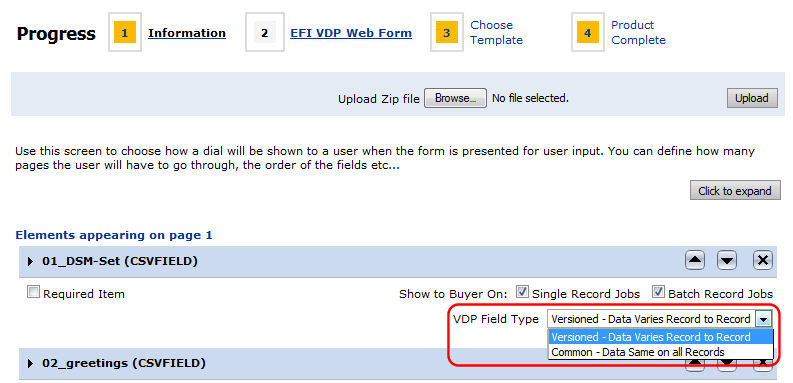
Note:
EFI VDP Templates Combo Mode
A batch VDP product in MarketDirect StoreFront
can have both common (single) and versioned (batch) data. The term "combo"
(combination) refers to a mix of single and batch data in a VDP job. For
example, a batch of postcards that a realtor distributes can combine common
elements (all the postcards have the realtor's photo and address or a
photo a property for sale; this is the single mode part) and versioned
elements (recipient customers' names and addresses; this is the batch
part). The buyer experience has the buyer entering the common/single information
into form fields (i.e., the web form) and assigning a data source for
the versioned/batch information.
● Display
Name: The name for the field displayed to buyers. This field is
view-only but can be changed on the Language
Management | Customize Strings page.
Note:
For more information on
customizing text using Language Management tools, see Customize
Strings. Note that the Custom
Words and Phrases (added by me) check
box should be checked before searching for the string.
● Display
As—There are a number of formats in which buyers can input their
own personalized data. For instance, for the item Gender
you could use radio buttons Male
and Female, pull-down list with
the two options, a text box in which the user would type “Male” or “Female,”
etc. Select the type of field/control you want buyers to interact with
on the storefront from the pull-down list:
● Text
Box: Provides buyers with a free entry of text, as for a name or
address.
● Drop
Down List: Lets buyers select an option from a click-expandable
list of options.
Note:
For this list, you will
have to pick a list from the data list manager (see the section Data Lists in this topic.
● Radio
Button List: Lets buyers select one option (a forced-choice list)
from a list containing two or more items. For this list, you will have
to pick a list from the data list manager.
● Checkbox
List: Lets buyers select one or more options. For
this list, you will have to pick a list from the data list manager.
● Graphic:
Gives buyers the option of selecting a default image, uploading an image
file, or selecting an image from a gallery.
● Calendar:
Helps buyer select a date using the calendar utility.
● Multiline:
Selecting multiline will cause the field to be displayed to buyers as
a multiline text box without scroll bars (you can specify up to a
maximum of 10 lines as, e.g., for a paragraph of text). You can make any
field a multiline text box. Note that the width value you specify in the
Enter Width field sets the line
width (i.e., the smaller the width, the quicker buyer-entered text will
fill up the lines and reach the line limit, i.e. which will cause the
scroll bar to be displayed).
● Rich Text
Area: Please disregard this field.
● Month
and Year Picker: Provides buyers with
a month and year utility.
● RadioButtonPics:
Lets buyers select a single image from
a small number of images.
● Image
Selector: Lets buyers select an image from a predefined image gallery.
● Enter
width—Enter
in pixels the width of the field to display on the storefront (maximum=700
pixels).
● User
Profile Field: Please disregard this field.
● Order
on page—Select the position for the field on the page (with 1 being
at the topmost position) from the pull-down list.
● Show
on page—Select the page on which to
display this field (e.g., if you are setting the input page for this product
to span more than one page).
● Enforce
formatting—Enables you to force buyer input to conform to a particular
format. The format can be either a known pattern (e.g., United States
Phone Number) or a custom pattern (e.g., using terms in a regular expression).
● Use
known pattern: Select a pattern from the pull-down list.
● Use custom pattern: Enter the custom pattern in
the Pattern
text box using a regular
expression (or regex) recipe. An Internet search using the search term
“regex” will help you locate a glossary of regular expressions for formatting.
For example: The regular expression for the U.S. phone number format (000)
000-0000 is: ^\(?\s?\+?\s?\d{3}\s?\)?[-]?\d{3}[
-]?\d{4}$ For more
information see Quick
Reference on Regular Expressions.
● Please
enter the description of the format you expect: You
can add a validation message that will alert buyers if they enter a format
that is incorrect and advise them of the correct format for data entered
in the field.
● Font
Treatments—Please disregard the fields in this section as they
do not apply to EFI VDP products.
Note:
Only those fonts installed on the StoreFront Studio Server will be available
to buyer—not those on the MarketDirect StoreFront
Server.
—Stand-alone
(self-hosted) customers can
embed the fonts in their design, export to campaign package, define the
font in a rule, add the font to MarketDirect StoreFront
by adding it to a corresponding data list as a pull-down selection for
the customer and place the font on their server.
—SaaS
(EFI-hosted, or cloud) customers
are limited to selecting
the default fonts listed in the pull-down list.
11. Click Next.
12. On
the Progress 3: Choose Template page: Select the ticket template
to associate with the product (as you would for a product of any other
type).
13. Click Finish.
14. On
the Progress 4: Product Complete page:
● Click Manage
Products to return to the Manage Products page.
● To publish the
product to your storefront, click Publish
It.
● On the Select
Target Category dialog, select the category in which to display
the product to buyers on your Web storefront.
● Click Publish.
● If you have a license
for product-level punchout (to allow buyers to "punch out" to
your site from a procurement site (e.g., Ariba) and want to publish the
product on the procurement site, click Publish
to External Catalog.
Note:
For more information on integrating your site with a third-party procurement
site such as Ariba, Coupa, or Four51, see Site
Settings - PunchOut Integration Tab and Punchout
Buyer Management.
For information on licensing the Punchout Buyers option, contact your EFI
MarketDirect StoreFront
Sales at http://efi.com/about-efi/contact-us/how-to-buy/.
● On the PunchOut
Buyers dialog, select the external (i.e., punchout) site to publish
the product to.
● Click
Publish.
15. Click Finish.
16. Go to your buyer
Storefront and review the product as it will appear to buyers. If changes
need to be made, click Manage
on the storefront and edit the product specifications.
Note:
Note that EFI VDP products will work properly only on SmartStore storefronts
not on classic storefronts.
See Also
● XMPie
Products
● FusionPro
Products
● EFI
VDP Products
● Variable
Data Products - VDP
● Create
Products