XMPie Products
Note:
For an overview of Variable Data Products (VDP) in MarketDirect StoreFront,
see Variable Data Products - VDP.
The XMPie software enables you to create variable document templates
using Adobe InDesign and the XMPie uDirect plug-in. After creating the
templates and exporting them as a CPKG flat file (single table), you will
then import the templates to the system following the steps described
below. Your variable data templates will contain both static elements
(such as background images or clipart) and dynamic elements (placeholders
or areas on the template where variable data, such as the customer’s name
entered on the interface, will print).
Note:
The system can export users
in CSV format, which enables you to export existing users in the system
to create a campaign in XMPie, for example, for a sales promotion.
Note: Detailed step-by-step instructions
for creating templates with XMPie that you can then import into the system
and configure as XMPie variable data products (VDPs) are on the XMPie
CD that you received after purchasing your license for XMPie.
Importing
XMPie Templates into MarketDirect StoreFront
After you create your templates in XMPie and export them in .cpkg format
(cpkg stands for campaign package), you are ready to import them into
the system during the process of creating an XMPie variable data product.
Quick
Reference: Setting Up XMPie Products that will Print on Pre-Printed
Shells
Often your XMPie products will impose buyers' personalized data
on a pre-printed shell (background). Follow the steps below to set
up these products so that buyers can see a preview of the product
that includes the pre-printed shell (background) instead of just seeing
the personalized data they enter on a white background. The image
of the pre-printed shell will not be included in the production PDF
that MarketDirect StoreFront
generates (i.e., to avoid overprinting the pre-printed shell).
1. In the template data source, include
a field that will contain the rule required to dynamically remove
the layer in the template that contains the pre-printed content (in
the example below, it is the "Background" column with a
control set either "On" or "Off").
.
2. In the InDesign template, create two
layers. One layer will contain the objects that are included on the
pre-printed shell (e.g., "Background" below). The second
layer will contain the objects that should be included in the production
PDF when it is generated (e.g., "Main" below).
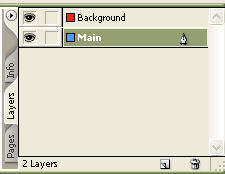
3. Complete the template by placing the
appropriate objects on their corresponding layers.
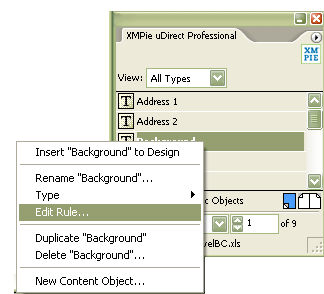
4. In the uDirect pallet, right-click on
the content object designated to control the pre-printed shell layer
and select Edit Rule.
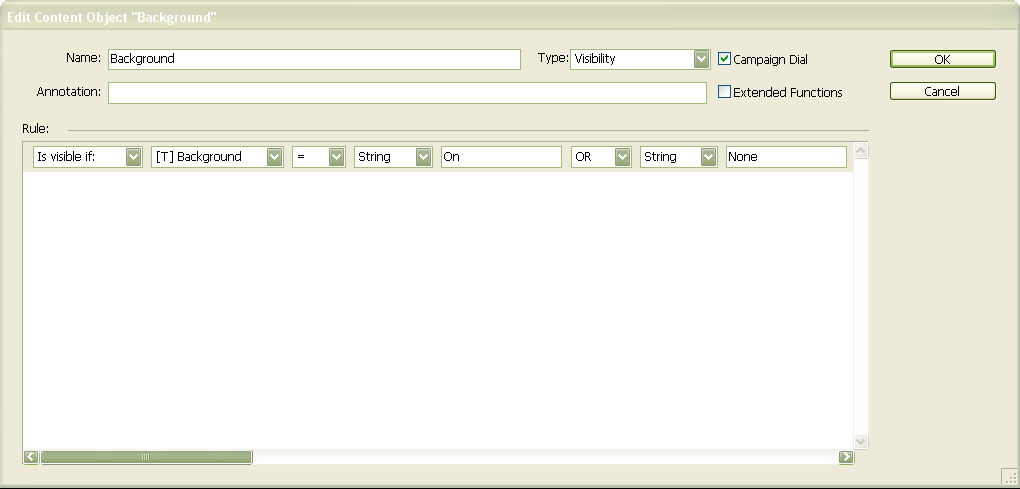
5. Change the content object's Type
to Visibility.
6. Select the checkbox next to Campaign
Dial.
7. Edit the rule so that if the rule equates
to true, the desired preview action occurs.
Note:
For example, if you want the layer to which the content object is
being applied to be visible when the buyer previews the template,
create a rule syntax that would always equate to true. One approach
to accomplish this is to select a field in your template that you
are going to make a required field (which means it will always have
a value) and then write the rule to state that if the length of the
selected field is greater than zero (0) then the layer is visible.
Since the field selected will never be empty, validating that the
length of the field content is greater than zero (0) would always
equate to true.
8. Click OK
to save the revised rule.
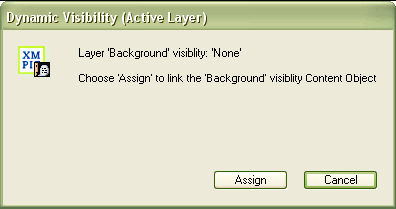
9. In the Layer
pallet, single-click to highlight the layer that contains the pre-printed
shell content. Once the layer is highlighted, double-click on the
content object edit above in the uDirect pallet to assign the visibility
rule to the layer. When the Dynamic
Visibility dialog box appears, click Assign.
10. Once the design is completed, export
the design using the XMPie Exchange
Export to generate the campaign package (.CKPG).
11. In MarketDirect StoreFront,
create a product as Type "XMPie
VDP" (following the steps listed in this Topic).
12. On the XMPie Web
Form tab, upload the campaign file.
13. Since the Campaign Dial checkbox was
selected in the rule editor during template creation, there will be
two form fields for the visibility layer content object, the CSVFIELD
and the DIAL. Verify that the checkbox next to Single Mode for the
CSVFIELD is not selected and that the checkbox next to Single Mode
and Batch Mode for the DIAL is not selected.


14. Expand the DIAL content object to show
its properties. Set Production Value
to Off.

15. Make any additional updates to the XMPie Web Form as necessary,
then save and publish the product. During order entry when the web
form is completed and the preview is updated, the content on both
of the layers will be displayed so that they can visualize the complete
product. However, when the production PDF is generated, the layer
containing the pre-printed shell content will be turned off and not
included on the output file.
The procedure for importing a group of template-based products into the
system is similar to that of adding any other product (document) to your
online catalog (see Importing
Products).
To
create an XMPie product in MarketDirect StoreFront
1. Go
to Administration > Products
to open the Manage Products page.
2. Click Create
Product.
3. On the Create
New page, type a Product Name
for the product.
4. From the Type pull-down list, select XMPie VDP.
5. Click Next.
On the Progress  Information | “Information” page:
1. Product Name—Name of the product
for administrative purposes. It can be the same as the displayed name.
This is the only field required to make a product. The product name can
include up to 50 characters.
2. Display As—Can be a more buyer-friendly
name of the product that will appear to buyers on the product pages on
the storefront.
3. Product ID—Product code or SKU.
The product name can include up to 50 characters.
4. Item
Template—(MIS only) Enter the name
of the MIS template, if applicable, to link new print products with a
particular estimate. This field is for associating a print product with
a particular estimate in the MIS so the MIS knows which specifications
should be used to produce the print job. This field is intended for
print
products. Note that the system populates
the Product ID field for fulfillment products sent from the MIS.
Note:
This field will be displayed when MarketDirect StoreFront is integrated
with an MIS.
Note:
For PrintSmith Vision and Classic
integrations, Product ID will be used to link all products.
5. Description
Footer—Enter any additional information about the product. The
footer will be shown on the storefront and in the product details.
6. Direct Product Link—A direct "deep
link" to the product (the field will be visible only after you have
entered a Product ID and saved the product).
Note:
This is a "deep link" to
the product file that links to a specific page where the product file
is located. A deep link is a link that bypasses the site navigation and
takes the buyer directly to a specific product page in MarketDirect StoreFront. The
purpose of such a deep link to the product is to ensure that the product
remains accessible. For instance, if you copied the link to a product
from the browser’s address
field the link could not be expected to remain valid because such links
are typically encrypted and cannot be guaranteed to remain functional
from one version of MarketDirect StoreFront
to the next. Direct product links prevent this problem by making certain
links (to categories and products) both permanent and short.
IMPORTANT NOTE for cloud (EFI-hosted)
customers: You will not see a link in the Deep
Product Link field. For direct product linking to work you will
need to:
(1) Make sure that a unique Product
ID (SKU) is applied to the product (in the previous step).
(2) Use the following format to create the URL for the deep link to the
product:http://[MyPrintSite]/DSF/PRODUCTS/SKU/[productSKU].aspx
TIP: If you are printing collateral
for your business that includes QR (quick response) codes, you can use
QR codes to promote your own content including StoreFront promotions to
drive online sales? By combining the “Deep Linking” feature of MarketDirect StoreFront with a
QR code, you can promote many different types of content, including an
online product promotion, customer-facing tips on creating VDP collateral,
your booth location at an upcoming tradeshow, etc. Leveraging QR Codes
and Deep Links to share content and drive promotions on your storefront
can help grow your business.
Using Deep Links in Customer Communications (such
as in email or Web links)
Appending ?cmd=begin
to a deep link to a product will take the buyer to the product ticketing
page for a product (i.e., eliminating the need for the buyer to click
Begin to begin ordering the product).
For example, if your deep link to the product is
http://[MyPrintSite]/DSF/PRODUCTS/SKU/[productnameorSKU].aspx
you could append ?cmd=begin to
it as shown below
http://[MyPrintSite]/DSF/PRODUCTS/SKU/[productnameorSKU].aspx?cmd=begin
to take a prospective buyer directly to the product ticketing page for
a Visual Product Builder (i.e., for products that use the Flex ticket)
product (so the buyer can begin selecting options for the product).
This is a great way to link to a product your are promoting in your marketing
materials, Web sites, the footer of an email message (for information
on how to add a custom footer to email see To
customize the header and footer for site-level email notifications),
etc.
Note on Deep Links with Login Bypass:
To navigate to the product ticketing page with login bypass, append the
following code to the deep link after ?cmd=begin:
ssotok= (followed by the user's
single sign on token) and &ssotokpwd=
(followed by that user's password). Thus, the deep link will be in this
format:
http://[MyPrintSite]/DSF/PRODUCTS/SKU/[productnameorSKU].aspx?cmd=begin&ssotok=[User
Profile Single Sign On Token]&ssotokpwd=[User Password]
7. Type—Display only product type that
you selected on the previous page.
8. Brief Description—Enter descriptive
text for the product that will be displayed to buyers on the storefront.
This brief product description is augmented by a longer description that
is displayed on an entire page when user click for more information on
a product.
Note:
There is a 2,000-character limit for HTML text.
Note:
HTML text characters add
up quickly, so when possible keep formatting simple.
Note:
Most of the controls on the text editor will be familiar to users of word
processing packages such as Microsoft Word or Corel WordPerfect. A few
of the controls that might not be so familiar are:
Control |
Description |

|
This displays the text editor workspace
in design mode, which means it will be displayed WYSIWYG (“what
you see is what you get”). |

|
This displays the text editor workspace
in HTML mode, which means you can use standard HTML formatting
tags to define how your text will appear (e.g., <b>Sale!</b>
will cause the word “Sale!” to display in boldface on the storefront). |

|
This displays the text in the workspace
without any formatting controls. |
9. Product Icon—The Product Icon is
the large version of the product image that will be shown to buyers on
the storefront.
● To select the image
click Edit.
● None:
Click this radio button if you want no product image to appear on the
storefront.
● Stock
Icon Library: Click this radio button if you want to select an
image from the stock icon library, which includes icons for nearly 30
product categories (e.g., binders, business cards, brochures, calendars).
● Upload
Custom Icon: Click this radio button to select an image to display.
● Click Browse...
and on the Choose File dialog
navigate to the image file you want to display, select it, then click
Open.
● Click Upload.
● Automatic
thumbnail: Click this radio button to have the system generate
a product image automatically from the first page of the document.
Note:
This option causes the system
to generate both a small and a large image from the first page of the
document. If you want a different icon to display on the product details
page, you must select a different custom icon in the Product
Details Image section
below. Note that you will not be able to preview the automatic image until
after you save the product.
10. Click Details
on the left navigation menu.
On the Progress Information
| “Details” page:
1. Long Description—Enter a detailed
product description that will be displayed to buyers on the product details
section on the storefront. There is a 4,000-character limit for HTML text.
2. Product Icon—You can upload a small
version of the product image that will be shown to buyers on the storefront
when they click for more information about the product.
● Click Edit.
● None:
Click this radio button if you want no product image to appear on the
storefront.
● Stock
Icon Library: Click this radio button if you want to select an
image from the stock icon library, which includes icons for nearly 30
product categories (e.g., binders, business cards, brochures, calendars).
● Upload
Custom Icon: Click this radio button to select an image to display.
● Click Browse...
and on the Choose File dialog
navigate to the image file you want to display, select it, then click
Open.
● Click Upload.
● Automatic
thumbnail: Click this radio button to have the system generate
a product image automatically from the first page of the document.
Note:
This option causes the system
to generate both a small and a large image from the first page of the
document. If you want a different icon to display on the product details
page, you must select a different custom icon in the Product
Details Image section
below. Note that you will not be able to preview the automatic image until
after you save the product.
3. Product
Details Image—You can upload a version
of the product image that will be shown to buyers on the storefront at
the top of the page when they are viewing details about the product.
● Click Edit.
● None:
Click this radio button if you want no product image to appear on the
storefront.
● Upload
Custom Icon: Click this radio button to select an image to display.
● Click Browse...
and on the Choose File dialog
navigate to the image file you want to display, select it, then click
Open.
● Click Upload.
● Automatic
thumbnail: Click this radio button to have the system generate
a product image automatically from the first page of the document.
Note:
Note that you will
not be able to preview the product details image until after you save
the product.
4. Click Settings
on the left navigation menu.
On the Progress Information
| “Settings” page:
1. Display
Priority—Select a priority for the product from the pull-down list.
Note:
This will specify the order
from top to bottom in which the product will be displayed on the storefront;
the higher the priority (lower number) will cause the product to display
higher on the storefront product page. If two or more products have the
same display priority, they will be sorted alphabetically.
Note:
PPML is
available only in batch mode. MarketDirect StoreFront supports output of XMPie
products in PPML format. PPML is short for Personalized Print Markup Language,
an XML-based printer language for variable data printing. PPML is for
jobs with very large record sets. PPML files can be sent through the Remote
Print Center (RPC) to a Fiery JDF or Fiery XF output device.
2. Valid
Dates
● Active:
No/Yes—Specifies whether the product status is active (available
now or, for instance, is created now to be made active at a later time,
such as when a sales promotion begins).
● Start
Date: Use the calendar tool  to
specify the date on which the product should start being displayed on
the buyer storefront.
to
specify the date on which the product should start being displayed on
the buyer storefront.
● End
Date: Use the calendar tool  to specify
the date on which the product should no longer be displayed on the buyer
storefront.
to specify
the date on which the product should no longer be displayed on the buyer
storefront.
● Select Never
if you do not want the product display to expire on a specified date.
3. Turn Around Time—If you want to
specify a turn-around time for the product (when it will be prepared and
ready for pick-up or delivery), type a number and time interval, else
select None.
Note:
The Print Shop
turnaround time will override any product turnaround time specified.
4. Shipping
& Taxes:
Note:
These settings are available
for all product types (except Kits). For Kit products, the configuration
of the items the kit contains will govern taxes and shipping exemptions.
● Exempt
Shipping Charges—No shipping calculations will be made on the product.
● Exempt
Taxes—No tax calculations will be made on the product.
● Supported
Print Shops: If
you want to restrict availability of the product to a specified Print Shop(s), click Add Supported
Print Shops and
then select the Print Shops
that will support the product on the Assign/Edit Print Shops
window.
● Record
Entry Mode: Record Entry Mode:
● Single
Mode—This option is for XMPie products that use a single record
(e.g., a single buyer's business card).
Note:
If you select both
Batch Mode and
Single Mode this is a hybrid mode
for VDP that enables buyers
to order the product either as a single job or a batch job. Single mode
will be the default on the buyer side, but buyers can select batch. Buyers
will be prompted to upload a CSV file. The file’s records are viewable
and a preview document (showing the user’s personalized data on the document)
can be generated to spot check each record’s content. This is useful for
preventing printing a job that has formatting issues, such as a name too
long for the allotted space.
● Batch
Mode—This option will prompt buyers to upload a multiple record
data file (in comma separated value, CSV, format) or to use multi-column
data sets (pre- created in the system; for more information, see Multi-Column
Data Sets). For instance, if a customer wants to order business cards
for all members of a department.
Note:
Notes on Batch Mode: Buyers will be prompted to upload a CSV file
with multiple records for their VDP product on the storefront. MarketDirect StoreFront will create
a sample CSV file for the template that you can use to format the CSV
you use to port data to the system. A “Sample.csv” file link will appear.
Buyers will be able to open the document in a text editor such as NotePad
or WordPad and save it with a name of their choice. This sample document,
created on the fly, serves to show users what data and in what format
it is needed for the selected variable template.
Note that the first line is the header line and is mandatory, meaning it
must be the first line in the CSV file because it establishes the format
for the table. An hourglass icon will indicate that the operation is in
process. An exclamation point icon will indicate any errors that occurred
during the mapping process. Here’s what the buyer will see on the storefront
when ordering an XMPie product.
How buyers will use multi-column data
sets: Buyers can also use an MCD along with an uploaded CSV data
file. The buyer can select the Select Data & Create Data Source option
then choose which records in the MCD should be used in the VDP job.
● PPML—This
option will make use of MarketDirect StoreFront's
support for output of XMPie batch mode products in PPML format.
Note:
PPML is
available only in batch mode. MarketDirect StoreFront supports output of XMPie
products in PPML format. PPML is short for Personalized Print Markup Language,
an XML-based printer language for variable data printing. PPML is for
jobs with very large record sets. PPML files can be sent through the Remote
Print Center (RPC) to a Fiery JDF or Fiery XF output device.
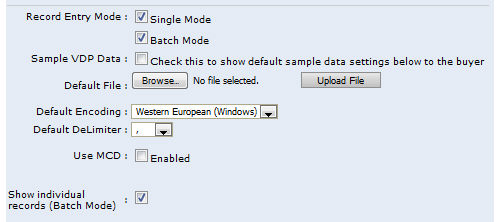
5. Sample VDP Data: Check this box
to show sample data to buyers (i.e., the sample data in the default file
you upload below).
6. Default File: Click Browse...
and navigate to the file with the sample data, select it, and then click
Open.
● Click
Upload File.
7. Default Encoding: Select the correct
encoding type from the pull-down list.
8. Default DeLimiter: Select the type
of delimiter (how the data fields in the sample file are separated): , | Tab ;
9. Use MCD: Click the checkbox to enable
buyers to use multi-column data sets.
Note:
For more information on multi-column data sets (MCDs), see Data
Sources.
10. Operator View PDF Creation—This
enables operators to create (from the Operator View) a PDF file of buyer
orders that use this XMPie product.
Note:
When batch mode is used, by default a PDF file is not
generated. For batch mode XMPie products with more than 20 records, we
strongly advise that you accept
the default of not automatically generating a multi-record PDF production
file using this option. The default is set if the Disabled
option is selected. This will avoid taxing server resources. For instance,
if you opt not to use the default, be aware that the system will generate
the same PDF file for both preview and production. For products with a
large number of records this will result in buyers having to wait for
the server to generate the large PDF file and will consume server resources
that will slow performance of the preview for all buyers using the system
at that time.
The recommended procedure for generating a production PDF file is to select
one of the options below:
(1) Use the PPML option for batch mode
XMPie products with more then 20 records: This option is strongly recommend because it avoids
consuming a large number of system resources and time. This PPML option
is available by selecting the Batch Mode
| PPML option in the Record Entry
Mode section. Outputting
XMPie products in PPML format sends the files directly through the Remote
Print Center (RPC) to a Fiery JDF or Fiery XF output device, which provides
full automation.
(2) Generate the PDF file from the PPKG
file that the system generates by default (i.e., when Operator View PDF
Creation is disabled): The default option generates a .ppkg file
that contains both the .csv file and the template. The operator can then
generate a PDF file from this .ppkg file (which will be the production
file in the Operator View) in the desktop version of XMPie following the
steps below:
How to Load
the XMPie Proof Set PPKG File into InDesign to Print the Job
1. Open
the InDesign (.indd) file that corresponds to the campaign in Adobe InDesign.
2. In the bottom left corner of the
XMPie UCreate Print palette InDesign, select Proof
Set from
the pull-down menu.
3. Click the link icon just below the menu.
4. Import the XMPie Proof Set .ppkg file that is referenced with the job
in the Operator View.
Result: All
of the records uploaded on that order will be displayed and are ready
for printing or for exporting to PDF.
● Disable:
Selecting this option will not
generate a PDF file of the product (accessible from the Operator View).
Instead, a PPKG file will be generated and the operator will need to follow
the steps above in the "How to Load
the XMPie Proof Set PPKG File into InDesign to Print the Job"
section in the note above to generate the PDF file.
● Enable if less than N Records: Selecting this option will
generate a PDF file of the product (for both buyer side preview
and administration side production, accessible from the Operator View)
for any product document that contains fewer than the specified number
of records.
Note:
The best practice for this setting is to set
the number to no more than 20. For products
with more than 20 records it is strongly advised that you use the PPML
option described in the first note above.
The default is 0, so to
use this option you must enter the number of records.
This specifies the cutoff for generating a PDF file vs. a PPKG file of
the product that operators can retrieve on the Operator View. So if you
specify a value of 20, then all
products with fewer than 20 records will have a PDF file generated and
all products with more than 20 records will have a PPKG file generated.
● Bleed:
Specifies the bleed offset in points
for the X and Y edges of the (side and top margins) on the PDF file generated
in the Operator View.
Note:
These bleed values will work only if bleeds are defined in the template.
● X:
Enter a value to specify the side bleed
margins in points.
● Y:
Enter a value to specify the top and
bottom bleed margins in points.
11. Dynamic Preview—Select to enable
or disable a dynamic preview of the product. A dynamic preview provides
buyers with a virtual display of the product based on the print and finishing
options and features they select.
12. N-Up—N-up stands for Number
of pages up (2-up, 3-up, 4-up,
etc.) printing. N-up printing is printing multiple buyer-submitted pages
onto a single physical sheet and then cutting them to a specified finished
size. For example, instead of using letter paper (8 1/2 by 11-inch paper),
a job can be printed with a left-side page and a right-side page on tabloid
(11 by 17-inch paper) and then cut down the middle with an industrial
paper cutter.
Note:
N-up printing accommodates your production processes that print multiple
pages on a single sheet then cut to final size (the “cut and stack” model).
The savings can thus be passed on to the buyer as the MarketDirect StoreFront
pricing engine will take into account the number of sheets and impressions
involved in printing N-up. For example, say a buyer orders 400 copies
of a 16-page document. Without N-up, the pricing would be calculated on
400 x 16 = 6400 impressions and 400 x 16 (simplex sheets per job) = 6400
sheets. But if the product is set up for 2-up printing, only 3200 impressions
and 3200 sheets are used (i.e., the number of sheets and impressions is
halved). The model correlates the product cost to your cost of production
with N-up capabilities (e.g., where lower impression cost is passed on
to the buyer).
Note:
N-up outputs the N-up information via the “OrderInformation” XML file
to Hagen, Logic, ePace, and the External System Connector (ESC).
Note:
N-Up should only be used for products that are very well-defined, i.e.,
those that have only one choice of size and a known finished size.
● Enabled:
Check the box to activate N-up printing for the product (catalog item).
Enabling N-up pricing enables the two fields below:
● N-Up
Number of Pages (required): Type a number between 2 and 9999 to
specify how many buyer pages will fit onto the physical sheet.
Note:
This value provides MIS & ESC systems with information to use for
more accurate job planning, costing, and scheduling calculations. The
default value is 1.
● N-Up
Preview Size: Select a preview size from the pull-down list; can
be set to None or to any of the standard final sizes as defined on the
Administration | |Standard Final Width
and Height page.
Note:
For more information on defining standard final width and height dimensions
for a product, see Setting a Final Width
and Height for Printed Products and Dimensions
below.
13. Mobile
Supported:
● Select Yes
if you want the product to be shown / available to buyers
accessing the storefront on a mobile device.
● Select
No if you want the product
to be hidden / not available to buyers accessing the storefront on a mobile
device.
14. Pre-Selected Services: Show/Hide—Pre-selected
services are those that have been set as non-configurable options for
the product (e.g., on the ticket template associated with the product).
Note:
Selecting to show pre-selected
services will let buyers see all options (e.g., for features and services),
including those that they cannot change.
15. Manage
Inventory
Note:
MarketDirect StoreFront
provides a simple product quantity / reorder point to manage inventory
of non-print-related (e.g., Non Printed, Static).
● Enabled:
Enabling inventory management lets you manage non-printed and static product
inventory (e.g., finished goods).
● Inventory:
Set the initial inventory of the product.
● Allow
Back Order: Check this box to enable processing of products that
are on back order.
Warning:
If you select this option,
buyers will not be notified during order placement that the whole or a
partial quantity of the order is back-ordered.
● Threshold:
Sets the reorder point (i.e., when inventory level reaches 10, send email
notification to recipient specified below). This number must be smaller
than the Inventory value you entered above.
● Notification
Email ID: Specifies recipients to be notified by email when the
inventory threshold is reached. You can enter multiple recipient email
addresses separated by a semi-colon ( ; ).
16. Order Quantities—Specifies the quantities
of the product buyers can order:
● Any
quantity: Lets buyers order any quantity of the product.
● Fixed
quantities: Specifies the fixed quantities of the product that
buyers must order. For example, you might offer the product only in the
fixed quantities 100, 200, and 300.
● Use the fixed quantity
editing tools to set up your fixed quantities:

|
Lets you enter a
fixed quantity in an entry box:  . After entering
a fixed quantity, click Update. . After entering
a fixed quantity, click Update. |

|
Removes the fixed quantity. |

|
Adds another fixed quantity. Click to add
an additional fixed quantity. Edit the quantity using the quantity
editor if needed. |
● Example:
If you set up the fixed quantities 100, 200, and 300, your fixed quantities
will appear as follows:

● This will present
the buyer with a quantity pull-down list containing the options 100, 200,
and 300 on the storefront.
● Click Update.
● By
Multiples:
● Minimum:
Specify the minimum number of the product that buyers must order.
● Maximum:
Specify the maximum number of the product that buyers can order.
● Multiple:
Specify the multiples in which the product must be ordered. For instance,
you might only want to sell the product in sets of two, so you would set:
Minimum = 2 and Multiple = 2, allowing buyers to order 2, 4, 6... of the
product.
● Advanced:
Enables you to specify a more complex quantity option, for instance to
match a pricing structure for the product. This calls for using regular
expressions, a very common standard for defining quantities. Enter the
quantity pattern using regular expression (or regex) recipes.
Note:
For more information on
regular expressions for formatting quantities, see Quick
Reference on Regular Expressions.
● Example:
You want to let buyers order the following quantities of the product:
1, 2, 3, 4, 5, 10, 20, 50, 1000, 2000, 3000, 4000, 5000. So you want quantities
for 1 to 5, then 10, 20 and 50, and finally 1000 to 4000 in steps of 1000.
The Advanced quantity tool enables you to do this by entering the following
rule in the entry box: 1..5-10|20|50|100-1000..4000[1000]
which is a combination of three simple syntaxes.“1..5” is the Begin..End[Step]
syntax, followed by “10|20|100” which is a Values syntax, followed by
another Begin..End[Step] syntax.
● This will present
the buyer with a quantity pull-down list containing the options on the
storefront.
● Click Done.
● Multiple
Recipients (SmartStores only): This
setting determines how the total quantity is handled for split orders
buyers place in SmartStore storefronts.
Note:
This setting will be available only if you selected one of the following
order quantity options above: Fixed, Multiple, or Advanced.
● Each
recipient set to a valid quantity: Choose
this option if you want the minimum order quantity to apply to each recipient.
For example, if the product has a minimum order quantity of 100, each
recipient in a split order (one with multiple recipients) must be set
to receive a minimum of 100 units of the product. Thus, this option enforces
the minimum order quantity for each recipient in the order.
● Total quantity must add up to a valid quantity:
Choose this option if you want to enforce the minimum order quantity only
for the total order amount for a split order. For example, if the minimum
order quantity for the product is 100, as long as the total units of the
product shipped meets or exceeds the minimum quantity, all is well. Thus,
for an order with two recipients, if recipient one receives 25 units of
the product and recipient two receives 75 units of the product, the order
will be acceptable because the minimum order quantity of 100 was met.
17. Production Notes—Enter any production
notes for the operator who will produce the job. These notes will be displayed
on the production job ticket when the product order is ready for production
and on tickets sent to output devices.
18. Keywords—Enter any descriptive keywords
that will help buyers searching for the product to find it.
Note:
Separate keywords with a
comma ( , ), spaces are not necessary, and note that your total character
count for keywords cannot exceed 500.
19. Dimensions:
Note:
Entering the dimensions is optional; entering them will cause them to
be displayed on the product detail page.
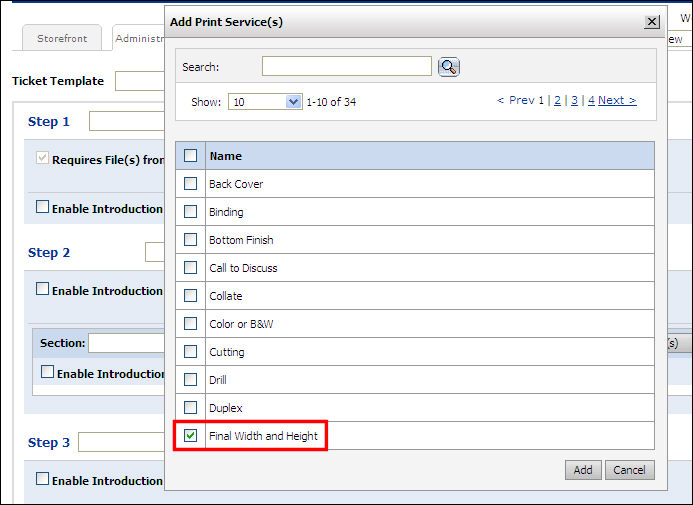
Note:
To ensure that the product previews correctly, it is strongly recommended
that you associate the product with ticket template that includes the
Final Width and Height print service and also specify a default size in
the Settings on this page. If you do not do this, the preview will likely
show the document on the wrong size (e.g., a business card or postcard
on a 8.5 x 11 document will have too much white space).
● Standard
Final Width and Height: You can set a standard final width and
height dimensions for the product by selecting a with a standard final
width and height defined.
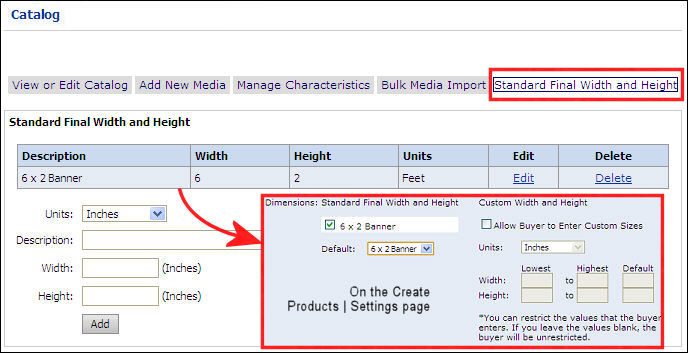
● Check the boxes
for each standard final width and height option you want to offer for
the product. (You do not have to offer any pre-defined sizes.)
● Default:
Select the standard final width and height option to use as the default
for the product.
● Custom
Width and Height:
● Allow
Buyer to Enter Custom Sizes: Select if you want to enable buyers
to specify custom sizes for the product.
Note:
Optional Fields: Use the fields below to restrict the range of
values buyers can enter when specifying custom sizes during the order
process. If you do not limit the values, buyers will be able to define
products of any size.
● Units:
Select the units to specify width and height values for the buyer-specified
custom size.
● Width
(optional): Type values for Lowest, Highest, and Default for the
buyer-specified custom width.
● Height
(optional): Type values for Lowest, Highest, and Default for the
buyer-specified custom height.
20. Weight:
MarketDirect StoreFront
will automatically calculate a weight estimation for the product based
on the (weight, size), finished size, tabs, printed covers, finished size,
etc. Check this box and enter a weight for the product if you want to
override the automatically-calculated weight with a specific weight value
for the product.
Note:
If you do not specify a weight, the shipping cost will be determined from
the weight of the but will not include the weight of any non- components
(such as binding coils and cover materials) in the product, so you might
want to specify a “per unit” weight to cover non- elements in the product.
21. Sub Container Dimension (for AuctionInc
shipping use; for details on configuring AuctionInc see Shipping
Cost Configuration Tab): Enter the dimensions of the shipping box:
Width, Length,
Height, and Quantity
per Package.
Note:
The “sub container dimension” is the package in which the product will
be packed, i.e., the “sub-carton” that will hold the product within the
actual shipping container. For instance, if you have a standard box in
which you ship business cards in quantities from 100 to 2,000, you would
enter the dimensions of the box (regardless of the amount of product from
100 to 2,000 that will actually be shipped in the box per the quantity
ordered). It is best not to think of the “shipment box” as the actual
shipping box (i.e., the container in which the completed order, including
any other sub-cartons containing other products, will be shipped).
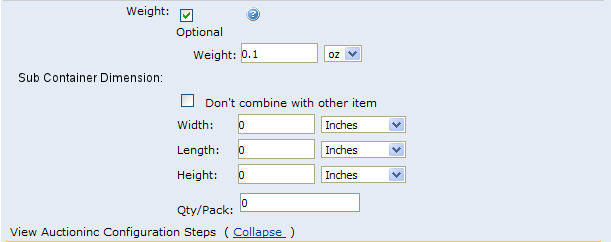
● Don’t
combine with other item: Check this option to prevent shipping
items from a multi-item order in the same “sub-carton.” For instance,
you might opt not to ship light bulbs and textbooks in the same container.
Note:
For instance, say you ship business cards in 7 X 3-1/2 X 2” boxes (with
a capacity of 500 business cards). If you have a multi-part order with
250 business cards for “Sam” and 250 cards for “Jane,” you would check
the Don’t combine with other item to prevent having all 500 cards placed
in one box (even though the business card box can hold all 500 cards;
you would want 250 placed in one box and 250 placed in another). Another
use for this option is to prevent items of different types or shapes and
sizes from being placed in the same carton (e.g., bricks and light bulbs
or baseball bats and books).
● Enter the
dimensions of the sub-container in which the product will be packed for
shipping:
● Width
of the sub-container
● Length
of the sub-container
● Height
of the sub-container
● Quantity
per Package: number of items to include in each sub-container;
so regardless of the actual capacity of the sub-carton, how many of the
items will be placed in each sub-carton.
Warning:
If
you are not using a
sub-container, the information should reflect the dimensions of a single
piece.
22. Click Pricing
on the left navigation menu.
On the Progress
Information | “Pricing” page:
1. From
the View pull-down list, select
which price sheet to apply to the product (i.e., the price sheet to associate
with the product you are creating).
2. In
the dialog for the selected price sheet:
a. Range Unit: Set the range break
points for each price point (e.g., 1 - 50 might represent the quantity
in the unit system in use on the site; for more information on the unit
system, see Unit System).
Use the button to add a range break point.
b. Regular Price: Type the standard
price for that range (e.g., 1 - 50 quantity might have a regular price
of 10.00).
c. Setup Price: Type the setup price
for the range; the setup price will reflect your material and handling
costs.
Note:
For more information on
pricing, see Pricing Configuration.
3. Click Security
on the left navigation menu.
On the Progress
Information | “Security” page:
Note:
Assigning Ownership and Access Rights
for the Product: In this section of the product builder you can
assign an owner for the product and set permissions to restrict access
to it. This enables you make the product available for editing and/or
publishing by a particular user or group of users. The security option
lets you assign management and publishing rights for a product:
Publish: can publish the product
for buyers on the storefront (this must
be used in conjunction with Manage rights; i.e., in order to publish a
product, which makes it available to buyers on the storefront, the user/s
must also have Manage rights).
Manage: can change a product by
accessing it on the Products page and editing its specifications.
1. Click
Change to add or change who owns
(is in charge of) the product.
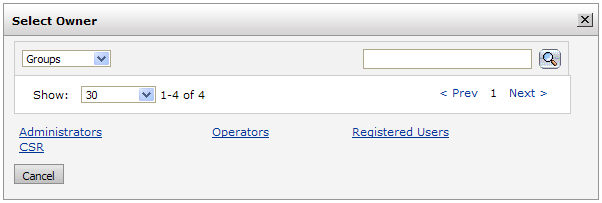
● On the Select
Owner dialog:
● In the first drop-down
select the category of user to assign ownership of the product to: Users, Groups,
Companies, or Departments.
Note:
Typically,
this will be a user. The search field will help you locate the group or
user you are looking for, and the Show field
will limit the number of items displayed.
● Click the group
or user to assign ownership to.
Note:
The
function of “owner” is to ensure that someone can always get to the product
(even if s/he does not otherwise have access rights). It exists in order
to prevent a situation in which you would inadvertently configure yourself
out of access to the product.
2. Click
Add User, Group, Company, or Department.
a. On
the Select Security Principal...
dialog:
● In the first drop-down
select the category of user to whom to assign access to the product: Built-in Groups, Users,
Groups, Companies,
or Departments.
Note:
Typically,
this will be a user or user group. The search field will help you locate
the group or user you are looking for, and the Show field will limit the number of items displayed.
● Click the user
or group to assign access to. The selected user or group will be shown
on the Security page in the Access Permissions table. You can
grant users the right to Publish
and/or Manage (modify) the product.
Note:
You
can retract access permissions at any time by clicking Remove for the
user, group, or company in the Access Permissions table on the Security page.
● Click Check
Permissions For... and select the user, group, or company whose
permissions you want to check. A new dialog will display the permissions
for the selected entity.
● Click Close.
● Click Next.
On the Progress  XMPie Web Form page:
1. In
the Upload Zip file field, click
Browse...
2. On
the File Upload dialog, select
the XMPie template zip file to upload.
a. Click
Open.
b. Click
Upload.
Note:
After uploading the
template, the page will display all input fields (ADORs, DIALs, and CSVFIELDs
in XMPie lingo) defined on the XMPie template. When ordering an XMPie
VDP product, buyers will be able to enter their own personalized data
on the storefront. Note that buyers will have the option of leaving any
of these fields blank unless you mark them required.
3. Associate
fields on the template with User Profile
fields.
a. Click
Click to expand to show all elements
that will appear on the page.
b. For
each item, define the formatting options by completing the steps below:
Note:
Click  to expand each field.
● Required
Item: Check this box to force a buyer input in this field.
● Show
to user:
● Check Single
Mode box to make the field visible to buyers ordering a single
(one record) VDP product
on the storefront.
● Check Batch
Mode box to make the field visible to buyers ordering a batch (multiple
record) VDP product on the storefront and enable buyers to enter data
into the editable field.
Note: This field is only enabled
for DIAL fields and some VARIABLE fields on XMPie products. This field
is always disabled for fields labeled CSVFIELD or SEPARATOR.
● Display
Name: The name for the field displayed to buyers. This field is
view-only but can be changed on the Language
Management | Customize Strings page.
Note:
For more information on
customizing text using Language Management tools, see Customize
Strings. Note that the Custom
Words and Phrases (added by me) check
box should be checked before searching for the string.
● Display
As—There are a number of formats in which buyers can input their
own personalized data. For instance, for the item Gender
you could use radio buttons Male
and Female, pull-down list with
the two options, a text box in which the user would type “Male” or “Female,”
etc. Select the type of field/control you want buyers to interact with
on the storefront from the pull-down list:
Note:
Multiline
Option
Selecting multiline will cause the field
to be displayed to buyers as a multiline text box without scroll
bars (you can specify up to a maximum of 10 lines as, e.g., for a paragraph
of text). You can make any XMPie ADOR a multiline text box. Note that
the width value you specify in the Enter Width field sets the line width
(i.e., the smaller the width, the quicker buyer-entered text will fill
up the lines and reach the line limit, i.e. which will cause the scroll
bar to be displayed).
● Text
Box: Provides buyers with a free entry of text, as for a name or
address.
● Enter
width—Enter in pixels the width of the field to display on the
storefront (maximum=700 pixels).
● Check
Box: Presents buyers with a forced-choice response
such as Yes or No.
● Drop
Down List: Lets buyers select an option from a click-expandable
list of options.
Note:
For this list, you will
have to pick a list from the data list manager (see the section Data Lists in this topic. For data
lists, you will have several additional fields:
—No Default: Choose this
if you do not want the field to have a default value.
—Select a Default: Choose this
if you want the field to have a default value.
—Default Value: Select a default
value for the field.
Lock Default Value:
Choose this if you want to lock the default value (so that users cannot
change it).
● List
Box: Presents buyers with a list of
options. For this list, you will have to pick a source of the data in
the list.
Note:
For this list, you will
have to pick a list from the data list manager (see the section Data Lists in this topic. For data
lists, you will have several additional fields:
—No Default: Choose this
if you do not want the field to have a default value.
—Select a Default: Choose this
if you want the field to have a default value.
—Default Value: Select a default
value for the field.
Lock Default Value:
Choose this if you want to lock the default value (so that users cannot
change it).
● Radio
Button List: Lets buyers select one
option (a forced-choice list) from a list containing two or more items.
For this list, you will have to pick a list from the data list manager.
Note:
For this list, you will
have to pick a list from the data list manager (see the section Data Lists in this topic. For data
lists, you will have several additional fields:
—No Default: Choose this
if you do not want the field to have a default value.
—Select a Default: Choose this
if you want the field to have a default value.
—Default Value: Select a default
value for the field.
Lock Default Value:
Choose this if you want to lock the default value (so that users cannot
change it).
● Checkbox
List: Lets buyers select one or more options. For this list, you
will have to pick a list from the data list manager.
Note:
For this list, you will
have to pick a list from the data list manager (see the section Data Lists in this topic. For data
lists, you will have several additional fields:
—No Default: Choose this
if you do not want the field to have a default value.
—Select a Default: Choose this
if you want the field to have a default value.
—Default Value: Select a default
value for the field.
Lock Default Value:
Choose this if you want to lock the default value (so that users cannot
change it).
● Graphic:
Gives buyers the option of selecting a default image, uploading an image
file, or selecting an image from a gallery.
● Calendar:
Helps buyer select a date using the calendar utility.
● Multiline:
Selecting multiline will cause the field to be displayed to buyers as
a multiline text box without scroll bars (you can specify up to a
maximum of 10 lines as, e.g., for a paragraph of text). You can make any
field a multiline text box. Note that the width value you specify in the
Enter Width field sets the line
width (i.e., the smaller the width, the quicker buyer-entered text will
fill up the lines and reach the line limit, i.e. which will cause the
scroll bar to be displayed).
● User
Profile Field: Select a field from the pull-down list if you want
to associate this item with a field from the user profile field.
Note:
Profile Mapping—Associate
values in the template (such as first name, last name, address, etc.)
with values in the buyer account profile. The default for each value is
No Association,
which does not map the template field to a value. This feature enables
buyers to auto-populate template fields when personalizing variable data
products with data from their buyer profile (i.e., they do not have to
manually re-key information such as their name and address when creating
a personalized variable data document).
● Order
on page—Select the position for the field on the page (with 1 being
at the topmost position) from the pull-down list.
● Show
on page—Select the page on which to
display this field (e.g., if you are setting the input page for this product
to span more than one page).
● Enforce
formatting—Enables you to force buyer input to conform to a particular
format. The format can be either a known pattern (e.g., United States
Phone Number) or a custom pattern (e.g., using terms in a regular expression).
● Use
known pattern: Select a pattern from the pull-down list.
● Use custom pattern: Enter the custom pattern in
the Pattern
text box using a regular
expression (or regex) recipe. An Internet search using the search term
“regex” will help you locate a glossary of regular expressions for formatting.
For example: The regular expression for the U.S. phone number format (000)
000-0000 is: ^\(?\s?\+?\s?\d{3}\s?\)?[-]?\d{3}[
-]?\d{4}$ For more
information see Quick
Reference on Regular Expressions.
● Please
enter the description of the format you expect: You
can add a validation message that will alert buyers if they enter a format
that is incorrect and advise them of the correct format for data entered
in the field.
● Font
Treatments—When turned on, the buyer will be able to control the
fonts for the field (as defined when building the XMPie template). The
buyer will be presented with a text box (if the control is configured
as text box) on the storefront followed by a font selector control.
● Select
Font source: Select the source list of the fonts buyers can choose
when ordering this product. For instance, select Common
Fonts.
Note: Only those fonts installed
on the XMPie Mini-Server will be available to buyer—not those on the MarketDirect StoreFront Server.
—Stand-alone
(self-hosted) customers can
embed the fonts in their design, export to campaign package, define the
font in a rule, add the font to MarketDirect StoreFront
by adding it to a corresponding data list as a pull-down selection for
the customer and place the font on their server.
—SaaS
(EFI-hosted, or cloud) customers
are limited to selecting
the default fonts listed in the pull-down list.
● Select
Font Size source: Select the source list of font sizes buyers can
choose when ordering this product. For instance, select Font
Standard Sizes.
● Choose
Color Set: Select the source list of colors buyers can choose when
ordering this product.
● Select
options to show: Select which of the following style options buyers
can choose: Bold, Italic,
Underline.
● Choose
Default Color: Select the default color for the field from the
pull-down list.
● Advanced
Users: ADORs DIALs VARIABLES: Advanced Users can use the controls
to view or edit elements. The list of ADORs and DIALS with their Lingo
expression can provide valuable information for an expert user. When this
option is turned on on the “XMPie Configuration” page, these diagnostic
control links are shown on this page of the product builder.
Note:
For more information on ADORs, DIALs, and VARIABLES, consult your XMPie
user documentation.
XMPie VDP Products: Combo Mode
A batch VDP product in MarketDirect StoreFront
can have both common (single) and versioned (batch) data. The term "combo"
(combination) refers to a mix of single and batch data in a VDP job. For
example, a batch of postcards that a realtor distributes can combine common
elements (all the postcards have the realtor's photo and address or a
photo a property for sale; this is the single
mode part) and versioned elements (recipient customers' names and addresses;
this is the batch part). The buyer
experience has the buyer entering the common/single information into form
fields (i.e., the web form) and assigning a data source for the versioned/batch
information.
● ADORS—ADORs
(automatic dynamic object replacement) are fields/variables in the XMPie
template that are populated by the data source (e.g., data from a CSV
file). If the data source as 10 records, the system will make 10 versions
of the document.
● DIALs—DIALs
are a subset of ADORs. These fields are part of the XMPie template, but
they do not get populated in MarketDirect StoreFront
from a data source (such as a CSV file). Instead, buyers enter a value
for these fields in a form. The buyer-entered value is used in each version
of the document. Thus, these values are common to all versions.
Note:
DIAL fields are those that the admin marked as DIAL in uCreate with the
intent that they would be common or have special rules or logic applied.
In MarketDirect StoreFront,
fields are marked either DIAL or CSVFIELD.
● CSVFIELDs—CSVFIELDs are tags on the design template
(such as Name, Title, Nickname, etc.) with their associated formatting
type (text, text file, graphic, visibility, style) that transforms them
into dynamic objects that can be used as elements in the web form.
Note:
These VDP fields were created in uCreate when the CSV file was imported.
● Variables—the
values defined in the design template to accept variable data (as opposed
to the static elements).
Note:
Both ADORs and DIALs are types of variables in the template.
● Data
Lists—a list of values that buyers can select when personalizing
a variable data product. An example of a data list is a list of months
that can be used to standardize elements on XMPie templates as they are
appropriated in web forms. See Data Lists for
more information on managing data lists.
4. After mapping fields,
click Next.
Note:
An exclamation point icon will indicate any errors that occurred during
the mapping process.
On the Progress  Choose Template page:
1. Select
the ticket template on which to base the product from the Ticket
pull-down list.
For
information on how to create and edit ticket templates, see Ticket
Templates.
2. Review
the product job ticket.
3. Click
Finish.
4. On the Progress
 Product Complete page:
● Click Manage
Products to return to the Manage Products page.
● To publish the
product to your storefront, click Publish
It.
● On the Select
Target Category dialog, select the category in which to display
the product to buyers on your Web storefront.
● Click Publish.
● If you have a license
for product-level punchout (to allow buyers to "punch out" to
your site from a procurement site (e.g., Ariba) and want to publish the
product on the procurement site, click Publish
to External Catalog.
Note:
For more information on integrating your site with a third-party procurement
site such as Ariba, Coupa, or Four51, see Site
Settings - PunchOut Integration Tab and Punchout
Buyer Management.
For information on licensing the Punchout Buyers option, contact your EFI
MarketDirect StoreFront
Sales at http://efi.com/about-efi/contact-us/how-to-buy/.
● On the PunchOut
Buyers dialog, select the external (i.e., punchout) site to publish
the product to.
● Click
Publish.
5. Click Done.
6. Go to your buyer
Storefront and review the product as it will appear to buyers. If changes
need to be made, click Manage
on the storefront and edit the product specifications.
To
Update an Existing XMPie Product
Follow the steps below if you need to update an existing XMPie product
(i.e., replace the existing .cpkg file with a new one).
1. Go
to Administration > Products
to open the Manage Products page.
2. Double-click the
product you want to update in the products list.
3. On the Progress
Information page, click next to advance to
the Progress XMPie Web Form page.
4. Click Browse...
and select the replacement .cpkg file.
5. Click Import
to upload the file.
6. Click Save
& Exit.
7. Repeat steps 1-3
above to return to the Progress
XMPie Web Form page.
● A new message will
be displayed: "Some DIALS are not yet used in this form. We recommend
you map them so the user can input the data."

8. Click the down
arrow to open the pull-down list to see the list of added DIALS.
Note:
Some fields (DIALS), depending on their properties, may have two entries
in the pull-down list and both will need to be added. If certain fields
on the template you are replacing do not exist in the new template they
will be highlighted with warning icons and should be removed.
9. Select the fields
(DIALS) you want to add to the Web form one at a time and click Add, or simply click
Add to add all of the new
fields in the .cpkg file.
10. Click Save
& Exit.
Note:
The new elements will now appear on the form when buyers order the product.
XMPie Configuration
The XMPie Variable Documents page provides you with two main tools for
managing XMPie variable documents:
● Manage
Data Lists: Data Lists can be associated with a variable data field.
For example, the variable data list “months” (which contains the 12 months
of the year) can be used in various web forms that use a pull-down list
containing the months of the year. This provide the buyers with a list
of choices via a pull-down list, for instance. Data sources are global
to the system and can be used across variable data documents.
● XMPie
Configuration: You can adjust the XMPie settings. However, changing
these settings may affect the ability of your users to submit variable
products.
To manage data lists
1. Go
to Administration > XMPie Variable
Documents.
2. Click Manage
Data List.
3. To add a new data
list:
a. Click
Add to open the Data
List Values Editor page.
b. In
the List Name field, type a name
for the new data list.
c. In
the List Description field, type
a description of the data list.
d. Click
Save.
e. Check
Sort List Automatically to have
the data list items display in the logical order (alphabetical or numerical)
for the type of data.
f. Click
Add to add a value (e.g., an item
in the data list, such as “January” in a data list of months of the year)
to the data list.
Note:
You can click Import to import
a data list. For information on how to import using the import utility,
see To
import company address books, , data lists, string overrides, or users.
g. Name: Type the name of the value
you are adding to this data list in the name field.
h. Value: The value is a string that
represents the data internally to the system.
Note:
This “value” is what is being sent to the XMPie engine. For instance,
there is a default “Yes/No” --> “True/False” that lets XMPie base its
rules on “True/False” not on “Yes/No” since “Yes/No” can be localized.
i. List Order: Specifies the rank order
of the value in the data list (i.e., which position will it occupy in
a pull-down list).
j. Is No Value: Any data source value
can be marked as Is No Value.
This will require the buyer to make a selection from the available options
(e.g., in a pull-down list) rather than merely accepting a default value
if the field is marked as required. (The value must be either TRUE
or FALSE.)
4. Click Save.
Note:
Unless there is a known problem with a value, it is best to exercise extreme
caution before editing it because many XMPie template design rules might
be using them and will thus be affected.
Note:
To add another value to the data list, click Add
and repeat the steps listed above. To edit a value, select the checkbox
for the data list item, then make changes as needed. Click Save
when finished. To delete a value, select the checkbox for the data list
item, then click Delete.
To configure
XMPie
Warning:
Changing your XMPie configuration settings may affect your customer’s
ability to submit variable product files.
Note:
For more information on setting up XMPie, see the XMPie
Mini-Server Setup Guide.
1. Go
to Administration > XMPie Variable
Documents.
2. Click XMPie
Configuration.
3. Enable
XMPie—Enables MarketDirect StoreFront
to import and order XMPie products.
4. XMPie
Server HTTP Address—The URL of the XMPie server.
5. Status
Report HTTP—The URL to which XMPie calls back to your system web
site to report on the status of XMPie variable data product jobs. Click
Default.
6. Upload
Folder—The folder (shared between the web site server and the XMPie
server) to which uploaded XMPie designed templates (.cpkg) are extracted
after importing.
7. Job
Outputs Folder—The folder (shared between the web site server and
the XMPie server) to which XMPie product files are output.
8. InDesign
Queue—The queue name where the Adobe InDesign files are stored.
Note: You should not have to change this setting.
9. Conversion
Timeout—Time in seconds a job is allowed to convert before it times
out and an error is shown to the buyer.
10. Batch
Chunk Size (Advanced)—When an XMPie batch is generated, the image
thumbnails are generated in segments as images (called “chunks”). This
field sets the number of segments to generate per XMPie job. If the chunk
is set to 20, 20 images are generated per job.
11. Generate
All Images At Once Limit (Advanced)—When a batch preview is generated,
the system generates only a few images to save. If the number of records
is small, however, it is more efficient to generate all images at once.
If the number of records in your batch is less than the number specified
in this field, all images will be generated.
12. Enable
Diagnostic Screens—Enables administrators to view diagnostic screens
(e.g., for ADORs, DIALs, Variables, and Data Lists) from the XMPie settings
screen in the product builder.
13. Enable
Preview of Production PDF—Enables an administrator (or operator)
to see a link to the production PDF in addition to the preview PDF. The
link to the production PDF will show only if the production PDF is different
from the preview PDF. This is helpful for testing.
14. Enable
Automatic Import of .cpkg Files—Allows XMPie campaign package (cpkg)
files to be recognized as packages during file import. If unchecked, the
cpkg will not be imported automatically. You can always import a package
one at a time from the XMPie main screen.
15. Batch
Record Limit (Advanced)—Sets the upper limit for the number of
records in an XMPie product.
16. Batch
Sample File—Default batch file that specifies how many sample records
to display for buyers. (0 = headers
only)
17. Show
Field Types—Reveals the type of field in a form on the XMPie settings
screen.
18. Click Save.
See Also
● Product
Building Overview
● FusionPro
Products
● To
manage products on the Manage Products page
● Creating
Products
● To
create an ad hoc, non-printed, kit, or static product
● To
create a variable data product (XMPie, FusionPro)
● Quick
Reference: Creating a Superwide Format Product
● Product
Management Contents Page