What are ticket templates for? |
Why should you use them? |
Defining all available options (the template) for the products associated with the template. |
To control what options (printing, , finishing) will be available to buyers when ordering a product based on the template. |
A ticket template is the format used as a basis for building a new printed product (e.g., Copies). A ticket template defines the set of all available options to buyers ordering a particular type of product on the storefront. A ticket template is a shorthand way of defining a product by constraining the number of options (service options, , etc.) available to buyers who select the template for a product they are ordering on the storefront.
Note: For instance, if a buyer orders a product based on the ticket template “Basic Copies,” the ticket template would limit the options for the types of and print services offered in that template (and thus no large print/continuous options would be available).
Tip: You can also access the ticket template associated with a product from the Administration > Products page by clicking on the name of the ticket in the Job Ticket column.
To create (or edit) a ticket template
Note: Changes made to the ticket template will be applied imtely to products based on the template on the Buyer side (i.e., without requiring you to go to the Products page and republish the products based on the ticket template).
1. On the Manage Ticket Templates page click the radio button corresponding to the template that most closely resembles the ticket template you want to create.
2. Click Copy.
Note: Copying an existing ticket template then renaming the product and modifying its specs as needed is often more efficient than creating a template from scratch. To create a ticket template from scratch, click Create Ticket on the Manage Ticket Templates page.
3. On the Copy dialog, type a name for the new ticket template in the Save as text box.
4. Click Save & Close.
5. Click the radio button to select the new ticket template you created.
6. Click Edit.
Note: For instructions on defining a new ticket template or editing an existing one, see Define or Edit Ticket Templates.
To view or change the ticket template associated with a product
Note: Changes made to the ticket template will be applied imtely to products based on the template on the Buyer side (i.e., without requiring you to go to the Products page and republish the products based on the ticket template).
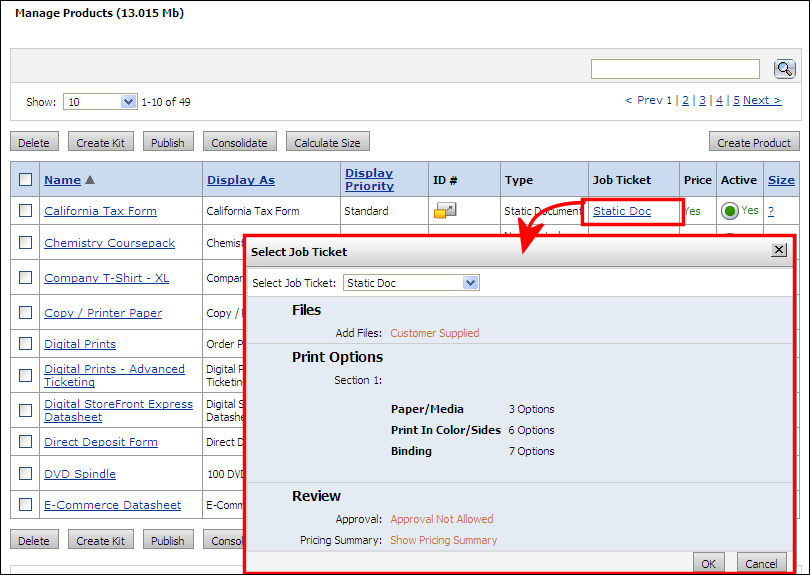
1. Go to Administration > Products to open the Manage Products page.
2. Locate the row of the product whose ticket you want to view or change.
3. Click the link
in the Job Ticket column.
4. From the Select Job Ticket pull-down menu, select the ticket to associate with the product.
5. Click OK.
MarketDirect StoreFront has two levels of intelligent or conditional ticketing designed to constrain buyer options based on various choices they make in the product ordering process.
● Print service and print service category intelligent conditional ticketing: This functionality (available on the Print Services and pages) enables administrators to establish incompatibility rules to prevent buyers from making illogical or ill-fated choices in the ordering process (i.e., by selecting two incompatible print services or a print service that is incompatible with a particular ).
Note: For information on intelligent conditional ticketing at the print service and print service category level, see Intelligent Conditional Ticketing.
● Ticket template level intelligent conditional ticketing: This functionality (available from the Ticket Templates page) provides administrators with additional options for tailoring the ticket (i.e., aside from simply making a print service incompatible with another print service or ) to determine what happens when a buyer selects a particular print service. The administrator can also recommend one or more additional options based on buyer choices or enforce a particular option (e.g., a banner for outdoor use must be printed on vinyl). This level of intelligent ticketing is covered in this section.
Buyers are often unaware of best practices in the print production process. For instance, a buyer ordering a wide format product might specify that a banner intended for long-term outdoor use with a viewing distance of more than 10 feet be printed on an inappropriate that will not weather well. Intelligent ticketing at the ticket level is intended to prevent buyers from making such unsatisfactory choices based on buyers' stated intent (i.e., as expressed through the choices they make). When the buyer selects a print service that you specify on the Intelligent Ticketing dialog (as described below), the system will either enforce or recommend certain choices or alert them to an incompatibility.
You can create print services designed to reveal buyers' intent. These print services will serve as an intent questionnaire that will help you make ticketing decisions on behalf of the buyer to best meet the buyers' needs. For example, for wide format products, you could create the following print services aimed at getting at your buyers' intent, how they intend to use the product:
● Display Environment print service with the following options: Indoor, Outdoor, Mixed-Indoor & Outdoor, etc.
● Viewing Distance print service with the following options: Less than 10 feet, More than 10 feet, etc.
● Length of use print service with the following options: Short-term (less than one month); Long-term (more than one month), etc.
Based on the options buyers select on these print services, you can use intelligent ticketing to constrain their choices so they get the finished product they need. For instance, if a buyer chooses Outdoor, Less then 10 feet, and Long-term options, you might opt to enforce vinyl , 600dpi resolution, and UV inks.
Step 1: Create new print service categories and print services as needed in your intelligent ticketing rules. These are designed to gather information from buyers on their intent for the so that you can make appropriate choices in the production process so that the finished product meets the buyer's expectations.
Note: For information on creating print services, see To add a new print service category and add new print services to it.
Step 2: Define ticket-level intelligent ticketing rules.
1. Go to Administration > Ticket Templates.
2. From the table, select the ticket template to which you want to apply conditional ticketing.
3. Click Manage Intelligent Ticketing.
4. On the Intelligent Ticketing page for the selected ticket template, click Add.
5. On the Intelligent
Ticketing dialog, define the rule using the following settings:
● Action: Specify the type of action to take when the buyer selects a print service that you will specify below.
● Enforce: This option forces application of the specified print service based on the buyer's selection for the print service.
Note: For example, if a buyer selects Outdoor use print service option, the system will force the job to be printed on vinyl (or another weather-resistant media).
● Incompatible: This option excludes one or more options based on the buyer's selection for the print service.
Note: For example, if a buyer selects Close viewing print service option, the system will not give the option of printing at a resolution less than 300dpi.
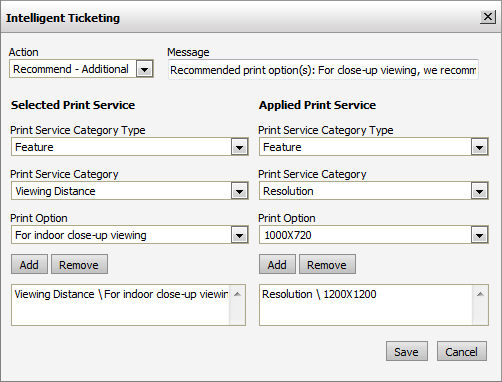
● Recommend - Additional: This option recommends additional print service options to the buyer based on the buyer's selection for the print service.
● Message: Type a message to buyers that explains the recommendation.
Note: For example, if a buyer selects Close viewing print service option, the system will also recommend that the job be printed at either 600dpi or 1,200dpi.
● Recommend - Alternate: This option recommends one or more alternative print service options based on the buyer's selection for the print service.
● Message: Type a message to buyers that explains the recommendation.
Note: For example, if a buyer selects Staples print service option for a document with a clear plastic cover, the system would recommend coil binding as an alternative.
● Selected Print Service
● Print Service Category Type: Select the print service category type (e.g., a Feature or Entry) included in the selected ticket template.
● Print Service Category: Select the print service category included in the selected ticket template.
● Print Option: Select the print option.
● Add: Click to add the rule to the selected print service list.
● Remove: Click to remove the rule from the selected print service list.
● Applied Print Service
● Print Service Category Type: Select the print service category type (e.g., a Feature or Entry) included in the selected ticket template.
● Print Service Category: Select the print service category included in the selected ticket template.
● Print Option: Select the print option.
● Add: Click to add the rule to the applied print service list.
Note:
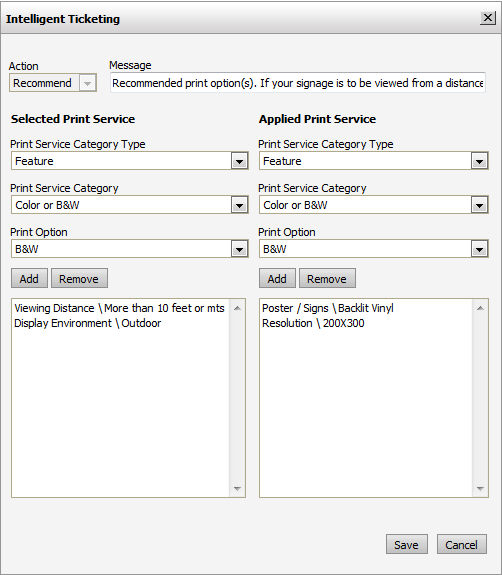
You can add multiple selected and applied services to establish more sophisticated
rules. The intelligent ticketing rule below, for instance, will recommend
that buyers who intend for their signage product to be viewed outdoors
and at a distance of more than 10 feet have their image printed on vinyl
at a medium resolution.
● Remove: Click to remove the rule selected in the applied print service list.
● Click Save.
Note:
There are a few exceptions to enforced ticketing:
●
If you establish an enforce rule, if a banner is larger than 24"
tall 36" wide, grommets must be
selected. The buyer, however, must choose what kind of grommets to use.
The admin cannot enforce the count, style, or position of grommets
●
If you establish an enforce rule print on cover, be aware that you cannot
enforce down to the level (i.e., this print service requires buyer
input).
1. Go to Administration > Ticket Templates.
2. From the table, select the ticket template to which you want to apply conditional ticketing.
3. Click Manage Intelligent Ticketing.
4. On the Intelligent Ticketing page for the selected ticket template, select the row of the column that contains the rule you want to edit.
5. Click Edit.
6. On the Intelligent Ticketing dialog, edit the rule as needed.
7. Click Save.
● Define or Edit Ticket Templates
● Intelligent Conditional Ticketing at the Print Service Level
● To view or change the ticket template associated with a product