What are print services for? |
Why should you use them? |
Defining the pre-printing, printing, and post-printing services available to buyers when ordering print products. |
To give buyers the option of selecting from all of the available print and finishing options you are capable of providing. |
Print Services are the features and services (pre-printing, printing, post-printing) that you make available to customers when ordering products. Print services represent the variety of printing, finishing, and output options a Print Shop is capable of producing given its equipment (i.e., the Print Shop’s capabilities). MarketDirect StoreFront ships with a pre-defined set of print services designed to cover the capabilities of many Print Shops and in-plants.
Note: Print services are non- product options such as stapling, binding, and laminating, and in some cases they are mapped into EFI products such as the MicroPress and Fiery devices so they can be produced automatically.
Print services are of two main types:
● Standard—These print services are pre-installed in MarketDirect StoreFront, and most are automatically mapped into job tickets that can be read by certain print devices (e.g., Fiery, MicroPress, Balance).
● Custom—You can add custom print services to a Print Shop’s job ticket to reflect additional services available to customers. These print services will require manual pre- or postprint intervention.
Note: In some cases two names will be used for essentially the same service (e.g., trimming and cutting). This is to maintain legacy support for those who have been using older versions.
To view print services/capabilities
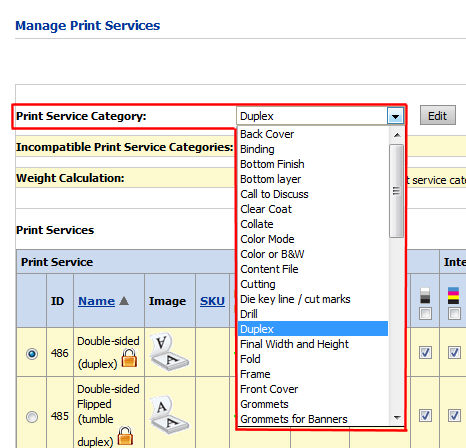
1. On the Manage Print
Services page, from the Print Service
Category pull-down list, select a category.
Note:
Print services are organized
into categories, such as Binding, Cutting, and Stapling. Each category
has individual options. For example, the print service category “Stapling”
includes print services such as Upper Left (slant), Bottom Left (slant),
etc.
The Manage Print Services page lists both the print service category ID
(upper right) and the print services IDs corresponding to each print service
(2nd column in the table). These can be used, for instance, in an MIS
database to map services between MarketDirect StoreFront
and the MIS.
In addition to the standard print services built in to MarketDirect StoreFront, you can define any number of custom print services to match the capabilities of available output and finishing devices.
Note: After enabling pre-installed standard print services that correspond to the equipment available at a Print Shop, review the list of categories and print services you created for each Print Shop. You can add a custom print service for service options you provide that is not already included in the standard set of print services defined in MarketDirect StoreFront. Note, however, that not all print service categories allow adding new print services.
The print services you define will be available for creating ticket templates and building products in your Print Shops.
Here are a few examples of custom print services:
● You can add a print service for a special type of binding that is not a pre-installed standard print service.
● You can create a new print service category and then add print services to it.
● One Print Shop may specialize in wide-format printing and thus need specific product ordering options to produce the output. Another Print Shop may specialize in post-printing print services, such as padding and lamination, and therefore would need those options available on the ticket.
Note: Custom print services are available for building products, but they do not map automatically to finishing options in EFI devices such as the MicroPress, Balance, and Fiery and require manual setup to complete jobs that use them. For example, if you add a special type of binding or lamination, the print service must be completed manually when the order is produced. When adding a custom print service, you can indicate if the print service requires manual pre-print and/or post-print action. Pre-print indicates that manual intervention is required before printing, and post-print that it is required after printing. Pre-and Post-print are used only by the MicroPress.
If your site uses automated pricing, custom print services must have pricing assigned or any products that use them will require manual price quoting, which may disrupt your workflow. For more information on pricing, see Edit Price Sheets. This will be the case even if the print service is a default option.
Note: Items with no price must be priced at 0.00 or they will be quote items and the order will be a manual quote workflow. This applies to the setup fee as well.
Custom print services must be manually produced. They are not mapped for automatic production by the EFI MicroPress, Balance, or Fiery.
Note: On the EFI MicroPress, ESC, MIS, Fiery, Balance, FJC, custom jobs are printed out as special instructions on the job separator page.
Warning: Administrators can define print services for “Back Cover” and “Front Cover,” but this is intended only for non-printed covers. So adding a new “Back Cover” or “Front Cover” print service underneath the standard print options (“Print on Outside” or “Print on Outside and Inside”) will not allow changes to the printing. In fact, such options will be treated as a non-print options and will not refer to or printing.
To add a new print service category & add new print services to it
1. On the Manage Print Services page click Create New Print Service Category.
2. On the Create
New Print Service Category dialog:
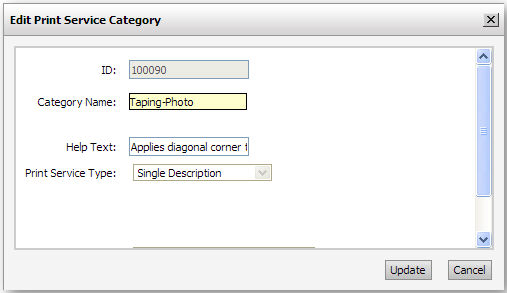
a. Category Name: Enter a name for the new print service category.
b. Help Text: Enter descriptive text
for the print service category that will be shown to buyers on the storefront
(for products with the Visual Product Builder UI, formerly Flex UI, enabled)
when they hover over the print service category when ordering a product
that offers the print service. Note that you can add/edit the help text
only for print service categories that you add (not to those the come
pre-loaded in MarketDirect StoreFront).

c. Print Service Type: Select whether the print service category description should be Single Description, Double Description, or Non-printed File Upload format.
Note: The Non-printed File Upload print service category: This print service type will allow buyers to upload file attachments for the defined print service category (i.e., at the ticket template level). Buyers can thus upload such files as a mailing list, source artwork, instruction notes, etc. The file attachment can be in any format except EXE. Note that the print service should be priced in the appropriate price list. The file attachment option will be displayed in the MarketDirect StoreFront job ticket if the option is selected in the ticket template. The file attachment can also be made by operators during order production.
Note: An example of a double description type of print service: Coil binding (as the primary description, or concept, of the print service category) with the secondary description, or concept, Color with black, blue, red, white, yellow, etc. each being one of the secondary descriptions of the print service). The double concept helps you manage combined options (e.g., a single binding type with multiple color choices) more efficiently.
i. If you select Double Description, type the primary description (e.g., “Plastikoil binding”) and the secondary description (e.g., “Color”) in the text entry fields.
d. Select the Billing Unit to use in pricing the component. The billing unit is independent of the range unit (which is used for establishing price breakpoints) and specifies the unit of the component that is priced. For example, you could choose to price a component by weight, area (size), copy, etc.
Note: Print services can also be priced in the pricing administration area. For more information on pricing, see Pricing Configuration.
e. Select the Range Unit to use in pricing the component. The range unit enables you to set price breakpoints at which pricing for the component will increase or decrease (as discussed below). If you set the Range Unit as Copy, you will be able to set your pricing so that, for example, the first 50 sheets (1-50) are priced at .01 each and the second 50 (51-100) are priced at .005 each.
f. Click Add.
3. If you want to specify a weight for print services in the print service category (other than , e.g., slip sheets, binding, etc.), check the Incorporate weight for this print service category check box in the Weight Calculation section.
● In the Computed as field, select whether to apply the weight per copy or per job.
● In the Unit field, select the weight unit to assign the weight to.
1. On the Manage Print Services page click Create New Print Service.
Note: For Non-printed File Upload categories, only one option is permitted and the interface is streamlined.
Tip: When you create a new category, add a default print service with wording such as “None” or “No” and do not select the Performs Feature checkbox. For example, if you add a new category called “Stacking,” create a print service called “No Stacking.” This allows you to select “No Stacking” as the default for a job; otherwise, some type of stacking would be selected for each ticket.
2. On the Create New... dialog:
a. Type the name of the print service in the primary description text entry field.
● If you selected a Double Description type for the new product:
(1) Select Add New from the pull-down list in the second description field.
(2) Type the name of the new option in the text entry field (i.e., the drop-down list becomes a text entry field after you select Add New).
b. Icon Image—you can upload an image icon to represent the print service to buyers on the storefront when they are choosing print services.
● None: Click this radio button if you want no print service image to appear on the storefront.
● Upload Custom Icon: Click this radio button to select an image to display.
Note: Supported image formats are: bmp, gif, jpeg, jpg, pjpeg, png. The recommended size for icon images is 80 pixels x 50 pixels.
● Click Browse... and on the Choose File dialog navigate to the image file you want to display, select it, then click Open.
● Click Upload.
c. SKU—Enter the SKU.
Note: SKU (stock keeping unit) is a unique code used to identify the print service.
d. Set the action status for the new print services using the check boxes:
Note: Defaults are set by the ticket template. If you do not override the default set on the ticket template, use the settings below to set the default. It is recommended to always have an “off” or “None” option for each category and to set the Performs Feature option off for it.
● Performs Feature—Identifies the default option settings for the service.
(1) To identify a print service as the default, leave the Performs Feature box unchecked.
(2) To identify a print service as a non-default option, check the Performs Feature box.
Note: You must check the Performs Feature box for the service to be included in the pricing information that is sent to the MIS or External System Connector (ESC).
● Requires Preprint Action—Check this box if the print service requires preprint action on the part of an operator at the Print Shop (such as placing custom paper in the printer). On an EFI MicroPress device, these may place a job on hold until an operator performs the action manually.
● Requires Postprint Action—Check this box if the print service requires postprint action on the part of an operator at the Print Shop (such as glue-binding a document). On an EFI MicroPress device, these appear as special instructions on the job separator page.
● Intelligent Ticketing Relationship—This conditional ticketing feature lets you establish incompatibility rules so that when buyers select certain print services when ordering products they cannot also select incompatible print services, , and job thicknesses that the selected print service does not support. These rules prevent buyers from being able to make incompatible selections (such as duplex printing on transparent ) during the product ticketing process. For information on setting up intelligent ticketing, see Intelligent (Conditional) Ticketing.
e. Click Add.
3. On the Manage Print Services page, set pricing for the print service on any or all of the available price sheets.
a. Range Unit: Set the range break points for each price point (e.g., 1 - 2 would represent the weight in the unit system in use on the site; see Unit System for more information). Use the button to add range break point.
Note: For more information on pricing, see Pricing.
b. Regular Price: Enter the standard price for that range (e.g., 1 - 2 pounds might have a regular price of 10.00).
c. Setup Price: Enter the setup price for the range; the setup price will reflect your material and handling costs.
4. Click Save.
To remove a print service category
● On the Manage Print Services page click Remove in the Print Service Category field.
Note: Once a custom print service is used to produce a job, the print service cannot be deleted.
● On the Manage Print Services page select the print service in the Print Services table then click Remove.
Note: Intelligent (conditional) ticketing functionality is also available on the Catalog page. There you can establish incompatibility rules between specified and print services. For more information, see Intelligent (Conditional) Ticketing.
Intelligent (or conditional) ticketing was designed to simplify the ticketing process for buyers by preventing them from making impossible or illogical options when ordering products. Intelligent ticketing lets you specify incompatibility rules at either the individual print service level or at the print service category level to ensure that buyers are presented with only relevant options based on certain decisions they have made in defining a product. Buyers are alerted that a particular option is not available based on a choice they have made. You can define "rules" that make an either individual print service(s) or an entire print service category incompatible with other print services, , or job thicknesses.
Note:
For instance, with intelligent ticketing you can prevent buyers from ordering
double-sided transparencies or having to see stapling options once a binding
option is selected. Other common use cases for intelligent ticketing include:
(1) Make two print service categories
incompatible: Make stapling incompatible with binding (because
stapled documents are not bound and bound documents are not stapled).
(2) Make a print service category (or
print service) incompatible with : Remove the choice of Astrobrite
(color) stock when a buyer opts to print in color by specifying Astrobrite
as incompatible with color printing.
(3) Make a print service incompatible
with job thickness: Make a 12mm coil binding print service incompatible
with job thicknesses that exceed 1/2" (~80 pages of 20# paper). Another
use case would be to make a machine stapling print service incompatible
with job thicknesses that exceed the machine stapler manufacturer's recommended
thickness.
Note: Please note that intelligent (conditional) ticketing rules are not supported presently with XMPie and FusionPro VDP products that use the HTML ticket.
1. On
the Manage Print Services page, select the print service category for
which you want to specify intelligent ticketing.
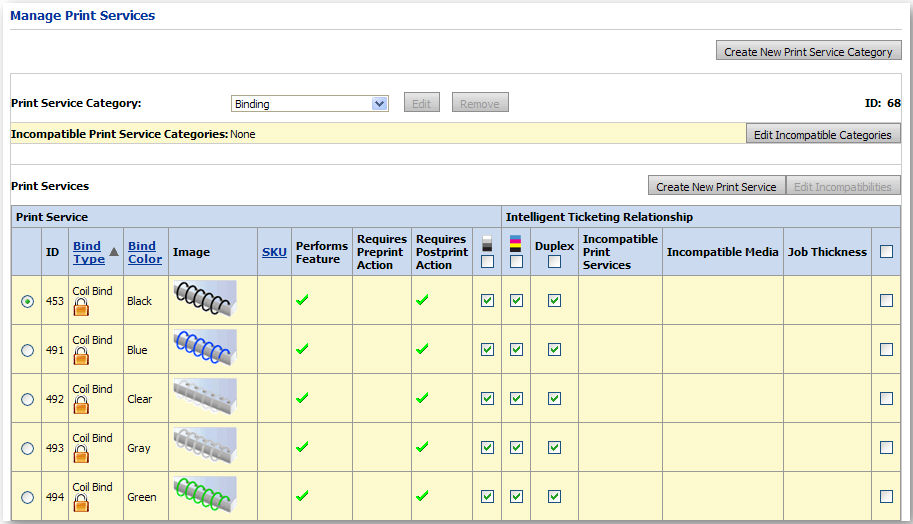
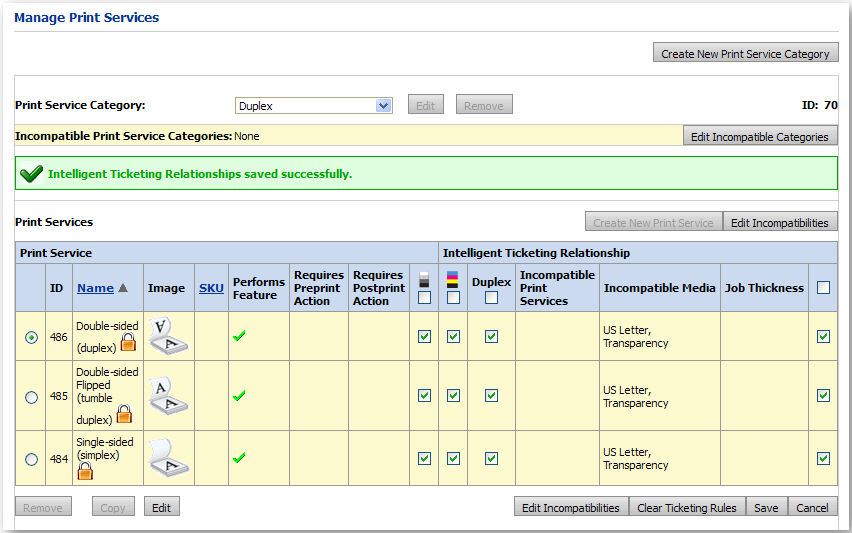
Note: Three print services—Black and White printing, Color Mode printing, and Duplex printing—are included on the Print Service table for convenience. By default all are checked (meaning they are compatible with the print service). Unchecking these print services will make a rule specifying them as incompatible with the print service.
2. To make an entire print service category incompatible with the selected category (i.e., if you want to disable all binding options when a buyer selects any stapling print service, and vice versa):
a. Click Edit Incompatible Categories.
b. On
the Edit Incompatibilities dialog, select the category from the All Print Service Categories list
and then click  to add the category to the Incompatible
Print Service Categories list.
to add the category to the Incompatible
Print Service Categories list.
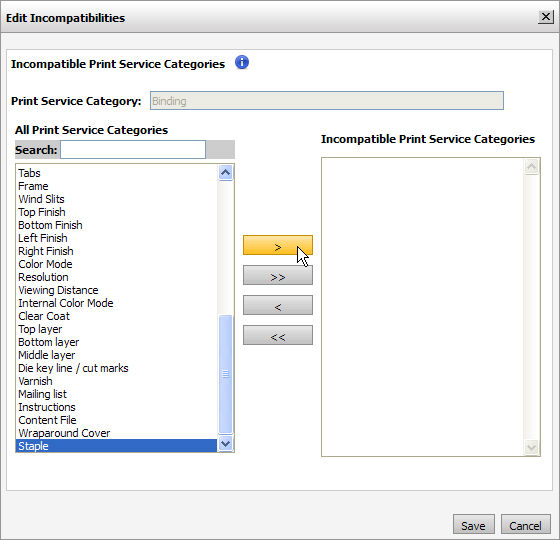
c. Click Save.
Note:
The Incompatible Print Service Categories
field on the Manage Print Services page will show the category(ies) that
you specified as incompatible with the selected category.

3. To make one or more print service(s) within the print service category incompatible with the selected print service category, do the following:
a. To select an individual print service(s) in the category, check the box in the far right column on the row that contains the print service.
b. To select all print services in the category, check the box in the far right column on the title row.
Note: Selecting one or more print services will enable the Edit Incompatibilities button.
c. Click Edit Incompatibilities.
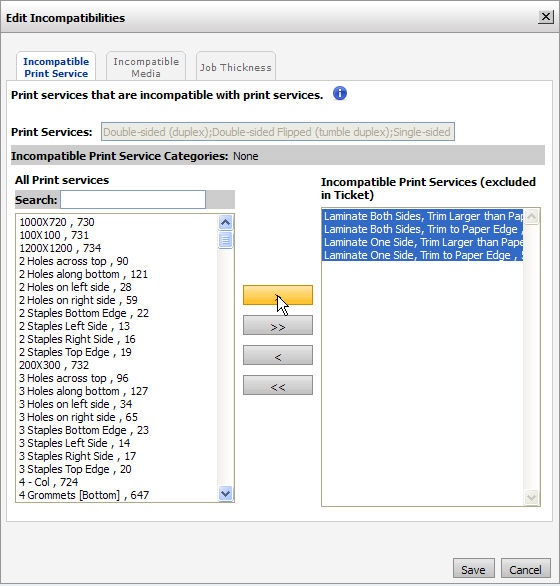
d. On the Edit Incompatibilities window, select the appropriate tab for what you want to make incompatible with the print service:
Note: You can set a print service to be incompatible with print services, , and job thickness.
● Incompatible
Print Service: Select the print service(s) from the All
Print Services list and then click to add to
the Incompatible Print Services (excluded
in Ticket) list.
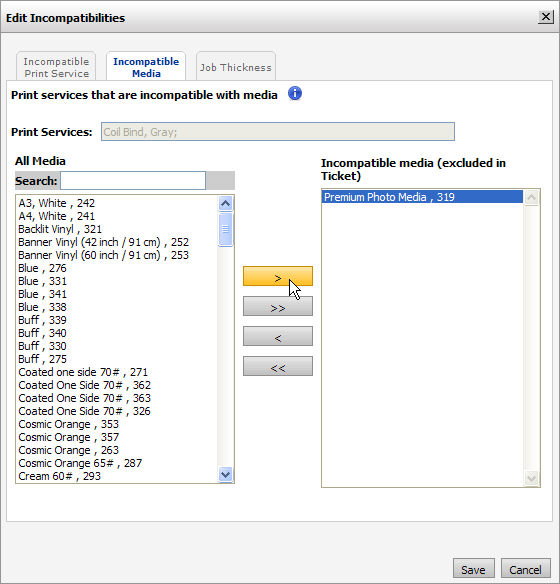
● Incompatible
: Select the from the All list and then click to
add to the Incompatible (excluded in Ticket) list.
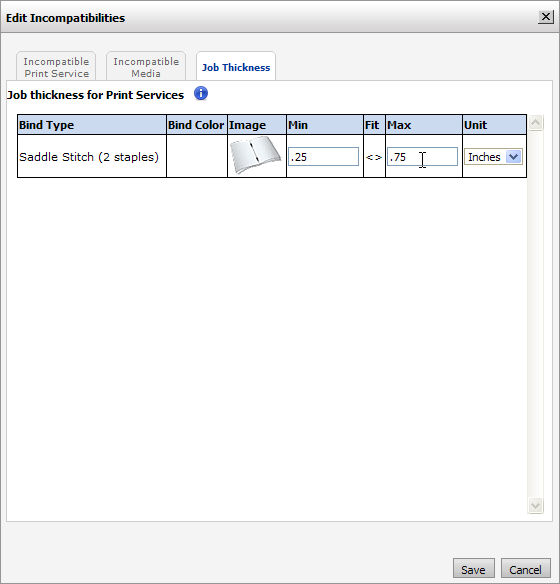
● Job
Thickness: Select a unit from the pull-down menu and then set minimum
and maximum thicknesses.
e. Click Save.
Note:
An "Intelligent Ticketing Relationships saved successfully"
message will be displayed. Also, the intelligent ticketing relationship
rules you have specified will be shown in the Intelligent Ticketing Relationship
columns on the Print Service table.
4. Click Save.
To remove an intelligent ticketing relationship incompatibility rule
1. On the Manage Print Services page, select the Print Service Category with rules you want to remove.
2. To remove an incompatible print service category rule:
a. Click Edit Incompatible Categories.
b. Select
the category(ies) in the Incompatible
Print Service Categories list and click  to remove
it (i.e., return it to the All Print
Service Categories list).
to remove
it (i.e., return it to the All Print
Service Categories list).
c. Click Save.
3. To remove an incompatible print service rule:
a. Select the print service(s) whose rules you want to remove.
b. To
remove all rules for the selected print service(s), click Clear
Ticketing Rules.
OR
To remove only some of the rules for the selected print service(s), click
Edit Incompatibilities to open
the Edit Incompatibilities dialog:
● Select only the print service, , or job thickness incompatibility rules you want to remove.
● After removing them, click Save.
4. Click Save.