What are CSRs for? |
Why should you use them? |
Designating certain members of your organization (e.g., customer service personnel) to login on behalf of other users (i.e., buyers). The CSR user identity does not have administrative rights and does not have access to the user passwords. |
To enable members of your organization to “impersonate” a user, i.e., place orders on behalf of customers (buyers) associated with a company in the system. This order-by-proxy function was designed to enable CSRs to login to the system as the customer (i.e., assume the customers identity). The CSR can do this (1) to provide assistance if the customer has encountered a problem placing an order or (2) to provide value-added customer service for selected customers (even if the customer is not online). |
The Customer Service Representative (CSR) management tools enable you to designate CSRs to place orders on behalf of customers (buyers) associated with a company in the system. This order-by-proxy function was designed to enable CSRs to login to the system as the customer (i.e., assume the customers identity). The CSR can do this (1) to provide assistance if the customer has encountered a problem placing an order or (2) to provide value-added customer service for selected customers (even if the customer is not online). The CSR identity does not, however, have administrative rights in the system and the CSR does not have access to the passwords of the customers he or she impersonates.
The system has a pre-configured CSR Group, which cannot be deleted. You can assign users to the CSR group following the steps in the section To manage a group’s page access.
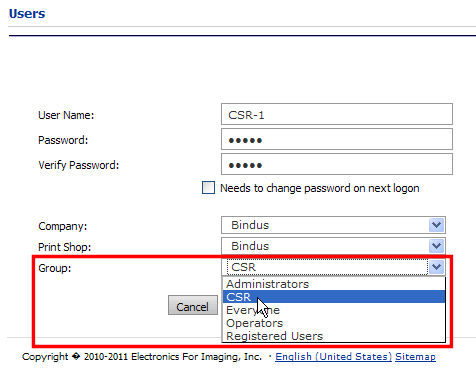
1. Go to Administration > Users.
2. On the Users page, click Add User.
3. Create the user
following the usual procedure described in To
add a user, making sure to select CSR
from the Group pull-down menu
as shown below.
1. Go to Administration > Users.
2. On the Page Access page, grant members of the CSR group access to the following (recommended) pages:
a. Storefront
b. Reports
c. Select User
d. Print Services (necessary for placing a print services order)
e. Order/Quote Confirmation (necessary to complete the order checkout process without errors)
f. Saved Jobs
g. Select User (enables the CSR to select a buyer to impersonate)
Warning: It is strongly recommended that a CSR belong only to the CSR group. For example, if a CSR is added to the Administrator group, she or he will have more privileges than intended (e.g., the ability to add buyers to her or his own list of users and then impersonate any user).
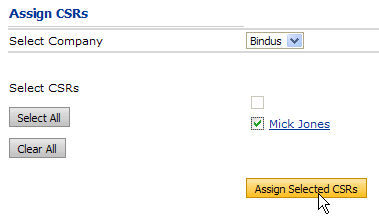
1. Go to Administration > Assign CSRs.
2. On the Assign CSRs page, in the Select Company pull-down list, select the company to assign the CSR rights to.
3. In the Select CSRs section, check the box corresponding to the CSR or CSRs you want to grant proxy buyer rights to.
Note: All CSR user names are hyperlinks to the Assigned Companies for this CSR page. This page displays the companies to which the selected CSR is assigned.
4. Click Select All to select all the CSRs displayed. Click Clear All to deselect all CSRs displayed.
5. Click Assign
Selected CSRs to complete the assignment.
1. Login to the system with an account with CSR user credentials.
2. Click Log
in as buyer on the system home page just below the banner in the
top right-hand portion of the screen.

3. On the Select User page, select the company with which the buyer to login as is associated with from the Select Company pull-down list. A list of available buyers to login as will be shown.
4. Click the name of the buyer to login as.
Note: No password is needed to login as a buyer. The site home page recognizes that the CSR is logged in as the buyer.
5. The message at
the top of the screen (below the navigation menu under the banner) will
read “Logged In As [Name of User]” and the company will be display after
the name in parentheses.

6. Click Logout Buyer when finished.
1. Go to Administration > Transaction Log.
2. Click the CSR column heading (which is a link) to sort the transactions in the log by CSR activity.
Note: CSR activity (such as order placement) will be indicated by the CSR number in the CSR column. (Other CSR activity will be noted in the Description column but not with the CSR number; e.g., “Impersonation Starts: [CSR user name] Starts Impersonating [buyer login]”). If a CSR has placed an order on behalf of a buyer, double-click the number in the CSR column to open the CSR User Information page, which provides complete information about the CSR.
● Overview of User and Access Management
● Overview of Group Management
● To manage a group's page access
● To control page access from the Page Access page
● To manage a group's access to companies and Print Shops