Simply put, a user is any person who accesses a MarketDirect StoreFront site, either on the Buyer side (for instance, a buyer who visits a MarketDirect StoreFront-powered storefront and orders a product) or on the Administration side (for instance, an administrator or operator who manages a site and processes orders). Administrators can import or create user profiles and assign access rights (i.e., what pages the user can access), associate users with Print Shops and companies, add users to various user groups (whose members share the same access rights), enforce password policies, designate customer service representative (CSR) users who can log on as a buyer to assist buyers in placing orders, etc.
User profiles contain information about the user and the user’s status. Most of your users will be customers who self-register when they login to the site. Users who self-register are by default placed in the Registered Users group. When a user registers as a member of a company, s/he will be given the user group rights, cost center, product access, etc., for that specific company.
Note: When setting up your site, create user profiles for personnel in your organization who process orders and produce jobs for the various Print Shops in your site. You will assign users to a specific Print Shop, group, and company (optional) so that when they log into the system, they user will view information only for that Print Shop/group/company. For example, if an operator is assigned to a Print Shop named Davis West, the operator will see only the Order View and Operator View for the Davis West Print Shop and any other pages to which s/he is assigned access. Likewise, a buyer user assigned to a Print Shop will be able to view tickets only for the assigned Print Shop and submit work through the Print Shop to which he is assigned.
The following sections cover how to add new users to the system and change the profile (email, password, company, Print Shop, and group) for existing users.
What are user profiles for? |
Why should you use them? |
User profiles define
a user's affiliation (e.g., what Print Shop, Company, and Group
the user belongs to) and contains information such as address,
phone number, and email address). |
Administrators can create user profiles for an organization’s personnel (such as operators and customer service representatives) and buyers who order products from a MarketDirect StoreFront site (company or Print Shop). This enables administrators to assign users to a specific Print Shop, group, and company in order to manage their access to and usage of the site. |
Note: To import users into the system, see Importing.
1. Go to Administration > Users.
2. On the Users page, click Add User.
3. Follow the instructions in the topic Add a User.
1. On the Users page, select the user/s you want to delete (via checkbox).
2. Click Delete.
3. To confirm your decision, click OK on Alert box.
1. On the Users page, to search for a user, select a filter from the View pull-down menu, then type a search term in the text box and click Find.
Note: For information on managing password policies (i.e., to enforce strong passwords), see Managing Password Policies.
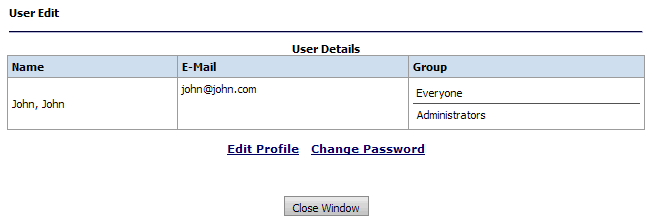
2. Click the user’s name in the Name column of the user table to open the User Edit page in a separate browser window.
3. Click Change
Password to enter and verify a new password.
Warning: Remember that it is critical for security reasons that you change the default password Administrator to a password that is secure. You might also want to edit your Administrator profile to include a first and last name so that the system can address you by name.
4. Check the box Needs to change password on next logon to require the user to change the password on next logon.
5. Click Save Password.
6. Click Close Window to return to the Users page.
1. On the Users page, to search for a user, select a filter from the View pull-down menu, then type a search term in the text box and click Find.
2. Click Edit Profile to update the user’s profile on the User Profile page (following the steps listed in the section Managing Users).
3. Click Edit Profile and then follow the instructions in the topic Add a User.
4. Click Save Profile.
1. On the Users page, to search for a user, select a filter from the View pull-down menu, then type a search term in the text box and click Find.
2. Click Edit in the right-hand column of any user name in the table to change the following attributes:
a. Company: select the name of the company the user is associated with, which is used, for instance, for reports or select None if the user is not associated with a company.
b. Print Shop: the Print Shop the user is associated with.
c. Active/Status checkbox: the status of the user’s account (active or inactive). When the status is inactive, a user cannot login to the system. However, the status of any existing orders the user placed is not affected.
d. Unlock: Click Unlock to unlock an account that has been locked because the user exceeded the threshold for number of attempts to login to his/her account with an incorrect password (as specified on the Account Lockout Threshold field; for more information see Managing Password Policies).
e. Spending Accounts: Click the spending accounts icon to create or edit the user’s spending account. For more information see To add or change a user spending account.
3. Click Update.
Note: User record information is never deleted from the system. The history of the user and user account is retained in the database and can be retrieved for reporting purposes.
Note: For information on how to import users or a company address book from a database (e.g., a comma-delimited list), see To export company address books, data lists, , string overrides, or users.
1. On
the Users page, click the spending
account icon ![]() to open the Spending Accounts
page where you can add or remove the user to or from a spending account
and manage the spending account.
to open the Spending Accounts
page where you can add or remove the user to or from a spending account
and manage the spending account.
Note: For information on managing spending accounts, see Spending Accounts.
2. Click Save.
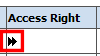
1. On
the Users page, click the icon
![]() in the Access Right
column beside any user name to view the parts of the system to which the
user has access.
in the Access Right
column beside any user name to view the parts of the system to which the
user has access.
Note:
The icon in the Page Access Allowed column
shows whether the administrator has granted the user access to the page
![]() or not
or not ![]() .
.
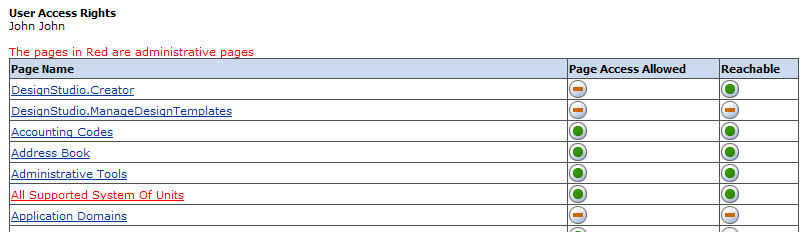
2. On the User
Access Rights page, the icon in the Reachable
column shows whether page access has been granted and no special conditions,
such as licensing, prevent the page from being reached.

3. Click the page name link to see the page in question in view only mode (no links or buttons are active).
4. Click Back to return to the Users page.
● Overview of User and Access Management
● Overview of Group Management
● To manage a group's page access
● To control page access from the Page Access page
● To manage a group's access to companies and Print Shops