What are Accounting Codes for? |
Why should you use them? |
Accounting codes are used for accounting and reporting purposes (i.e., billing tracking and order details). Through accounting codes you can collect additional data about each order during checkout using completely customizable text fields. |
To enable your customers to gather data to track their own customers for billing and informational purposes (i.e., to get specific details about each order). |
Accounting codes are codes used for accounting purposes and for tracking customer company-related information. Enabling accounting codes allows customers to track billing with their clients and gather additional information for each order during checkout. They can be used to generate reports in the system, such as total order amount. This information can be used to prepare invoices and billing statements for your business.
Note: Accounting codes expand the concept of cost centers. They are a means by which you can collect additional data about each order during checkout using completely customizable text fields.
Customer information entered during the order and checkout process is associated with the order for order tracking or for billing purposes. Accounting code administration consists of two parts: company-wide settings and field-level settings.
Accounting codes must be enabled for each company before they appear in the interface. (They must also be accepted as a valid payment option in the location.)
1. Go to Administration > Companies.
2. On the Companies page, click the name of the company with the cost center you want to add (or edit) to open the Manage Company page.
3. In the Order
Accounting section, click Accounting
Codes: View/Manage to open the Accounting
Codes - page.
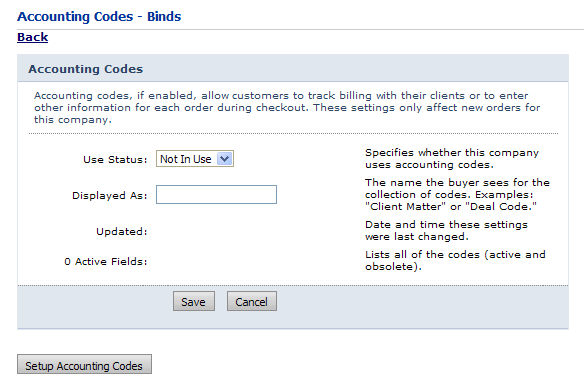
4. From the Use Status pull-down list, select Enabled.
Note: Enabling specifies that the company uses accounting codes.
5. In the Displayed As text field, type text for the accounting codes that will be displayed to buyers during the checkout process on the storefront (e.g., Client Matter or Deal Code).
Note: The read-only Updated field indicates the date and time the settings were last changed and the read-only Active Fields lists all accounting active and obsolete.
6. Click Save.
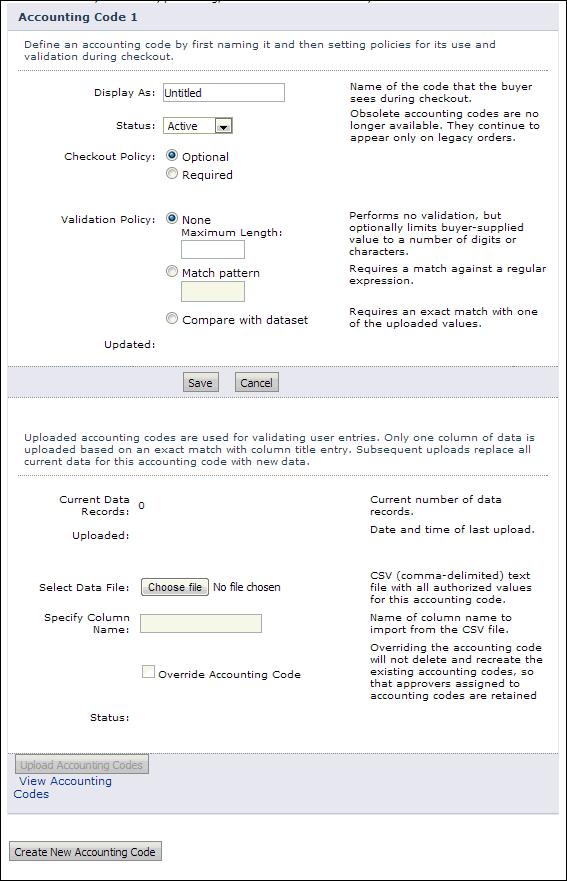
Any number of accounting codes can be created. Each has properties that control the presentation and type of text data that the buyer can enter during checkout.
1. On the Companies page, click Setup Accounting Codes to open the page that lists all of the fields for that company. Each field is shown in a box labeled Accounting Code 1, Accounting Code 2, etc.
2. To create new fields, click Create New Accounting Code.
Note: The read-only Updated field indicates the date and time the settings were last changed and the read-only Active Fields lists all accounting active and obsolete.
3. Set the options for each of the fields to suit the needs of your organization.
4. Define an accounting code by first naming it and then setting policies for its use and validation during checkout.
This setting... |
Stands for... |
Display As: |
Name shown to buyers on the storefront during checkout. |
Status: |
Obsolete or Active. Only Active fields are displayed for new orders. Obsolete ones are no longer requested for checkout and cannot be modified. These fields are retained in the system for reporting and order history.. |
Checkout Policy: |
Optional or Required. Specifies whether this is a required field for buyer. |
Validation Policy: |
Specifies the type of validation that should be performed. Choices are None, Match Pattern (which requests a regular expression) and Compare with dataset (comparison with a set of values that are imported from a CSV file). |
5. You can upload valid accounting codes to use for validating the accounting codes buyers enter:
a. In the Select Data File field click Browse... and select a CSV (comma-separated-value) formatted file containing all authorized values for the present accounting code and then click Open.
b. In the Specify Column Name field enter the exact name of the column in the CSV file you are uploading that contains the authorized values.
Note: The name of the column you enter in this field must be an exact match with the name of the column in the CSV file that contains the authorized accounting code values.
6. Click Upload Accounting Codes.
● Match
Pattern:
Here is an example that uses the pattern method to validate the buyer-supplied
data. In this case, you can use a Microsoft .NET regular expression, which
requires a series of digits starting with the digit 5. Note that the upload
area of the page will be present but disabled if this validation policy
is used. Example: 5\d
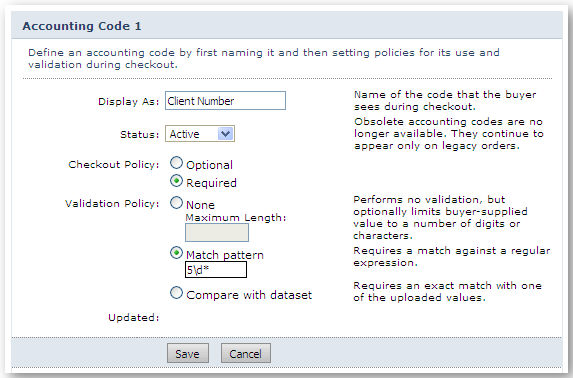
Note: For more information on regular expressions, see Regular Expressions.
● Compare
with Dataset:
Here is an example of an accounting
code that matches input against a data set. Here, we have uploaded a CSV
file containing four records. The CSV file must contain column names as
its first line. The column name entered in the Display As field must be one of the column names
for the file to import successfully. Also note that the upload operation
can be performed at any time, but it always replaces the existing data.
This is to keep the interface simple and to reduce the risk of errors.
(It is expected that, almost all of the time, the values are being exported
in their entirety from another database or spreadsheet application.)
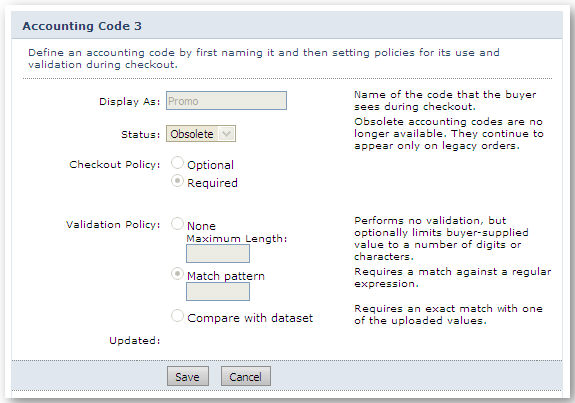
● Obsolete:
Here is an example of an obsolete field.
Notice that it has no upload area or Save or
Cancel button.