A storefront is your MarketDirect StoreFront Web site where visitors land when they visit the Web address to your site (e.g., from a Web search engine or advertising piece). Just as your business might have a “brick-and-mortar” location (physical storefront) where customers come to browse through and order products and services, your business has a digital (or online) storefront that is your Web presence, your virtual place of business that serves many important functions, such as:
● The storefront is the medium for providing site visitors with marketing and information communication about your product and service offerings: What does your company do? What products and services do you offer? Just as a physical storefront delivers sales and marketing pitches with signs and banners advertising special offers), so your online storefront can have promotional banners to alert buyers to featured products and special offers.
● The storefront contains your product catalog that buyers can browse through and order the products and services you offer: The storefront is a place where buyers can shop and order products with a virtual shopping cart and e-commerce payment options.
● The storefront is a place where buyers can manage their purchases (e.g., print and product orders) and place reorders conveniently, which helps ensure repeat business and customer loyalty.
SmartStores are the platform for building product catalogs and storefronts that use HTML5, AJAX, and other responsive technologies that enable the storefront to scale smoothly from desktop to mobile devices.
● SmartStores are buyer interfaces that
site administrators and Web management personnel can tweak using the SmartStore
Builder, which is a 6-step wizard to design, edit, and deploy your storefront.
The SmartStore Builder tools let administrators and site designers customize
the layout of page elements and edit the site’s HTML and CSS (cascading
style sheets). SmartStores offer greater flexibility for defining the
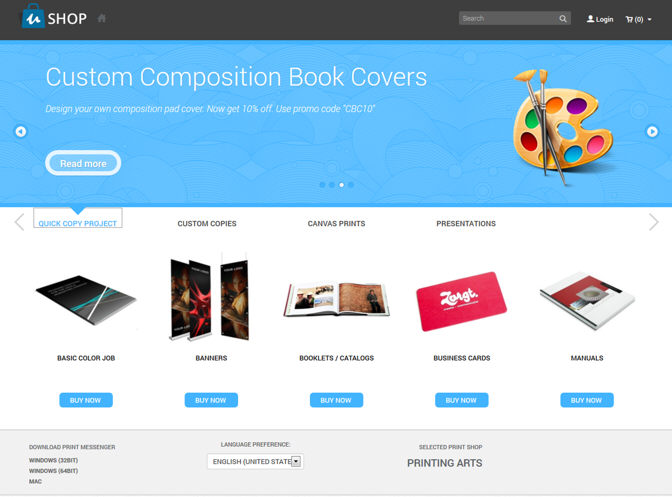
design and layout of storefronts. The image below shows a sample SmartStore:
What is Storefront Customization? |
When should you use it? |
Customizing your storefronts will help you tailor the branding of a storefront to a particular audience (i.e., associated with a company). |
To customize a storefront with a specific branding for visitor audiences associated with a company. |
Note: The MarketDirect StoreFront Essential version of MarketDirect StoreFront is limited to one (1) storefront.
MarketDirect StoreFront ships with a variety of SmartStore storefront themes. A storefront is the buyer interface where all interactions between site visitors (i.e., browser, buyers) and the site occur. The banner, logo, theme (color scheme), and layout (arrangement of columns and how products are displayed) of each storefront can be customized to match the corporate or organizational identity of a company.
Note: In MarketDirect StoreFront it is possible to share branding across Companies. Storefronts are independent of companies; thus, a single branded storefront can be applied to more than one company.
Note:
Any changes you make on the StoreFront Management page are active imtely
(in real-time) on the storefront.
It is recommend is that you create a dummy user for each company that you
can use to login and see what the branding and categories/products look
like. When you login with administrator credentials you will not see the
top banner associated with the currently selected company (i.e., what
users associated with that company will see).
What is adding a storefront for? |
When should you use it? |
Adding a storefront that you can customize and associate with a company. |
To provide a unique, branded shopping experience for users who belong to the company associated with the storefront. |
1. Go to Administration > Storefront Customization.
2. Click Add StoreFront to open the Add StoreFront dialog.
3. In the Name field, type a name for the new storefront.
4. Select the type of storefront you want to create:
Note:
Important Note on SmartStores Web Browser Support: SmartStores will work
only on the following browsers:
— Internet Explorer
10+
— Google Chrome
— Mozilla Firefox
— Apple Safari
— Opera
SmartStores will not work on Internet Explorer 7, 8, or 9.
● SmartStore:
SmartStores are second generation storefront
designs. They use the latest technologies (HTML5, AJAX, embedded hyperlinks)
for enhanced performance (they’re faster!) and scale smoothly across platforms
and devices, from desktops to mobile devices. SmartStores offer great
flexibility for design and layout. SmartStores adapt to the user’s screen
resolution and make optimal use of available space vs. standard grid layouts.
The system ships with 5 basic site themes, each with several color schemes.
Each theme was designed to suit the objectives of a particular storefront.
For instance, the Silk theme shown at right is ideal when you want to
highlight only a small number of products in a very dynamic layout. Other
layouts are for sites with more products to highlight or with a targeted
message to communicate. The SmartStore Builder’s design selection page
even provides guidance on which theme to select (more on this later).
5. Follow the instructions in the appropriate help topic for the type of storefront you are creating:
● SmartStores - Building and Customizing
To set a storefront as the default
The default storefront is the storefront (the user interface for your site) that visitors to your site will see if they are not logged in. Note that you can use the categories and products associated with the default storefront on any other storefront, so you can associate a standard set of products on the default storefront and other storefronts can inherit those settings whenever they change (i.e., so you don't have to edit the changes made to the default products on all sites that use them).
Note: For example, if a person comes across your Print Shop in a search engine, the link will likely be to your default storefront. An exception occurs when you have set up branded URLs (for information on company-branded URLs, see Branded URLS - Relational Branding - Company Branding).
1. Go to Administration > Storefront Customization.
2. Check the box for the storefront you want to set as the default.
3. Click Set as Default.
1. Go to Administration > Storefront Customization.
2. Check the box/es for the storefront/s you want to delete.
3. Click Delete.
In some cases you may need to disable a storefront (e.g., if a customer is leaving and you need to disable the storefront). You can disable a storefront in the following ways (without deleting the storefront):
1. In Storefront Customization you can disassociate the company from the storefront following the steps listed below in To associate and disassociate companies with a storefront.
2. You can also disable the storefront by denying page access for the target group following the steps listed in To manage a group's page access and To manage a group's access to companies and Print Shops.
3. You also can disable all users of the target company (so that they cannot log in to your site). You can do this for each account individually (following the steps for changing the user's status to inactive in To change a user's company, Print Shop, and status) or by exporting and re-importing a list of users with an Account Status = Inactive (following the steps in To import approvers company address books, , data lists, string overrides, or users).
To view the companies associated with a storefront
1. Go to Administration > Storefront Customization.
2. Click Multiple
in the Associated Companies column
in the storefront row.
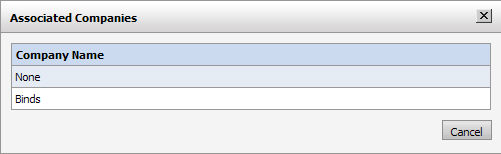
Note: The Multiple link will be available only if more than one company is already associated with the storefront.
3. Click Cancel.
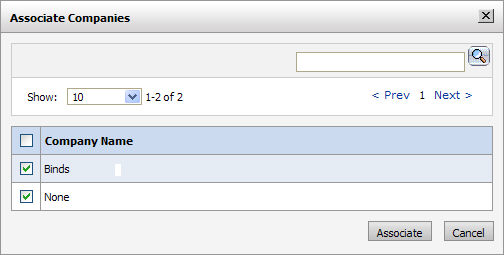
To associate and disassociate companies with a storefront
1. Go to Administration > Storefront Customization.
2. Select the storefront in the Storefront column.
3. Click  on the selected storefront's
row.
on the selected storefront's
row.
4. On Associate Companies dialog select the companies to associate or disassociate with the storefront.
5. Click Associate.
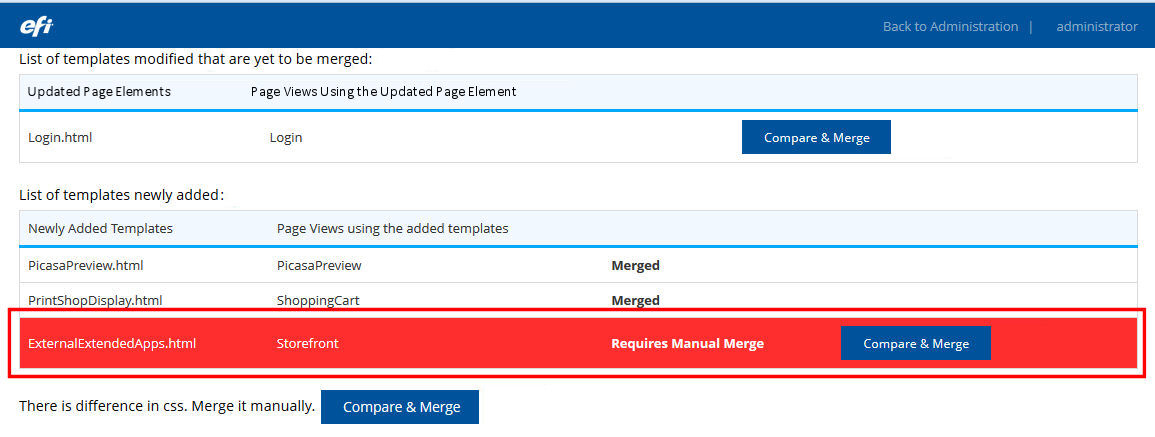
The MarketDirect StoreFront development team might need to modify an existing HTML page or CSS style sheet to resolve an issue or introduce enhanced functionality. These changes will be included in new or upgrade releases of MarketDirect StoreFront. The SmartStores storefront maintenance functionality described in this section was designed to enable you to smoothly update your site. It will:
● Alert
you that changes have been made to an HTML or CSS file that you are using
on your site and have made changes to (i.e., using the advanced customization
tools described in To
use the advanced customization tools to edit the storefront HTMLelements
and CSS styling). If changes have been made to files you have customized
as part of a new release or update, after upgrading to a new version of
MarketDirect StoreFront,
you will see the template maintenance alert icon  in the table on the StoreFront Management page.
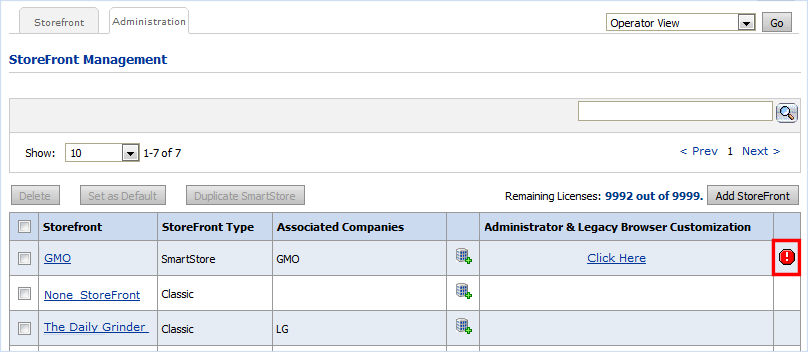
Note: You will see the conflict alert icon only if (a) a file (page, page section, or CSS style sheet) that you have customized was changed (i.e., if you have not made any changes to a file, you will not get an alert) or (b) a new template was added to a page section that you have deleted. For a list of SmartStore HTML templates and CSS style sheets that were changed, consult the Release Notes for the current new or upgrade release of MarketDirect StoreFront. The Release Notes are available on the MDSF Forum (http://dsfforums.efi.com/).
● Provide you with tools for merging the changes into your customized storefronts without losing your customizations.
You are strongly advised to make a backup of your existing CSS style sheet before making any changes to it. To do so:
● Open the SmartStore with the changes (i.e.,
the one with the change alert icon
next to it).
● In the SmartStore Builder, open 5 Edit Page Elements & Styles.
● Click the CSS editor icon ![]() to open the style sheet.
to open the style sheet.
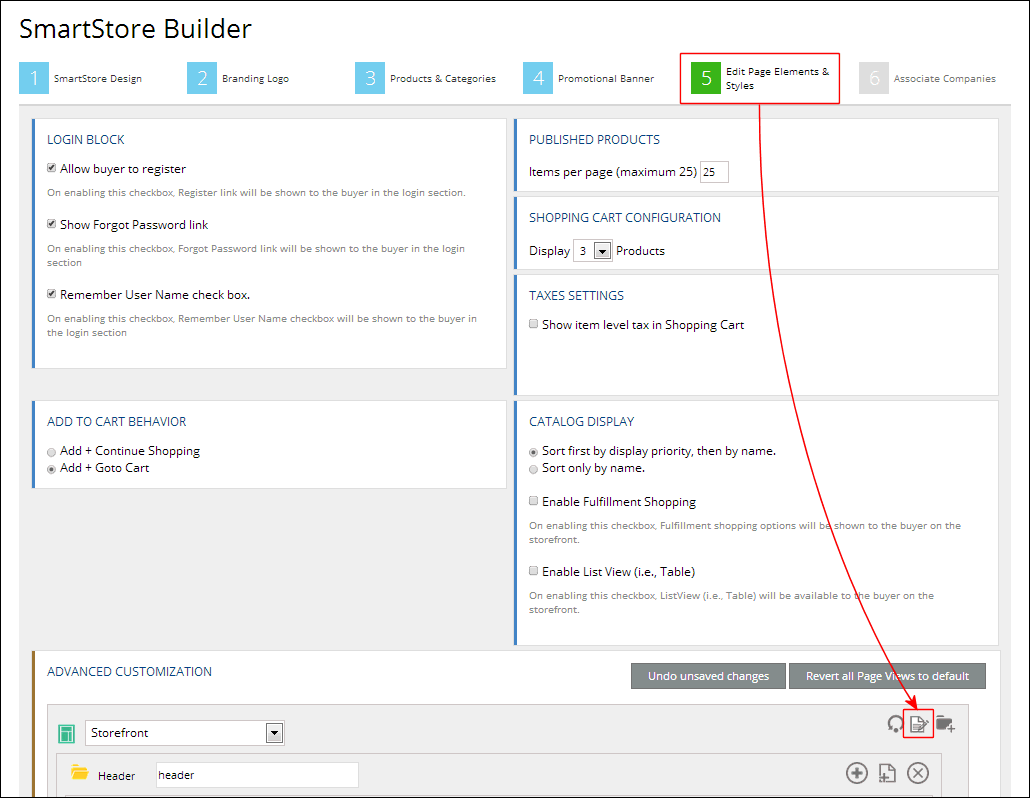
● With your cursor in the CSS editor, press Ctrl-A to select the entire contents of the window.
● Press Ctrl-C to copy the code to the clipboard.
● Open Notepad or WordPad and press Ctrl-V to paste the code into a new document.
● Save the document.
To compare and merge changes
1. Click
the
alert icon on the StoreFront Management page.
The template maintenance page will open showing a list of all modified
elements (those the MarketDirect StoreFront
team has changed) that you have customized on your SmartStore.
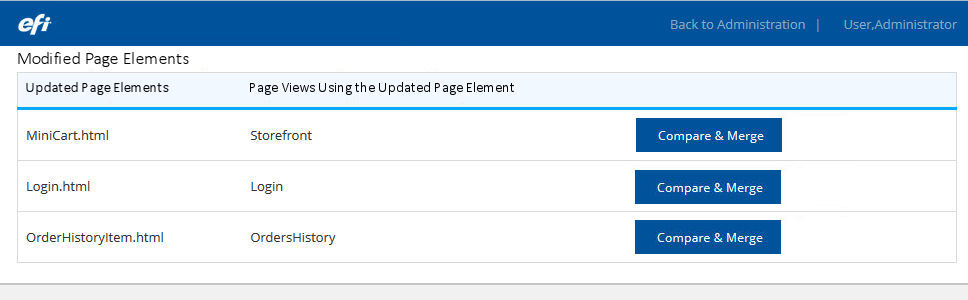
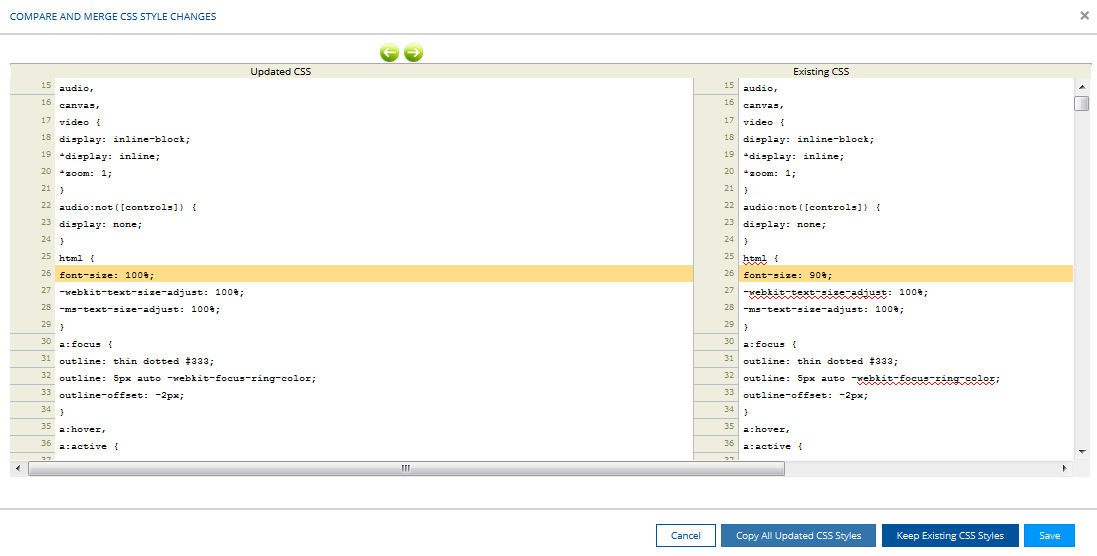
2. To view a side-by-side comparison of the new version of the element (changed by the MarketDirect StoreFront team) and the version you have customized and are currently using, click Compare & Merge.
● The new version is shown in the left window; your current customized version is shown in the right window.
Note:
Use the forward and back buttons to scroll through the identified
differences between the updated and existing versions:  .
.
● Code shaded in green is in your current customized version but not in the new (updated) version of the page element.
Note: This could be code in the original version that was removed in the new version code you added as part of your customization.
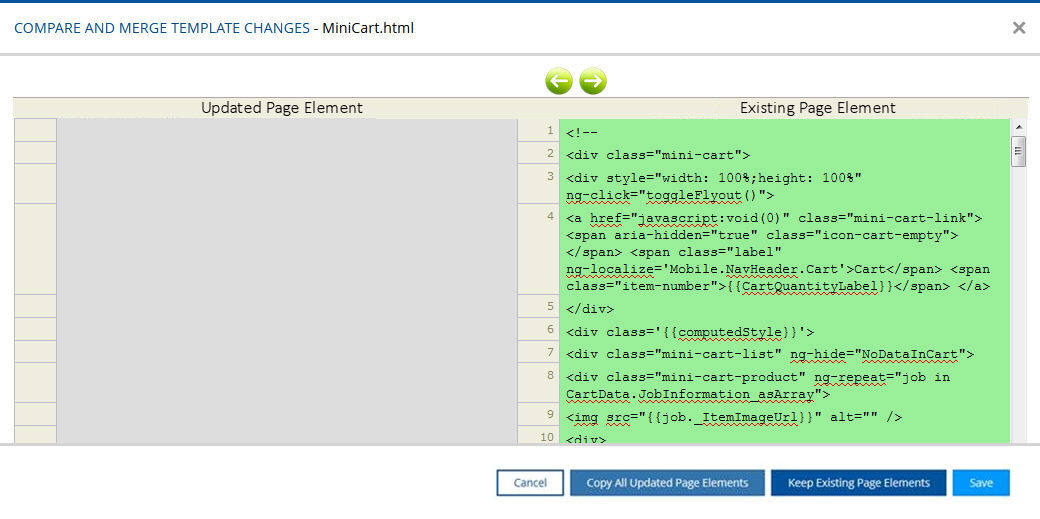
● Code shaded in yellow is in both your current customized version and in the new (updated) version of the page element.
Note: The difference could be because of changes that you made or that the MarketDirect StoreFront team made to the element.
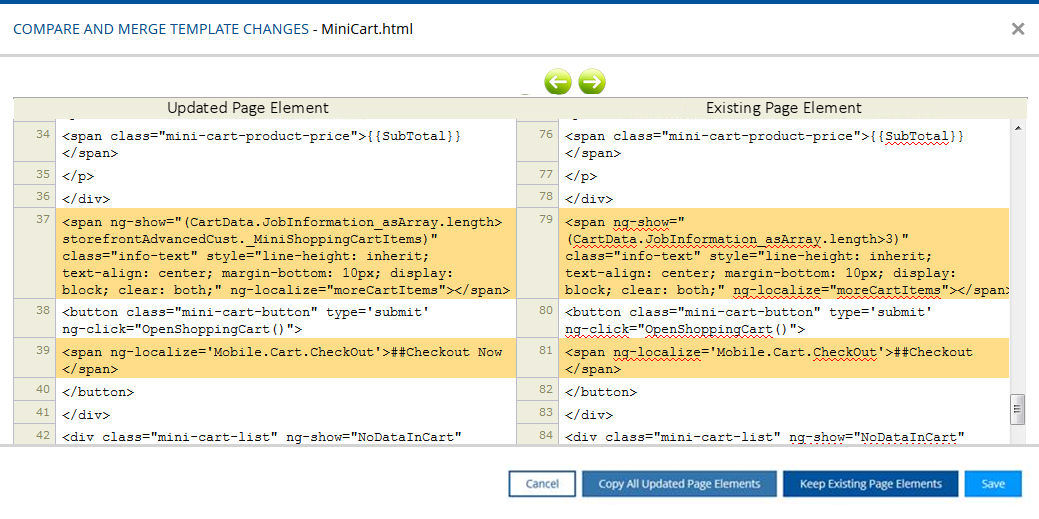
● Code shaded in red is in the new (updated) version of the page element but not in your current customized version.
3. If there is a difference in CSS:
Note:
Use the forward and back buttons to scroll through the identified differences:
.
What do you want to do?
● Replace your current customized version with the new or updated version: Click Copy All Updated Page Elements or Copy All Updated CSS Styles.
Note: Note that you will lose all customizations you have made to the page element. So make sure this is what you want to do before click Copy All Updated Page Elements.
● Continue using your current customized version and disregard the changes in the new or updated version: Click Keep Existing Page Elements or Keep Existing CSS Styles.
● Merge some of the changed code in the new or updated version into your current customized version:
● Select the HTML
or CSS code in the new version in the left window, right-click, and select
Copy.
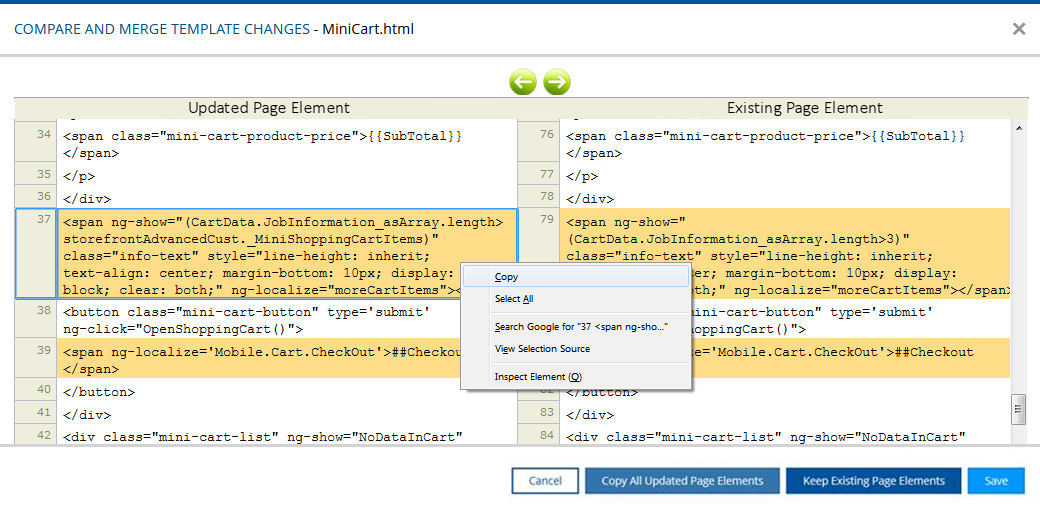
Note: Note that you can only copy-and-paste from the new or upgraded version to the current version and not vice versa.
● In the right window,
select the code you want to replace, right-click, and select Paste.
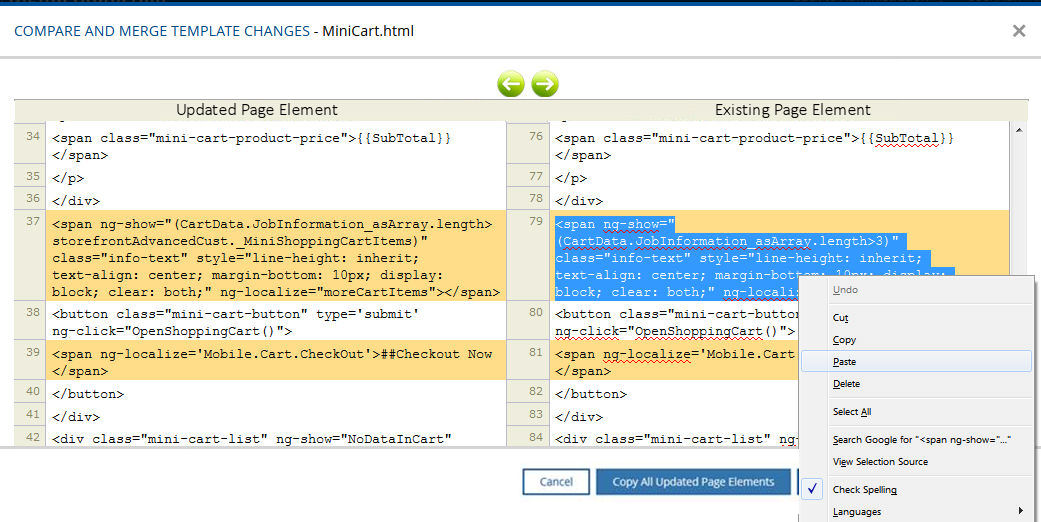
● Click Used Merge Content.
● Add a page section or other element in the new or updated version to your current customized version:
● New page elements added as part of the upgrade are blocked in red. To add the new functionality, you must add it to your SmartStore template following the steps below.
● To view a side-by-side comparison of the new version of the CSS (changed by the MarketDirect StoreFront team) and the version you have customized and are currently using, click Compare & Merge Manually in the section "
● Locate the element in the list and click Compare & Merge Manually.
● Scroll down and locate the new element in the site tree in the right window (new version; it will be shaded in green).
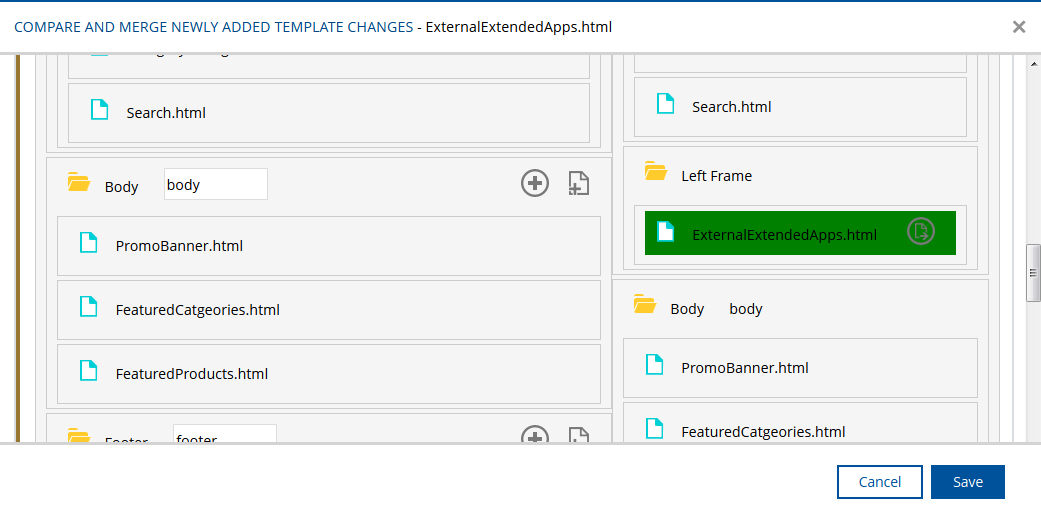
● If the section that contains the new element does not exist in your current SmartStore, you will need to create that section or place the new page element in another page section. The issue is that the system does not know where to put the page element on your SmartStore layout:
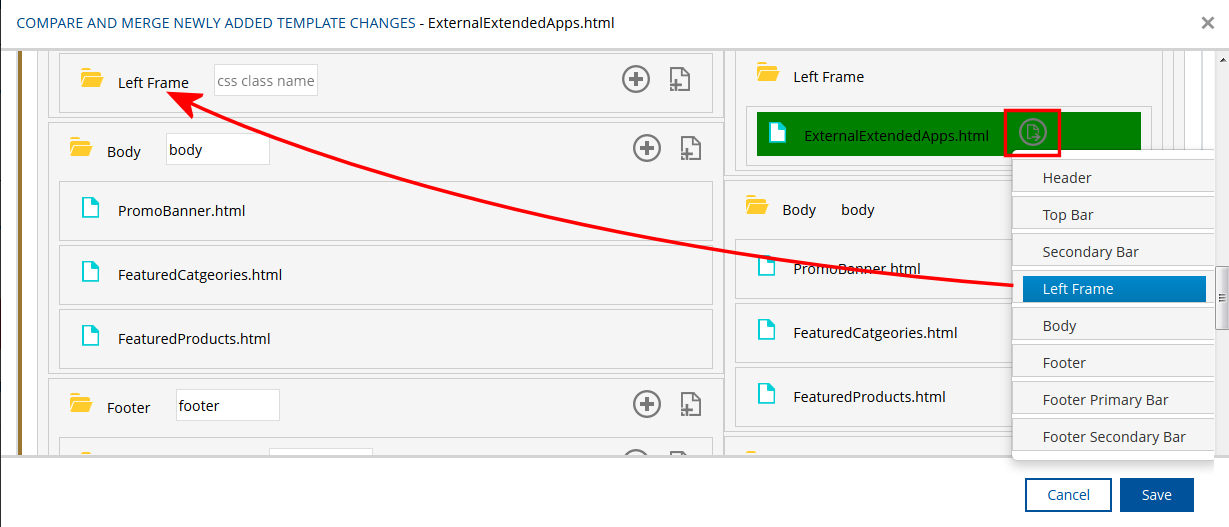
● For
example, if the new page element is in a page section "Left Frame"
that is not in your existing SmartStore, click the add section icon  in
the section where you would like to place it.
in
the section where you would like to place it.
● Scroll down and specify a name for the section (e.g., "Left Frame") and a CSS class (if you know it).
Note: The section shaded in green
has not yet been added to your storefront.
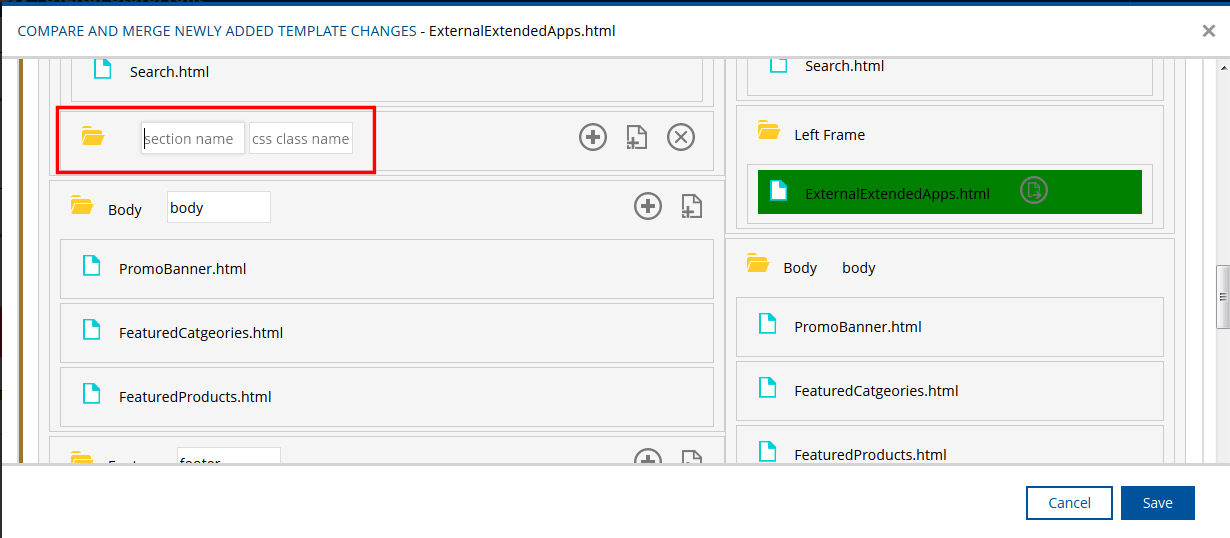
● Click Save to save the added section to the site template.
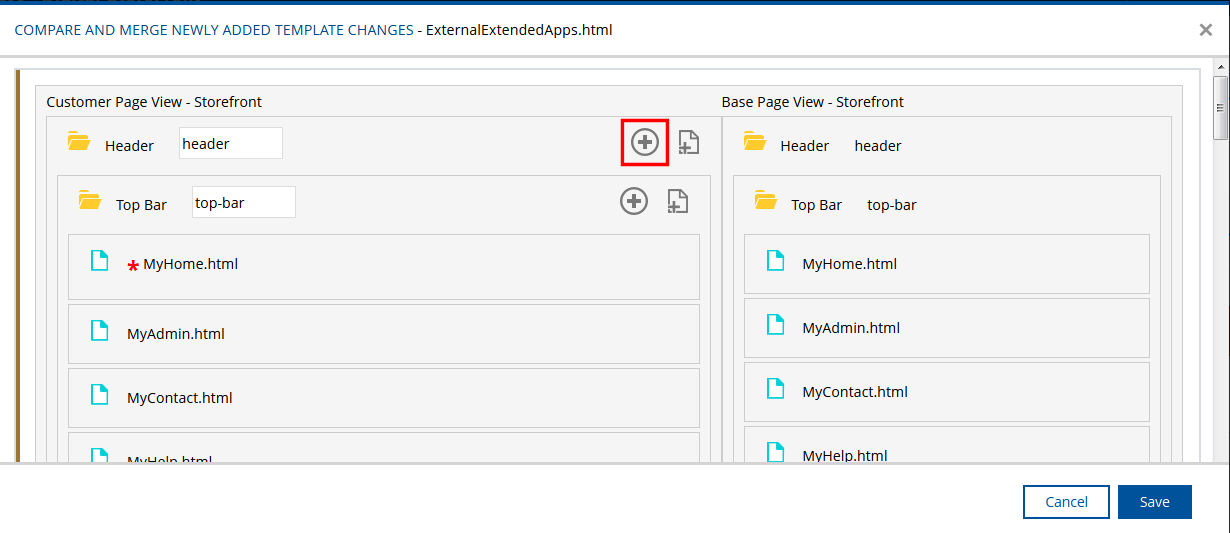
● To add the page element to the new section, you can either:
● Click the add
template button for the page section where you want to place the new section:

● On the Add Template
window, select the page section file from the Templates list.
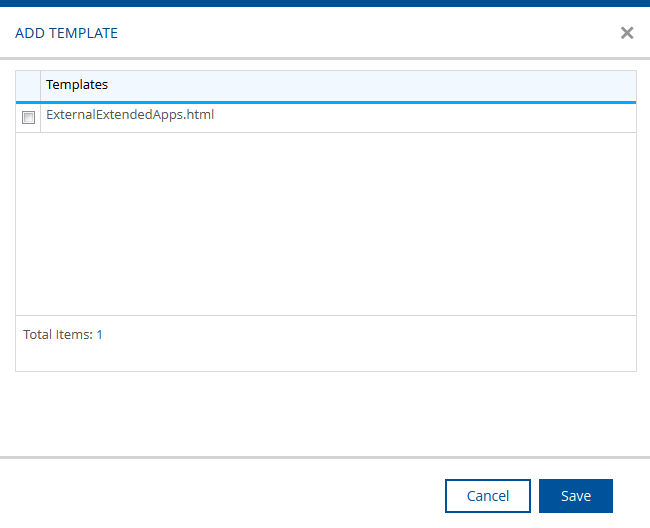
● Click Save.
OR
● Click the Move Template icon on the section
you want to add and select the section to which you want to add the new
section.
● Click Save.
To preview a branded site (e.g., before taking the site live):
1. On the
Companies page, right-click the site’s Company Branded Url link
and select Copy Link Location (in Mozilla Firefox), Copy Shortcut
(in Internet Explorer), or Copy link address (in Google Chrome).
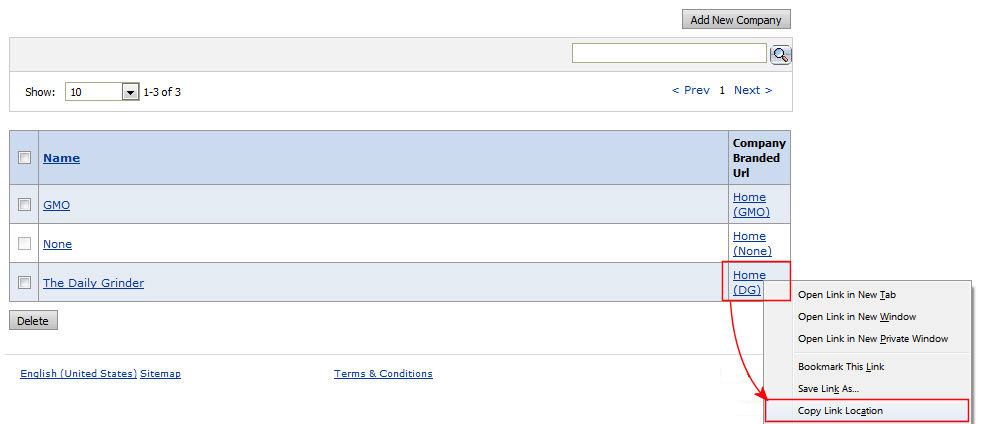
2. Open another browser (not another instance or tab of the browser you saved the link on).
Note: For example: If you copied the link from Firefox paste and open it in Internet Explorer or Google Chrome.
3. Paste the link into the Address field and click Enter to view the site.
Note: Please Note: Clicking Company Branded Url on the Companies page for any site will only open the Default company. This change was made to accommodate the new SmartStores next-generation storefront functionality introduced in v. 7.0.
Note: If you use Advanced Customization functionality: It is strongly recommended that you create a test user account for each company you customize to prevent customers from possibly seeing unwanted/unfinished storefronts.
What is PrintMessenger customization for? |
When should you use it? |
Branding the PrintMessenger print driver with your own name and banner. |
To brand the PrintMessenger with the name of your print service (e.g., “AAA Print-for-Less”) and a banner that matches your site, features your logo, etc. |
You can customize the PrintMessenger print driver on the site server by adding your own window title and banner image.
Note: Only the Windows version of the PrintMessenger print driver can be customized; the MAC version cannot be customized.
● For the Windows PrintMessenger: Follow the steps in Windows PrintMessenger Install.
● For the Mac PrintMessenger: Follow the steps in Mac PrintMessenger Install.
● See the topic Installers.
● To customize a storefront theme
● To customize a storefront layout
● To customize the homepage column layout
● Arranging the Web Blocks
● To customize the storefront branding logo and banner
● To customize the landing page content
● To edit the layout of featured categories