For general information about Departments, see Managing Departments.
On the Departments page define the fields to set up your Department.
Note: You can also add departments from the Department Information section of the Manage Company page.
1. From the Select Company pull-down list, select the company to add the department to.
2. Click Add New Department.
Note: You can also add a department on the Manage Company page in the Department Information section.
3. Department: Type a descriptive name.
4. Supported Payment Methods: Select payments available to users associated with the department.
5. Default Payment Method: Default payment method for the department.
6. Credit Card Merchant—specifies the merchant account that will govern all credit card payments made to the company unless another merchant account is specified in the Credit Card Merchant field on the Department page.
● Use the Print Shop merchant account: This is the default option that uses default merchant account set up in the Print Shop to which the company is associated.
● Other: You can select any of the other merchant accounts that are set up in the site from the pull-down list.
Note: For instructions on setting up merchant accounts, see Managing Merchant Accounts.
● Paypal Merchant Account ID—will show only if you have selected PayPal as a supported payment method.
● Use the Print Shop merchant account: Choose this option to use the Print Shop's default PayPal merchant account ID.
● Other: You can select any of the other PayPal options listed in the pull-down list.
Note: If you are using Payflow Pro be sure it is configured to use PayPal transactions. Contact PayPal Payflow Pro Customer Support for more information. For details on setting up a PayPal account, see Managing Merchant Accounts.
7. Show Inventory to Buyer: Check box to permit members of the department to see inventory levels (i.e., remaining stock for items under inventory control).
8. Assign/Edit Delivery Methods: Click to select delivery method/s to assign to this department.
Note: The Assign/Edit Delivery Methods link will not appear until you save the department and return to it (i.e., by selecting it from the table on the Departments page).
9. Add Delivery Method: Click to add a delivery method for the department.
Note: For detailed instructions on adding delivery methods, see To add a delivery method.
10. Click Expand in the View Auctioninc Configuration Steps field.
Auctioninc Shipping Cost Calculator |
|
Handling Charges |
Specify an amount to charge (above and beyond the cost of shipping) for each order processed by the Print Shop. Notes on handling charges with AuctionInc: If you want to add a handling charge over and above the shipping cost, set it using the Handling Charges and Handling Charge Percentage fields on this screen. The handling charge can be configured as a fixed amount or as a percentage of shipment cost. During calculation, the system will check the values and calculate handling charges based on whichever handling charge yields the higher value. |
Handling Charge Percentage |
Specify a percentage of the shipping cost for each order processed by the Print Shop. |
View Auctioninc Configuration Steps |
Click Expand to see a wizard of steps for configuring Auctioninc. See Shipping Cost Configuration. |
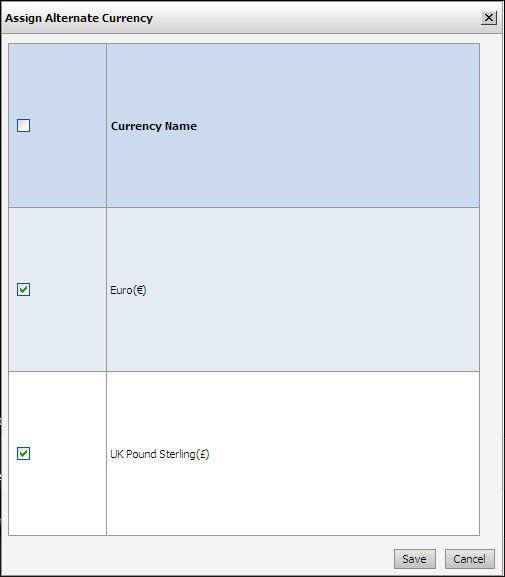
11. Supported Alternate Currencies: Click Assign/Edit Currencies to open the Assign Alternate Currency window.
● Select the available
alternate currencies you want to make available to buyers associated with
this department (i.e., the currency conversion you set will be displayed
to buyers).
Note: For instructions on configuring and enabling alternate currencies, see Configuring Alternate Currencies.
● Click Save.
12. Check the box Allow Tax Exemption to enable users associated with this department to buy on tax exempt terms.
Note:
The Tax
Exemption Settings link
will not appear until you save the department and return to it (i.e.,
by selecting it from the table on the Departments
page).
Note: If you are using the VAT
Taxation Model, tax exemption settings are not available at the department
level. They are available at the company level. For
information on the VAT Taxation Model, see VAT
Taxation Model.
a. In the Tax Exempt Certificate field, click Upload Certificate.
b. On the Upload Tax Certificate dialog, type the following information:
● Certificate Number: the number assigned by the authority that granted the tax exempt status.
● Customer Name: name of exempt customer.
● Exemption Jurisdiction: extent of exemption (e.g., state, federal).
● Exemption Reason: grounds for exemption (e.g., 501(c) non-profit entity).
● Click Browse... in the Upload Tax Exemption Certificate field to upload a certificate (e.g., in PDF format).
Note: The system does not validate tax exemption status certification. Please validate and verify all tax exempt status claims per your standard business procedure.
● Click Upload.
13. To associate members with the department, select users to add to the group from the Existing Users in Company listbox. Press the Control (Ctrl) key and hold it then click the users you want to add to the group.
14. Click Add to move the selected users from the All users list box to the Associate Users to Department list box.
Note: Users can belong to only one department.
15. To view or manage (create or change) a spending account for the department, click View/Manage Spending Accounts.
Note: For more information on creating and managing spending accounts for users and departments, see Spending Accounts.
16. Click Save.