Follow the steps below to configure your merchant account(s):
● 1. Establish an Account with a Supported Payment Gateway and Gather Needed Setup Information
● 2. Set up a Merchant Account
● 3. Test the Merchant Account
● 4. Assign a Merchant Account to a Print Shop
Before setting up your account in MarketDirect:
(1) Establish your merchant account with one of the following supported merchant accounts:
● Alipay (Alipay)
● Authorize Net (United States)
● Authorize.Net-Relay Response (United States)
● Braspag-Pagador (South America)
● CardConnect (United States)
● CyberSource (United States)
● CyberSource Secure Acceptance - Hosted (hosted solution)
● E-xact (North America)
● Ingenico (formerly Ogone e-Commerce) (Europe)
● iPay88 (Malaysia)
● Pagadito (Latin America)
● PayPal (United States)
● Paypal Payflow Pro Hosted (Payflow Link) (hosted solution)
● PayU (Europe)
● PayU (Latin America)
● PxPay (Australia)
● SecurePay (Australia)
● USAePay (United States; for PrintSmith Vision-integrated sites)
● WPM (Europe)
● Worldpay (Europe)
Note: For information on setting up Digital Server Certificates see Digital Server Certificates.
(2) Read the following notes for the supported payment gateway(s) you will be using to process credit orders so you can be sure you have the required information on hand during account setup in the MarketDirect system.
Note: 2Checkout supports many countries and currencies. For more details, please visit https://www.2checkout.com/faq.
(1) If you have not already done so, before configuring your merchant account in MarketDirect, you must establish your account with 2Checkout.
For more information or to set up a 2Checkout account visit:
● web site: https://www.2checkout.com
(2) To configure your account in MarketDirect you will need the following information about your merchant account:
● Account Number
Note: 2Checkout will provide you with your account number after you establish an account.
● Secret Word
Note: This is the secret word you chose on the 2Checkout site.
● Language
Note:
This is the language in which the 2Checkout payment form will be displayed
when your site redirects buyers to the 2Checkout payment page to complete
a purchase.
You must specify with the appropriate language code all languages you will
support, for example:
-- en
--zh
For a complete list of support countries and currencies, please visit https://www.2checkout.com/faq.
● API User
Note: This field and the API Password field are required for processing refunds. This is the username and password for the API account you set up on the 2Checkout site.For more information on settig up an API account, see http://help.2checkout.com/articles/FAQ/How-to-create-an-API-only-Username.
● API Password
(1) If you have not already done so, before configuring your merchant account in MarketDirect, you must establish your account with Alipay.
For more information or to set up an Alipay account visit:
● web site: http://www.alipay.com
(2) To configure your account within MarketDirect, you will need the following information about your merchant account:
Note: Alipay will provide you with these three bits of information.
● Partner ID
● Key
● Charset
(1) If you have not already done so, before configuring your merchant account in MarketDirect, you must establish your account with Authorize.net.
For more information or to set up an Authorize.net account visit:
● web site: http://www.authorize.net
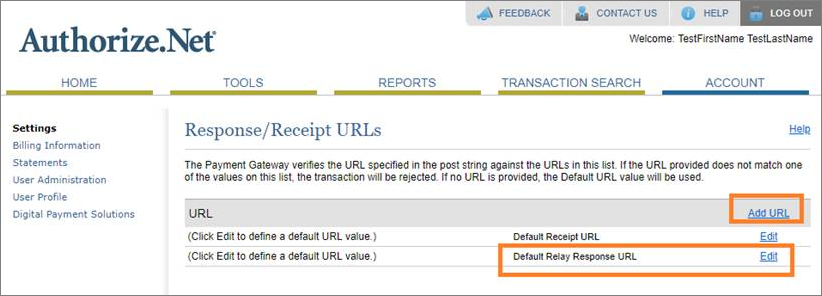
(2) To configure your account on the Authorize.net site:
● Log into your account.
● Click Account.
Note: In the Response/Receipt URLs field, you must add any and all domains that customers checking out with Authorize.NET credit card payment methods will be using (e.g., if you are using multiple domains).
● Select the Receipt Method as POST.
● Enter the Link Text for the URL that will return buyers to the shopping cart.
● Click Submit.
● Click Test to test the configuration by placing a credit card order payment.
(3) To configure your account within MarketDirect you will need the following information about your Authorize.Net merchant account:
● Host Address URL
● Demo Host Address URL
● Login ID
Note: You will get this value from the Authorize.net account page "API Login & Transaction Key."
● Transaction Key
Note: You will get this value from the Secret Answer field on the Authorize.net account page "API Login & Transaction Key."
● Text for Return Button
Note: This will be the label for the button that returns buyers from the gateway to your site.
● Use SHA512 (Signature Key is must if this is turned on)
Note: This will be used to support the SHA-512 Cryptographic Hash Algorithm.
● Signature Key
Note: Login to the merchant account site to generate the Signature Key.
(1) If you have not already done so, before configuring your merchant account in MarketDirect, you must establish your account with Authorize.net.
Note: MarketDirect supports two Authorize.Net gateway accounts. The difference is that the Authorize.net-Relay Response option implements a relay response option. The relay response option lets buyers return to your site automatically after making payment (i.e., without having to click a return button).
For more information or to set up an Authorize.net account visit:
● web site: http://www.authorize.net
(2) To configure your account on the Authorize.Net site:
● Log into your account.
● Click Account.
● On the Response/Receipt URLs page:
● Scroll down and click Edit on the row with Default Relay Response URL.
● Enter the URL and then click Submit.
● Select the Receipt Method as POST.
● Enter the Link Text for the URL that will return buyers to the shopping cart.
● Click Submit.
Note: Be sure to add all possible URLs (e.g., for any branded URLs associated with your site) by clicking Add URL and then entering and then clicking Submit.
● Click Test to test the configuration by placing a credit card order payment.
(3) To configure your account within MarketDirect, you will need the following information about your Authorize.Net merchant account:
● Host Address URL
● Demo Host Address URL
● Login ID
Note: You will get this value from the Authorize.net account page "API Login & Transaction Key."
● Transaction Key
Note: You will get this value from the Secret Answer field on the Authorize.net account page "API Login & Transaction Key."
● Text for Return Button
Note: This will be the label for the button that returns buyers from the gateway to your site.
● Use SHA512 (Signature Key is must if this is turned on)
Note: This will be used to support the SHA-512 Cryptographic Hash Algorithm.
● Signature Key
Note: Login to the merchant account site to generate the Signature Key.
(1) If you have not already done so, before configuring your merchant account in MarketDirect, you must establish your account with Braspag.
For more information or to set up a Pagador account visit Braspag at:
● web site: http://www.braspag.com.br/fale-conosco/
(2) To configure your account within MarketDirect you will need the following information about your Pagador merchant account:
Note: Braspag will provide you with these three bits of information.
● API Host Address
● API Demo Address
● Merchant Login (Vendor ID)
(1) If you have not already done so, before configuring your merchant account in MarketDirect, you must establish your account with CardConnect.
For more information or to set up a CardPointe account visit CardConnect at:
● web site: https://cardconnect.com
(2) On the CardConnect site, you will need to configure the Return to Website URL and Webhook URL fields to direct customers back to your site after payment is processed.
● Log in to your CardConnect account on the CardConnect web site:
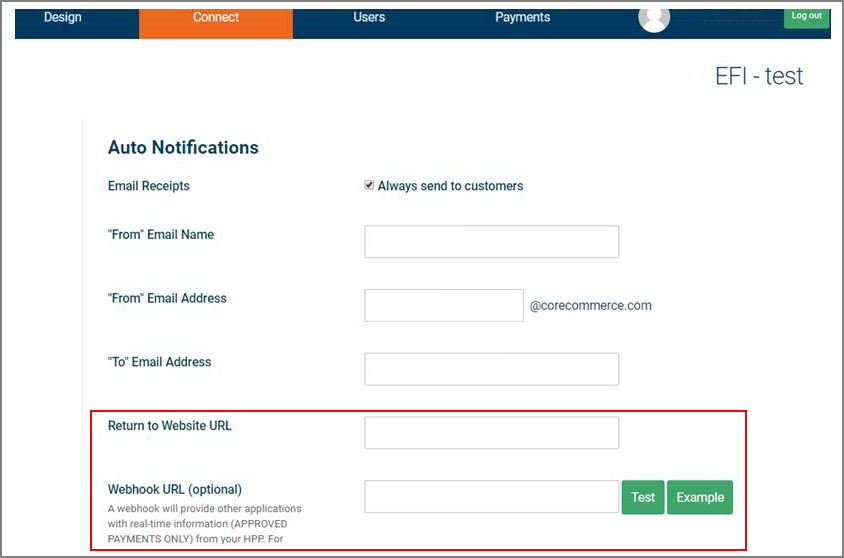
● In addition to specifying your email addresses for auto notifications, enter the following information in the specified formats:
● Return to Website URL: Enter https://[your domain name]/DSF/CCRedirect/CardConnect/CardConnectPaymentAccepted.aspx
● Webhook URL (optional): Enter https://[your domain name]/DSF/CCRedirect/CardConnectWebHook.ashx
(3) To configure your account within MarketDirect, you will need the following information about your CardConnect merchant account:
CardConnect will provide you with the following information:
● Host Address URL
● API Endpoint URL
● API access user name
● API access password
MarketDirect supports two CyberSource payment processing options: (1) CyberSource, which is self-hosted, and (2) CyberSource Secure Acceptance, which is hosted, meaning that all payment processing and management will be handled on the CyberSource site.
Note: CyberSource Secure Acceptance is a credit card payment processing solution that ensures PCI compliance.
Note: This section covers CyberSource's self-hosted solution. CyberSource also offers a hosted payment processing solution, CyberSource Secure Acceptance. For more information on Secure Acceptance, see CyberSource Secure Acceptance Hosted.
Note:
Please note that CyberSource services the following Latin American countries:
-- Guatemala
-- Uruguay
-- Mexico
-- Brazil
(1) If you have not already done so, before configuring your merchant account in MarketDirect, you must establish your account with CyberSource.
For more information or to set up a CyberSource account visit:
● web site: http://www.cybersource.com/contact_us/
(2) To configure your account within MarketDirect, you will need the following information about your CyberSource merchant account:
Note: Refer to CyberSource Account QuickStart below for basic information on how to set up a CyberSource account before you do steps 1-5 in the "To set up a merchant account" section below.
● Host Address
● Demo Host Address
● Merchant ID
● Keys Directory
Account Set Up
You will select a merchant ID and password, which you will use to access the CyberSource online Support Center. The Support Center provides you with the information you need to get started.
Note: If you encounter problems at any point in this setup process refer to the email you received from CyberSource when your account was created. It will contain your CyberSource ID (also called a Merchant ID) and sources of support. Note also that you should disregard any instructions in this email that refer to the CyberSource Developer Kit or CyberSource Services, as the integration to your merchant account is already built into the system.
(For standalone, self-hosted customers only) Merchant Keys and Certificates
● For security purposes, you must update your certificate and private key at least every 12 months. CyberSource will send out notice 60 days before your keys expire and continue sending notices until you update your keys. Please ensure that CyberSource has up-to-date contact information on record for your account. Contact CyberSource Customer Support to submit updated contact information.
● A transaction key must now be created so that all transactions sent to and from CyberSource are secure. This ensures that information is encrypted and cannot be read.
● Log into CyberSource: https://ebc.cybersource.com/.
Note: For step-by-step guidance on setting up your security keys log in to this site: http://www.cybersource.com/developers/test_and_manage/managing/update_keys_and_certificates/
● Note that your username is the same as your Merchant Account name.
● Once logged in, click the Account Management menu item.
● Click Transaction Security Keys.
● Click Security Keys for the Simple Order API.
● Click Generate Key. When the Warning - Security dialog appears, click Run.
● Click Generate Certificate Request and when prompted, save it to a folder on your local drive (and make a note of the path to the key so you can find it).
● At this point, the files your site needs to communicate with CyberSource have been created.
(For standalone, self-hosted customers only) Locate the CyberSourceKeys folder on your server
● Open Windows Explorer and search the drive on which your site is installed for the CyberSourceKeys folder.
● When you locate the CyberSourceKeys folder (i.e., Keys Directory), write down the exact path to the folder (you will need it when creating the account following the steps in the section To set up a merchant account).
Note: The CyberSource Hosted Order Page merchant account works on both 32-bit and 64-bit versions of MarketDirect.
MarketDirect supports CyberSource's hosted payment processing solution, Secure Acceptance.
(1) If you have not already done so, before configuring your merchant account in your site, you must establish your account with CyberSource.
For more information or to set up a CyberSource Secure Acceptance account visit:
● web site: http://www.cybersource.com/contact_us/
(2) To configure your account within MarketDirect, you will need the following information about your CyberSource Secure Acceptance merchant account to enter in the "Payment Gateway Information" section of the merchant account configuration page on your site:
Note: Refer to CyberSource Secure Acceptance Account QuickStart below for basic information on how to set up a CyberSource account before you do steps 1-5 in the "To set up a merchant account" section below.
● Host Address
● Demo Host Address
● Demo Host Address URL
You will also need the following information to enter in the "Account Setup Authorization and Delayed Capture (Mandatory Fields)" sections of the merchant account setup page in your MarketDirect system:
● Profile ID
● Access Key
● Merchant ID
● Transaction Key
Account Set Up
Before configuring your CyberSource Secure Acceptance account within MarketDirect, you must establish a CyberSource account. Contact the CyberSource Sales Team (via the contact information on the CyberSource corporate web site http://www.cybersource.com/contact_us/). You will createt a merchant ID and password, which you will use to access the CyberSource online Support Center. The Support Center provides you with the information you need to get started.
Note: If you encounter problems at any point in this setup process refer to the email you received from CyberSource when your account was created. It will contain your CyberSource ID (also called a Merchant ID) and sources of support. Note also that you should disregard any instructions in this email that refer to the CyberSource Developer Kit or CyberSource Services, as the integration to your merchant account is already built into the system.
Configure Your CyberSource Secure Acceptance Account
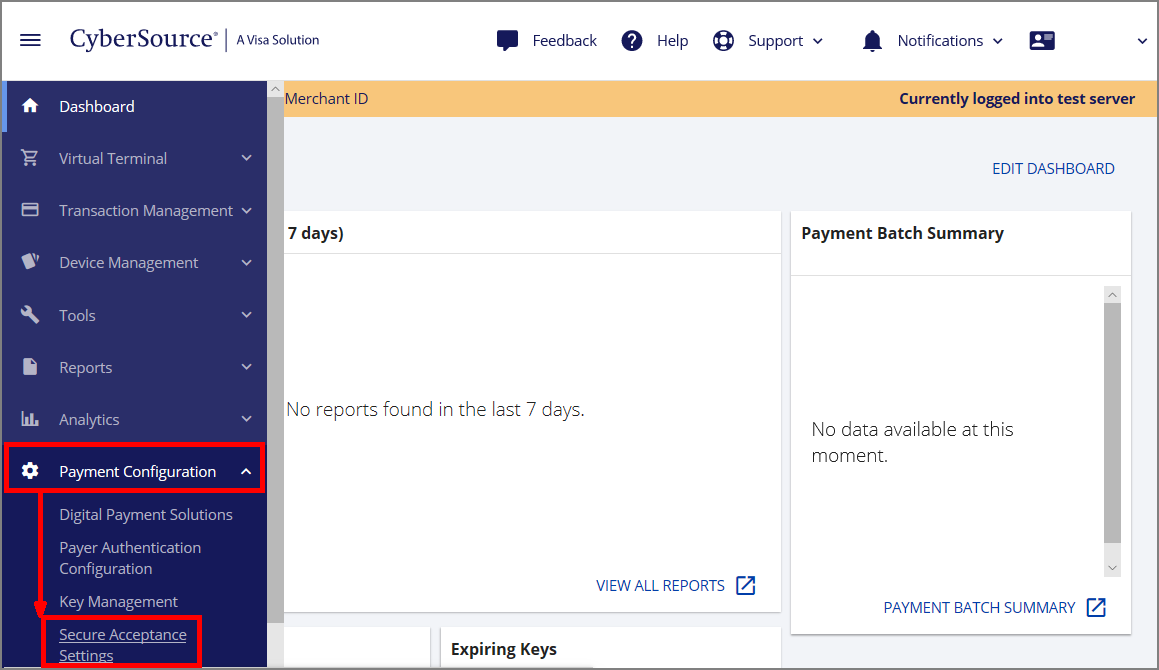
● Log into CyberSource Business Center at https://ebc.cybersource.com/.
Note: Note that your username is the same as your Merchant Account name. For step-by-step guidance on setting up your security keys log in to this site visit: http://www.cybersource.com/developers/test_and_manage/managing/update_keys_and_certificates/
● From the side navigation bar, select Payment Configuration > Secure Acceptance Settings.
● On the Secure Acceptance Settings page, click NEW PROFILE.
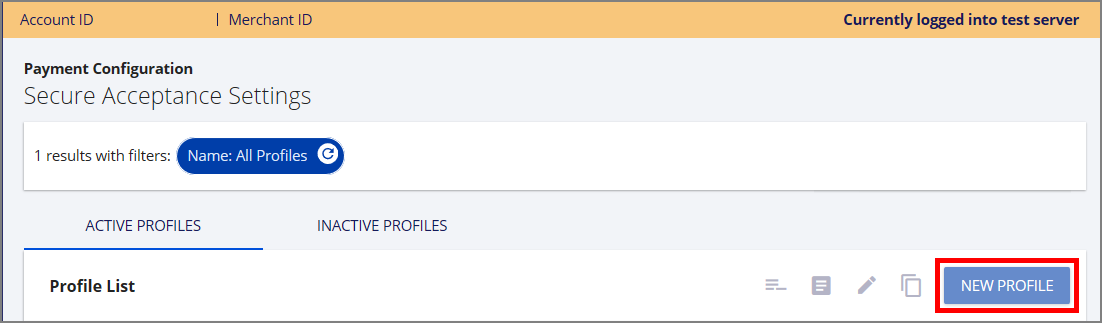
● In the Create Profile flyout window, create your profile:
● Profile Name: Enter a name for the account (i.e., with a name of your choice).
● Profile Description: Enter a profile ID for the account (i.e., with a string of your choice).
Note: You will need to enter this profile ID when configuring your account in MarketDirect StoreFront.
● Integration Method(s): Select Hosted Checkout.
Note: The three fields above are required; the other fields on the page are optional.
● Click SUBMIT.
Note: The Edit Profile GENERAL SETTINGS tab page contains the information you provided in the Create Profile flyout. You can edit the information on this tab or any other profile tab at any time and click SAVE to update your profile.
● On the Secure Acceptance Edit Profile page, open the PAYMENT SETTINGS tab and configure the fields below:
● Card Type:
● Click ADD CARD TYPES and select all card types you want to enable.
● Click SAVE.
● On the Secure Acceptance Edit Profile page, open the SECURITY tab and configure the fields below:
● Click the + (Create Key) icon.
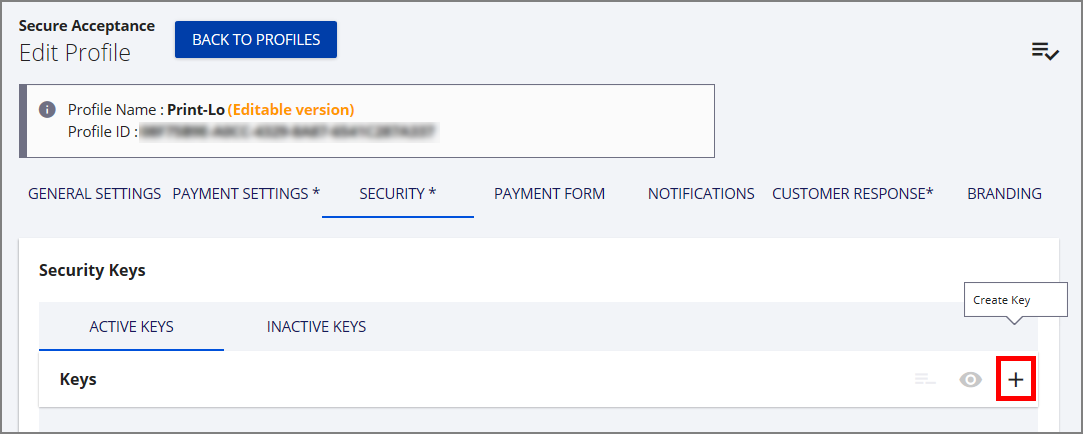
● In the Security Keys flyout window, enter a name for the key in the Key Name field.
● Click CREATE.
● Click Confirm if you are certain that you want to create the key.
● Copy or download the access key and secret key below.
Note: Act fast! You have 30 seconds before the window closes. We suggest that you copy both fields to a text file because you will need to paste both keys into fields in the Account Setup - Authorization (Mandatory Fields) section in MarketDirect StoreFront.
● On the Secure Acceptance Edit Profile page, open the PAYMENT FORM tab and configure the fields below:
● To configure the payment form that will be shown to buyers, on the Payment Form page, select either Multi Step Payment Form or Single Page Form.
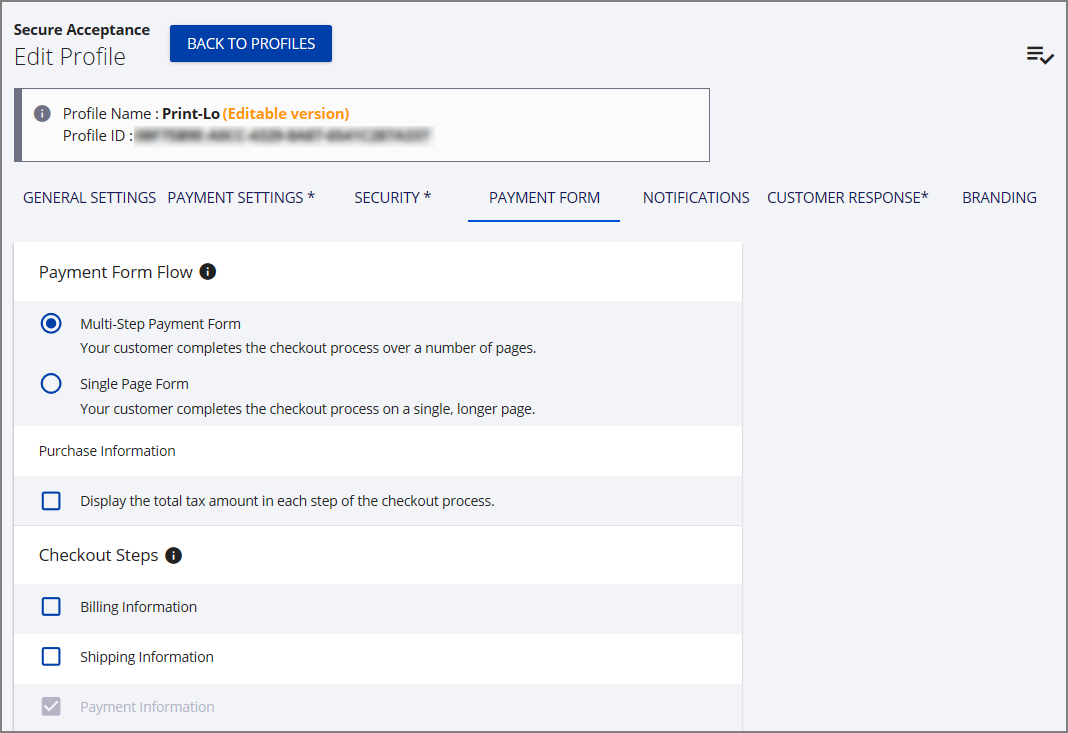
Note: In the Checkout Steps section, the integration of CyberSource Secure Acceptance with MarketDirect StoreFront supports only Billing Information and Payment Information. Shipping information is handled only by the MarketDirect StoreFront system.
● Click SAVE.
Note: You can disregard the NOTIFICATIONS, CUSTOMER RESPONSE, and BRANDING tabs.
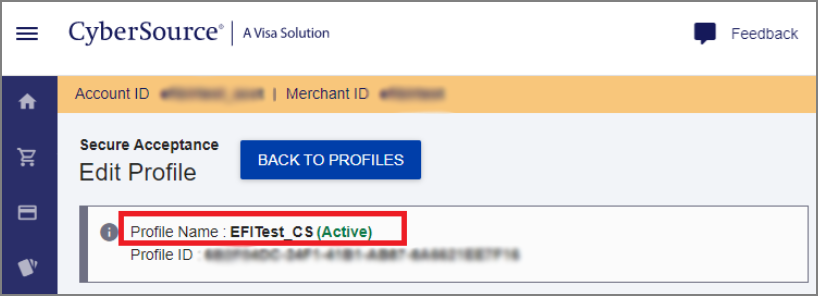
Obtain CyberSource Hosted Information for the Account Setup - Authorization (Mandatory Fields) section in MarketDirect:
● Profile ID
Note:
This is the same as your Profile Name.
● Access Key
● Secret Key
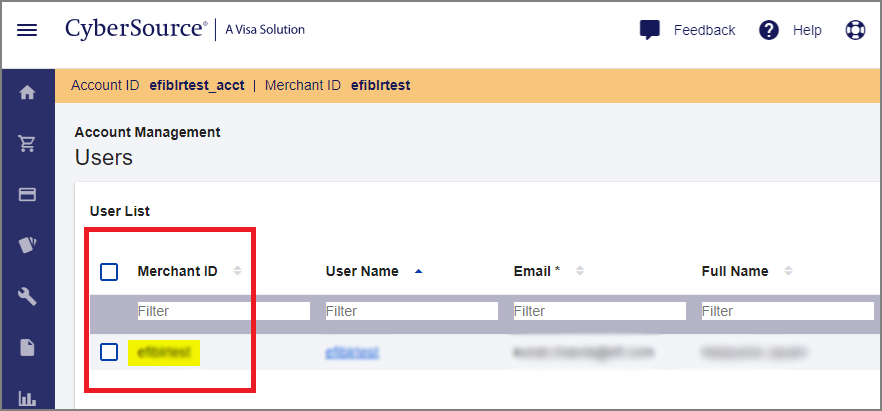
Obtain CyberSource Hosted Information for the Account Setup - Delayed Capture (Mandatory Fields) section in MarketDirect:
● Merchant ID
Note:
You can obtain this from Account Management
> Users.
● Transaction Key
Note:
Follow the steps below to obtain this value:
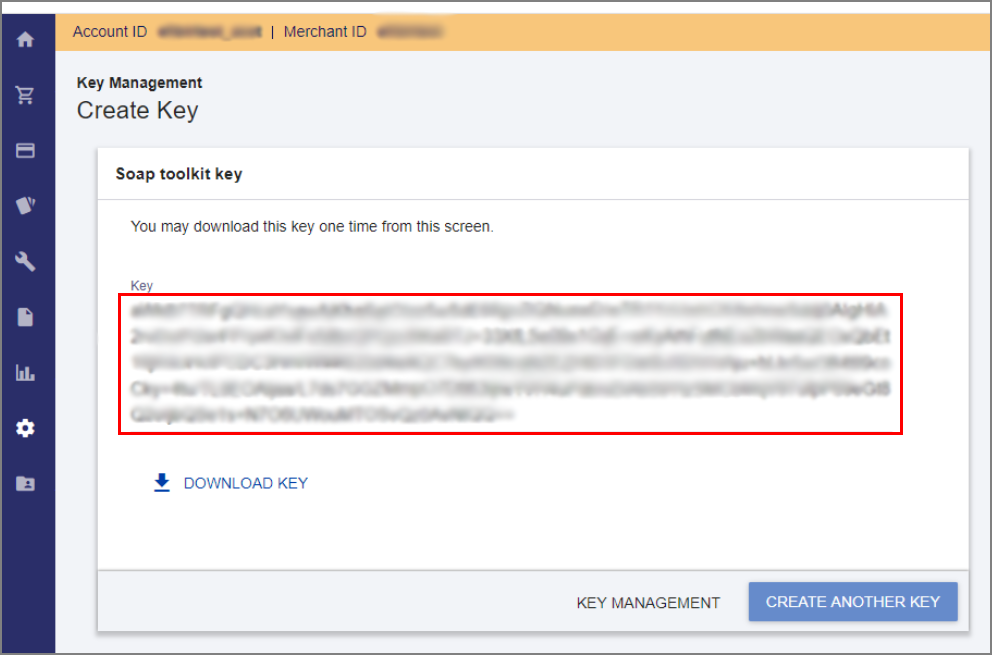
1. Go to
Payment Configuration > Key
Management > GENERATE
KEY.
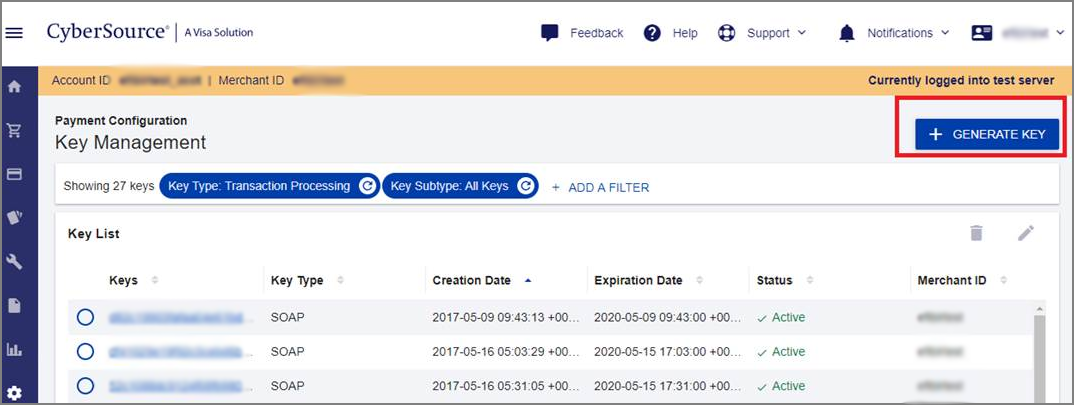
2. Select
Transaction Processing
and then click NEXT STEP.
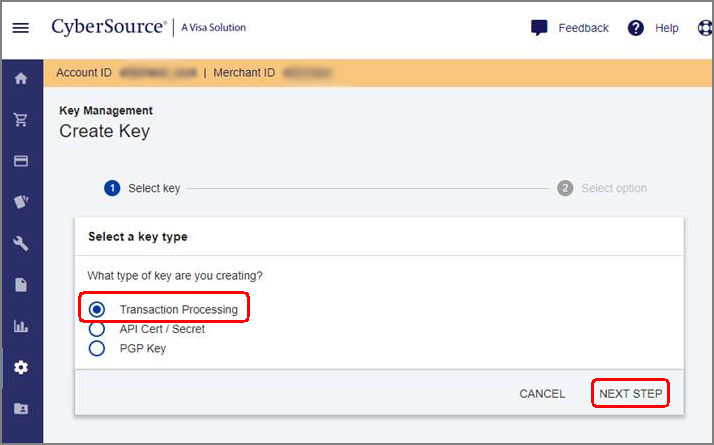
3. Select SOAP
in the next page and click on SUBMIT.

4. Copy the generated key.
Note: You are now ready to configure your CyberSource Secure Acceptance merchant account in MarketDirect following the steps in the To set up a merchant account in MarketDirect.
(1) If you have not already done so, before configuring your merchant account in MarketDirect, you must establish your account with E-xact.
For more information or to set up an E-xact account visit:
● web site: http://www.e-xact.com
(2) To configure your account within MarketDirect you will need some information about your E-xact merchant account to enter in the "Payment Gateway Information" section of the merchant account configuration page in MarketDirect. You will get this get this information as you create your account.
● Host Address URL
● Demo Host Address URL
● API Endpoint URL
● Demo API Endpoint URL
You will also need the following information to enter in the "Account Setup Authorization and Delayed Capture (Mandatory Fields)" sections of the merchant account setup page in MarketDirect:
● Login Id
● Transaction Key
● Gateway Id
● API Password
● Text for Return Button
(1) If you have not already done so, before configuring your merchant account in MarketDirect, you must establish your account with First Atlantic Commerce.
For more information or to set up an First Atlantic Commerce account visit:
● web site: https://www.firstatlanticcommerce.com/
(2) To configure your account within MarketDirect, you will need some information about your E-xact merchant account to enter in the "Payment Gateway Information" section of the merchant account configuration page in MarketDirect. You will get this get this information as you create your account.
● Hosted Page URL
● Demo Page URL
● Hosted Page Service: Host Address
● Hosted Page Service: Demo Address
● Services: Host Address
● Services: Demo Address
You will also need the following information to enter in the "Account Setup (Mandatory Fields)" section of the merchant account setup page in MarketDirect:
● Merchant ID
● Acquirer ID
● Processing Password
Note on
Partial Capture with First Atlantic Commerce Payment Gateway:
Although First Atlantic Commerce (FAC) can do partial capture, it must be enabled at the account level. If
you have configured a buffer amount (or percentage) for credit card
transactions and the capture amount differs from the authorization amount,
FAC will return an exception unless partial capture is enabled in your
account.
Thus, if you are using FAC and want to add buffer in authorization
transactions, enable partial capture in your FAC account. To do this,
you must contact FAC.
(1) If you have not already done so, before configuring your merchant account in MarketDirect, you must establish your account with Ingenico.
For more information or to set up an Ingenico account visit:
● web site: http://payment-services.ingenico.com
Important Note: Your Ingenico account must support "Authorisation" mode (i.e., this mode is supported with Premium accounts only, not with Pro accounts). Contact the Ingenico sales team and let them know that you need an account that supports Authorisation mode.
(2) To configure your account within MarketDirect, you will need some information about your Ingenico merchant account to enter in the "Payment Gateway Information" section of the merchant account configuration page in MarketDirect. You will get this get this information as you create your account.
Note: Refer to Ingenico Payment Services Account Set Up for Integrating Ingenico with MarketDirect below for information on how to set up an Ingenico account before you do steps 1-5 in the "To set up a merchant account" section below.
Ingenico Payment Services Account Set Up for Integrating Ingenico with MarketDirect
● Go to http://payment-services.ingenico.com and select your country and language for creating your merchant account.
● Click Create a free test account.
● Scroll down and click Get a production account.
Important note: Be sure to choose to establish a production account not a test account.
● On the “New merchant registration (Production)" page, enter the required information.
● Leave the If integration is achieved by a Ingenico e-Commerce Solutions certified solution provider field as None.
● After completing this step you will receive an e-mail from Ingenico with detailed instructions for completing the next steps in your registration process.
Note: Ingenico will validate your information before sending you a temporary password to log in to your account, so there will be a short wait.
● After receiving your temporary password, use the link to log in and change your password.
● Click End.
Note: You will receive an email confirming your password change.
Ingenico Account Configuration
You must now configure your Ingenico account. On the "Welcome to Ingenico account administration" page, you can disregard the Your administrative details link because you completed this task when you established your account.
Note: If at any time during the account setup process you need help, click SUPPORT in the upper right-hand part of the screen. On the "Welcome to the Support site" page, you can access Frequently Asked Questions (FAQs), Integration & User manuals, and Contact information.
● From the main menu bar, click Configuration > Account:
● On the Your subscription page:
● Select your required option: The options will vary based on the country and language you have selected.
● Click Activate for your required option to begin the activation.
● On the Your options page:
● Activate the appropriate option.
● Click Save when finished.
● From the main menu bar, click Configuration > Payment methods.
● On the "Choose new payment methods" page:
● Click Add to the right of the payment method to add.
● On the Card affiliation request - [name of card] page, specify whether you have or have not yet signed an affiliation contract for distance selling with an acquiring bank.
● Click ADD THIS PAYMENT METHOD.
● On the confirmation page, click Confirm and go to 'Your payment methods.'
● To add additional payment methods, click Choose new payment methods and repeat the steps above to add the methods.
● From the main menu bar, click Advanced > Fraud Detection:
● Click Edit and configure as you wish.
● From the main menu bar, click Configuration > Technical information:
● On the Global Transaction Parameters page:
● Default operation code: Must be set to Authorisation.
Note: You must set this field to Authorisation.
● Default data capture (payment) procedure: Set this to Data capture by the merchant (manual or automatic).
● Payment retry: Enter any value you want.
● Processing for individual transactions: Choose Always Online (Immediate).
● Click Save.
● On the Global Security Parameters page:
● Hash algorithm: Choose SHA-1.
● Character encoding: Choose Use the character encoding expected with the initial transaction request (depending on the URL called).
● Leave the remaining fields set to their default values.
● Click Save.
● On the Payment Page page:
● Cancel button: Choose whether to hide the Cancel button on the Ingenico secure payment pages.
● Back button redirection: Leave this URL field blank.
● Click Save.
● On the Data and Origin page:
● URL of the merchant page...: Leave this URL field blank.
● SHA-IN Pass phrase: Enter a pass phrase (password) for sending data from MarketDirect to Ingenico.
Note: Remember this pass phrase because you will need to enter it when creating your account in MarketDirect. This pass phrase cannot contain special characters (e.g., * ! & %).
● Checks for Ingenico DirectLink:
● IP address: Leave this field blank.
● SHA-IN Pass phrase: Leave this field blank.
● Click Save.
● On the Transaction feedback page:
● HTTP redirection in the browser:
● Leave all URLs blank.
● Check the box I want to receive transaction feedback parameters on the redirection URLs.
● Direct HTTP server-to-server request:
● Timing of the request:
● Choose No Request.
● URL of the merchant's post-payment page:
● Leave all URL fields blank.
● Request method:
● Choose POST.
● Dynamic e-Commerce Parameters: The following parameters are selected:
● ACCEPTANCE
● AMOUNT
● CARDNO
● CN
● COMPLUS
● CURRENCY
● NCERROR
● ORDERID
● PAYID
● STATUS
● TRXDATE
● Security for request parameters:
● SHA-OUT Pass phrase: Enter a pass phrase (password) for sending data from Ingenico to MarketDirect.
Note: Remember this pass phrase because you will need to enter it when creating your account in MarketDirect. This pass phrase cannot contain special characters (e.g., * ! & %).
● HTTP request for status changes:
● Timing of the request: Choose No request.
● URL on which the merchant wishes to get a deferred HTTP request, should the status of a transaction change offline: Leave this URL field blank.
● Click Save.
● On the Emails page (if available):
● You can configure these setting in whatever way works best for you.
● (If you were configuring a test account and want to specify how the test account operates: Click the "Test Info" tab).
● Create a second user account following the steps below.
Warning: This is a required step to ensure that your Ingenico merchant account works properly (i.e., to capture payments via MarketDirect).
● Log in to your Ingenico account.
● Go to Configuration > Users and create a new account to allow automatic capturing.
● Click Configuration > Users.
● Click New user.
● On the "User's data" page:
● Enter all required information:
● USERID (username)
Note: Remember this USERID because you will need to enter it when creating your account in MarketDirect.
● REFID (main account name)
● User type
● User's name (first and last name)
● E-mail address
● Profile (select Admin from the pull-down menu)
● Check the box Special user for API (no access to admin.).
● Enter your password.
Note: Remember this password because you will need to enter it when creating your account in MarketDirect. Remember that this pass phrase cannot contain special characters (e.g., * ! & %).
● Click Save.
● Click Configuration > Technical information to open the Your technical settings page.
Note: This is an optional step but is recommended. It ensures that the only communication using this account will be from the Ingenico site.
● Click the Data and Origin tab.
● Leave the Checks for Ingenico DirectLink fields blank.
● Click Support to open the Welcome to the support site page.
● Click the Ticket inbox tab.
● Click New ticket.
● In the Please enter a subject for your ticket field, enter: "SHA Request."
● In the Please describe your issue field, enter: "I would like to request to have the SHA validation disabled for maintenance requests."
Note: It typically takes 24 hours for this request to be processed. If it is not, please contact your Ingenico customer support representative.
● Click Submit ticket.
● You are now ready to configure your account to work in MarketDirect. To configure your account within your MarketDirect site, you will need the following information about your Ingenico merchant account as you complete the steps in the To set up a merchant account section below in this help topic:
● PSPID: This is the name you gave your account when you created it.
● SHA-IN Pass phrase
● SHA-OUT Pass phrase
● USER Id (For performing a Data Capture)
Note: This is the USERID you used for the second user account you created in step 3 above.
● Password (For User Account performing the Data Capture)
Note: This is the password you used for the second user account you created in step 3 above. Remember that this pass phrase cannot contain special characters (e.g., * ! & %).
● For certain payment methods,
the amount captured when payment is confirmed will be the amount of the
authorization. No changes can be made to the amount. You will need
to go to the Credit Card Configuration
section on the Site Settings
| Basic Settings tab in MarketDirect and set the values for the fields
Credit Card Estimated Pricing
Percentage and Credit Card
Estimated Pricing Minimum Amount fields to 0.
Failure to set these values to
0 will cause an additional amount to be added to the authorization and
the capture will be for the wrong amount.
Warning:
If you are using Ingenico merchant account for credit card payment
processing, be sure to:
1. Go to Administration > Site Settings
> Basic Settings tab and scroll down to the Credit
Card Configuration section.
2. Set the values in the Credit Card Estimated
Pricing Percentage and Credit
Card Estimated Pricing Minimum Amount fields to 0.
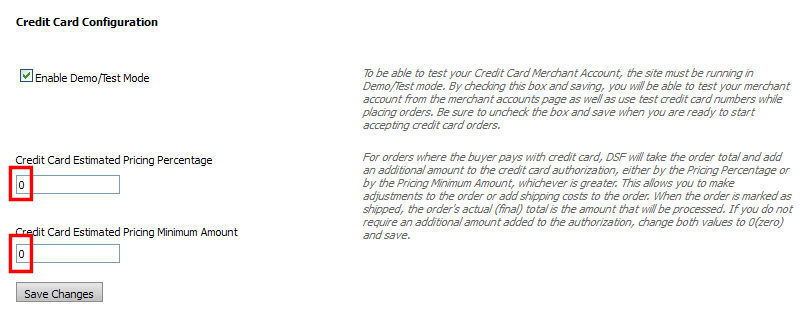
Failure to set these values to 0 will
cause an additional
amount to be added to the authorization and the capture will be for the
wrong amount.
Transaction Results
TRANSACTION RESULT |
BASED ON AMOUNT |
BASED ON CARD NUMBER |
|
Amount |
Amount x 100 |
||
Successful |
0
- 9000 |
0
- 900000 |
Any
other card number |
Test-card numbers
VISA |
4111 1111 1111 1111 |
Visa 3-D Secure |
4000 0000 0000 0002 |
MasterCard |
5399 9999 9999 9999 |
American Express |
3741 1111 1111 111 |
Contact Ingenico's Customer Care department in one of the following ways:
● Log in to your Ingenico account and go to the support section of your Ingenico Back-Office.
(1) If you have not already done so, before configuring your merchant account in MarketDirect, you must establish your account with iPay88.
Note: iPay88 can be used with Chinese Yuan currency when enabled with an Alipay account. To use Alipay with iPay88, you must contact the iPay88 team and elect a merchant account with the Alipay option enabled.
For more information or to set up an iPay88 account visit:
● web site: http://www.ipay88.com
(2) To configure your account within MarketDirect, you will need the following information about your iPay88 merchant account to enter in the "Payment Gateway Information" section of the merchant account configuration page in MarketDirect:
● Host Address URL
● Demo Host Address URL
You will also need the following information to enter in the "Account Setup - Authorization (Mandatory Fields)" sections of the merchant account setup page in MarketDirect:
● Merchant Code
● Merchant Key
(1) If you have not already done so, before configuring your merchant account in MarketDirect, you must establish your account with Pagadito.
For more information or to set up a Pagadito account visit:
● web site: http://www.pagadito.com
(2) To configure your account within MarketDirect, you will need the following information about your Pagadito merchant account to enter in the "Payment Gateway Information" section of the merchant account configuration page in MarketDirect:
● Host Address URL
● Demo Host Address URL
You will also need the following information to enter in the "Account Information" section of the merchant account setup page in MarketDirect:
● Account Name
● Description
● Currency
● Enabled
You will also need the following information to enter in the "Account Setup - Authorization (Mandatory Fields)" sections of the merchant account setup page in MarketDirect:
● UID (user ID)
● WSK (the key to access Pagadito)
MarketDirect supports two PayPal Payflow Pro options:
(1) Payflow Pro, which is self-hosted
(2) Payflow Pro Hosted (Payflow Link), which is hosted, meaning that all payment processing and management will be handled on PayPal's site (i.e., in the PayPal Manager)
Note: Payflow Pro Hosted is a credit card payment processing solution that ensures PCI compliance.
The difference between Payflow Pro and Payflow Pro Hosted (Payflow Link):
● Payflow Pro: When Payflow Pro is
used, all credit card information is entered on the MarketDirect site
on a MarketDirect site page. MarketDirect thus handles securing the page
and makes the method calls to the API to do the authorization.
For setup instructions, see PayPal
Payflow Pro Account Self-Hosted Setup.
● Payflow Pro Hosted (Payflow Link):
When Payflow Pro Hosted is being used, all credit card and shipping address
information will be entered on the Paypal web site. MarketDirect does
not handle entering information and does not make the call to do the credit
card authorization. Instead, MarketDirect redirects to the Paypal/Payflow
Pro Hosted URL and allows buyers to enter their information. Paypal then
redirects the buyer back to the MarketDirect site to complete the order.
For setup instructions, see PayPal
Payflow Pro Hosted (Payflow Link) Account QuickStart.
Note: For more information on PCI compliance with Payflow Pro Hosted visit: https://merchant.paypal.com/us/cgi-bin/?cmd=_render-content&content_ID=merchant/pci_compliant_solution
PayPal Payflow Pro Account (Self-Hosted) Setup
(1) If you have not already done so, before configuring your merchant account in MarketDirect, you must establish your Payflow Pro account with Paypal.
For more information or to set up a PayFlow Pro account visit:
● web site: http://www.paypal.com/us/webapps/mpp/payflow-payment-gateway
(2) To configure your account within MarketDirect, you will need the following information about your Payflow Pro merchant account to enter in the "Payment Gateway Information" section of the merchant account configuration page in MarketDirect:
● Host Address
● Demo Host Address
● API Host Address (for Payflow Pro only, not Payflow Pro Hosted)
● API Demo Address (for Payflow Pro only, not Payflow Pro Hosted)
● Partner ID
● Password
● Payflow User ID
● Merchant Login (Vendor ID)
Note: This gateway supports both Credit Card and PayPal payment options.
Warning: PayflowPro: MarketDirect supports issuing manual (i.e., “non-referenced”) credits to a credit card number. By default, Payflow Pro does not support issuing non-referenced credits. So when establishing your Payflow Pro account let PayPal know that you want to be able to issue non-referenced credits.
Note: This option is both a merchant account and gateway and supports both Credit Card and PayPal payment options and enables you to process credit cards directly on your website.
(1) If you have not already done so, before configuring your merchant account in MarketDirect, you must establish your Payflow Pro Host (Payflow Link) account with Paypal.
For more information or to set up a PayFlow Pro Hosted (Payflow Link) account visit:
● web site: http://www.paypal.com/us/webapps/mpp/payflow-payment-gateway
(2) Follow the steps below to integrate your Payflow Pro Hosted (Payflow Link) with MarketDirect
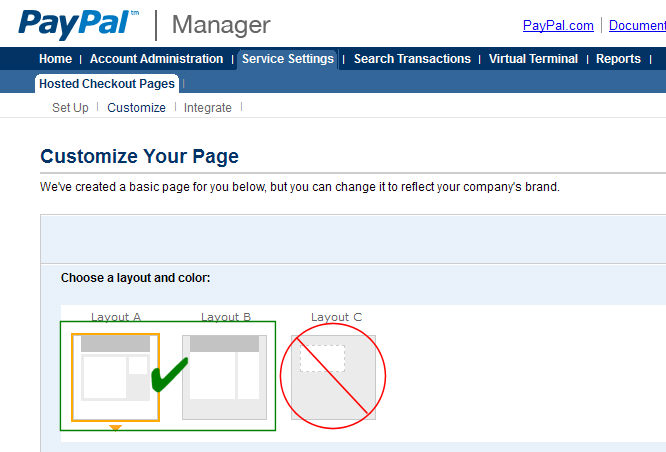
Caution:
When setting up your Paypal Payflow Pro Hosted Account on the PayPal web
site, when you reach the step where you select the layout for the checkout
page, you must select either Layout A or Layout
B. If you select Layout C
the Payflow Pro Hosted account will not
work.
● After you set up your Payflow Pro Hosted account, log on to the PayPal Manager (https://manager.paypal.com/loginPage.do).
● On the Service Settings page (on the PayPal Manager Web site), scroll down to the Display options on payment page and locate the Enter Cancel URL field. The Cancel URL specifies the page to which buyers will be taken when they click Cancel on the Payment page of your site.
● Enter the URL to your site's shopping cart.
Note:
To determine your site's shopping cart URL, log on to your site and click
the Storefront tab. Click the shopping Cart icon on your site's top navigation
bar (i.e., http://[YOURSITENAME]/DSF/ShoppingCart.aspx. Copy the URL from
the Web browser address field. Paste it into the Enter
Cancel URL field in the PayPal Manager.
Note that if your site is secure you will need to use https
instead of http in
the URL.
● From the Cancel URL Method pull-down list, select POST.
● Scroll down to the Billing Information section and select the billing information fields that you want to make required and editable by buyers when they are checking out.
● Scroll down to the Payment Confirmation section:
● In the Show confirmation page field, select the On my website option.
Note: If you do not select this option, the buyer will never be returned to your site from PayPal.
● Locate the Enter Return URL field. The Return URL will return buyers to the Payment page of your site once they have paid for their order.
● Enter the URL to your site's payment page.
Note:
To determine your site's
payment page URL, log on to your site. Paste your site's shopping cart
URL (which you determined in step 2 above) into the Enter Return
URL field and modify
it thus: http://[YOURSITENAME]/DSF/CCRedirect/CCPaymentAccepted.aspx. Replace the "ShoppingCart.aspx"
in the address URL with "CCRedirect/CCPaymentAccepted.aspx."
Note that if your site is secure you will need to use https
instead of http in the URL.
● From the Return URL Method pull-down list, select POST.
● Scroll down to the Security Options section:
● From the the AVS pull-down list, select Medium.
● From the the CSC pull-down list, select Full.
● From the the Enable Secure Token pull-down list, select Yes.
● Click Save Changes.
Note: For more information on how to get the order number for an order processed through PayFlow Pro Hosted to show in Reports, see Reports.
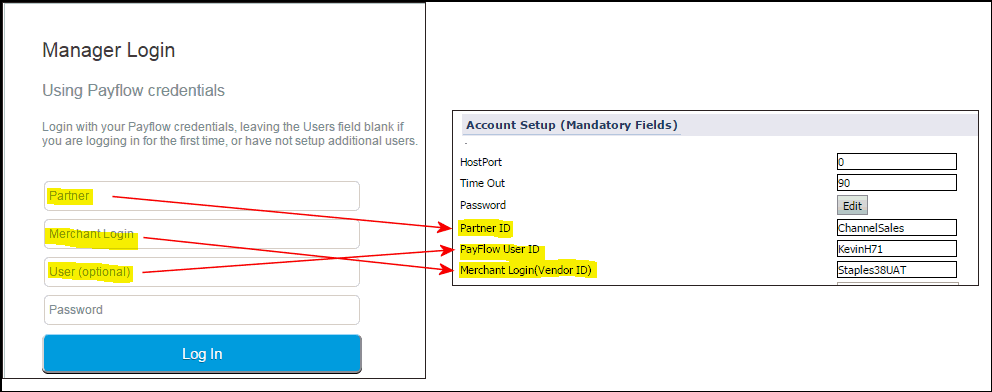
(3) To configure your account within MarketDirect, you will need the following information about your Payflow Pro Hosted merchant account:
● Host Address
● Demo Host Address
● API Host Address (for Payflow Pro only, not Payflow Pro Hosted)
● API Demo Address (for Payflow Pro only, not Payflow Pro Hosted)
● Password
● Partner ID
● Payflow User ID
● Merchant Login (Vendor ID)
Note:
The image below shows how the Partner ID, Payflow User ID, and Merchant
Login (Vendor ID) fields in MarketDirect's Account Setup (Mandatory Fields)
map with your Payflow Pro Hosted login credentials:
Note: Please note that Paypal Payments Pro was formerly called Website Payments Pro.
(1) If you have not already done so, before configuring your merchant account in MarketDirect, you must establish your Paypal Payments Pro account with Paypal.
For more information or to set up a PayFlow Pro account visit:
● web site:https://www.paypal.com/webapps/mpp/paypal-payments-pro
(2) To configure your account within MarketDirect, you will need the following information about your Paypal Payments Pro merchant account to enter in the "Payment Gateway Information" section of the merchant account configuration page in MarketDirect:
● Host Address
● Demo Host Address
● API Host Address
● API Demo Address
● API User ID
● API Password
● API Signature
(1) If you are interested in integrating a PayU-EU merchant account with MarketDirect, you must first establish a PayU account.
For more information or to set up a PayU account visit:
● web site: https://corporate.payu.com/
(2) Follow the steps below to integrate your PayU account with MarketDirect:
● After you set up your PayU account, log on to the PayU site to configure your account: https://secure.payu.com/.
● Enter your login credentials, then click Log in.
● Click Advanced configuration at the bottom of the page.
● Click Add shop at the top right of the page.
● On the Add shop page:
● Enter values for the following fields to identify the shop you are creating:
● (Required) Website address: Specify your web address.
● (Required) Shop name: Specify a name for your company.
● (Optional) Description: Add a description of your company site.
● Click Next.
● On the POS tab:
● In the POS type field, select Classic API.
● In the POS name field, specify a name of your choosing.
● In the Data coding field, select UTF-8.
● In the Error return address field, enter [your_site_base_domain]/DSF/SmartStore.aspx#!/ShoppingCart.
● In the Successful return address field, enter [your_site_base_domain]/DSF/CCRedirect/CCPaymentAccepted.aspx?sessionId=%sessionId%&PayUeu=yes.
Note:
You must enter the exact URL for your site that buyers will use to access
your site. For example, if buyers access your site with the URL "www.PrintStravagance.com"
you should enter this exactly followed with the suffix DSF/CCRedirect/CCPaymentAccepted.aspx?sessionId=%sessionId%&PayUeu=yes.
Thus: www.PrintStravagance.com/DSF/CCRedirect/CCPaymentAccepted.aspx?sessionId=%sessionId%&PayUeu=yes
Failure to do so will result in an error when buyers return to your site
after payment processing on the PayU site.
● Leave the Address for reports field empty.
● In the Available payment methods table:
Note: Based on the country in which you are registering the PayU account, there may be different payment methods available in the Available payment methods table. Be sure to enable only the credit card payment method option even if other options are available.
● In the Status column, click Enable.
● In the Automatic collection field:
● Click
Disable if you want to use delayed
captures
OR
● Click Enable if you want to use the immediate-sales transaction instead of delayed captures.
Note:
You will need the values in the CONFIGURATION
KEYS box to integrate your PayU account with MarketDirect. 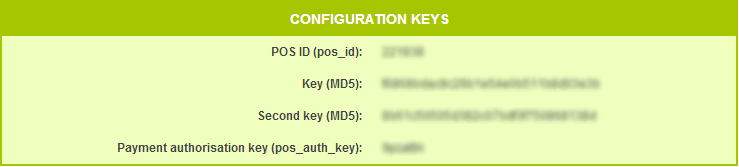
(3) You will also need the following information to enter in the "Account Setup - PayU-EU (Mandatory Fields)" sections of the merchant account setup page in MarketDirect:
● POS ID
● Key
● Second Key
● Payment authorisation key
(1) If you are interested in integrating a PayU-LatAm merchant account with MarketDirect, you must first establish a PayU account.
For more information or to set up a PayU account visit:
● web site: https://secure.payulatam.com/online_account/create_account.zul
(2) You will also need the following information to enter in the "Account Setup - PayU-LATAM (Mandatory Fields)" sections of the merchant account setup page in MarketDirect:
● Merchant ID
● API Login
● API Key
● Account ID
Important Note: The PayU-LatAm plugin supports only sales transactions instead of authorization and delayed capture. Thus you shouuld not add any buffer amount because there will be no way to return it to the buyer.
If you are interested in integrating a PxPay merchant account with MarketDirect, please contact MarketDirect technical support at md.support@efi.com.
For more information or to set up a PayFlow Pro account visit:
● web site: http://www.paymentexpress.com.au/ (Australia) / http://www.paymentexpress.com.nz/ (New Zealand)
You will need the following account information from PxPay to set up your MarketDirectg site to work with PxPay (in the 2. Set up a merchant account in MarketDirect section below):
● Host Address
● API Host Address
● Account Name
● Description
● Enabled
● Currency
● API User ID
● API Password
(1) If you have not already done so, before configuring your merchant account in MarketDirect, you must establish your SecurePay account.
For more information or to set up a SecurePay account visit:
● web site:https://www.securepay.com.au/
(2) To configure your account within MarketDirect, you will need the following information about your SecurePay merchant account to enter in the "Payment Gateway Information" section of the merchant account configuration page in MarketDirect:
● Login ID
● Transaction Key
● Text for Return Button
Note: This will be the label for the button that returns buyers from the gateway to MarketDirect.
Note: If your site is integrated with PrintSmith Vision MIS and you are using USAePay in Vision and want to use the same gateway in MarketDirect, you must integrate your MarketDirect site with USAePay for secure credit processing of PrintSmith Vision orders.
(1) If you have not already done so, before configuring your merchant account in MarketDirect, you must establish your SecurePay account.
For more information or to set up a SecurePay account visit:
● web site: https://usaepay.info/merchants/
(2) To configure your account within MarketDirect, you will need the following information about your USAePay merchant account to enter in the "Payment Gateway Information" section of the merchant account configuration page in MarketDirect:
● Transaction Key
● Pin (optional): This pin number is optional and is configured on the USAePay site.
(1) If you have not already done so, before configuring your merchant account in MarketDirect, you must establish your WPM account.
For more information or to set up a SecurePay account visit:
● web site: http://www.wpmsoftware.com/
Note: For information on WPM's online payment systems and online store solutions tailored specifically for educational institutions, visit http://www.wpmeducation.com/ or contact WPM by phone at +44 (0) 844 264 1580.
(2) To configure your account within MarketDirect, you will need the following information about your WPM merchant account to enter in the "Payment Gateway Information" section of the merchant account configuration page in MarketDirect:
● Client ID
● Shared Secret
● Pathway ID
● Department ID
(1) If you have not already done so, before configuring your merchant account in MarketDirect, you must establish your Worldpay account.
For more information or to set up a Worldpay account visit:
● web site: http://www.worldpay.com/
(2) To configure your account within MarketDirect, you will need the following information about your Worldpay merchant account to enter in the "Payment Gateway Information" section of the merchant account configuration page in MarketDirect:
● Shared Secret (this is the MD5 secret for transactions)
● Installation ID (this is the Worldpay installation ID)
1. In MarketDirect, go to Administration > Credit Card Management and Configuration > Merchant Accounts.
2. On the Merchant Accounts page, select the payment gateway for the merchant account you are creating from the pull-down list.
3. Click Add New Account.
4. Type a descriptive name for the account in the Account Name field.
Note: This is not your merchant account username but a descriptive name of your choice for identifying the account in MarketDirect.
5. Click Add New Account again.
6. On the merchant account setup page, complete the fields below.
7. In the Payment Gateway Information panel:
● Host Address URL: the web address (URL) for the payment gateway that MarketDirect’s credit card module will contact to sync up with the payment gateway’s processing software to process transactions made on this merchant account in MarketDirect).
Note: This field will typically be pre-populated.
Note: For Ingenico enter: https://secure.ogone.com/ncol/prod/maintenancedirect.asp
● API Endpoint URL: the web address (URL) for the payment gateway (e.g., that MarketDirect’s credit card module will contact to process transactions made on this merchant account in MarketDirect).
Note: For CardConnect account holders: Enter the URL you received from CardConnect when you established your account.
● Demo Host Address: the web address (URL) for the payment gateway that is used for testing the payment gateway.
Note: This field will typically be pre-populated.
Note: For Ingenico enter: https://secure.ogone.com/ncol/test/maintenancedirect.asp
● API Host Address or Host Address URL: the web address (URL) for the payment gateway (e.g., that MarketDirect’s credit card module will contact to process transactions made on this merchant account in MarketDirect).
Note: The field you see will depend on which merchant account you are configuring.
Note: In some cases, this field will be pre-populated with the appropriate host address for the payment gateway.
Note: For CardConnect account holders: Enter the URL you received from CardConnect when you established your account.
Note: For Ingenico merchant accounts enter: https://secure.ogone.com/ncol/prod/orderstandard_utf8.asp.
● API Demo Address or Demo Host Address URL: the web address (URL) where transactions made when the system is in demo mode will be processed (used for testing transactions processed through the payment gateway).
Note: For Ingenico merchant accounts enter: https://secure.ogone.com/ncol/test/orderstandard_utf8.asp.
Note: The field you see will depend on which merchant account you are configuring. Note: In some cases, this field will be pre-populated with the appropriate host address for the payment gateway.
● Demo API Endpoint URL: the web address for the demo test account.
Note: For CardConnect: You need not change the default value.
(CardConnect only) IP addresses allowed to call Webhook URL: This is the IP address from which the system gets the response from CardConnect. You need not change the default value for this field unless the IP changes and you need to update it.
● Note: MDSF will receive responses only from this IP for security purposes. Multiple IP addresses can be provided as comma-separated list if required.
● Is Paypal: Check this box to enable support of PayPal checkout.
Note: This field will be present only for Payflow Pro and Website Payments Pro accounts. It will not be present for CyberSource, Ingenico, or Payflow Pro Hosted accounts.
8. In the Account Information panel:
a. Account Name: Enter the unique name by which you will identify this merchant account.
b. Description: Enter a brief description of the account (e.g., PrintCo-Baltimore).
c. Enabled: Check this box to enable the account or leave it unchecked to leave the account disabled.
d. (Required) Currency: Enter the 3-letter ISO code (e.g., USD) for the currency in which transactions will be made in this merchant account.
Note: The merchant account currency must match the site currency standard if the account is enabled. For more information, see Configure Pricing Settings. Thus, if your site currency is INR your payment gateway currency should also be INR.
e. (First Atlantic Commerce only) ISO Numeric Currency Code: Enter the 3-digit ISO code (e.g., 840 for USD) for the currency in which transactions will be made in this merchant account.
f. (Ingenico only) Gateway Does Billing Address: Checking this box allows MarketDirect to send the buyer’s profile information to Ingenico as the billing address (i.e., so that buyers do not have to enter their billing address).
Note: Please note that this functionality works only with iDEAL.
g. (Braspag Pagador only) Display CVV: Check this box to prompt users to enter the CVV number associated with their selected payment card.
h. (SecurePay only) Do Sale Transaction: Check this box to have the system perform sales transactions instead of the default Authorization and Delayed Capture model. If a sales transaction is performed, the amount will be sent to the merchant immediately, and when the order is completed capture will not be called from MarketDirect.
Note: When using Do Sale Transaction, do not add a buffer amount because there is no way to return the buffer amount to the buyer.
i. (SecurePay only) Enable FraudGuard Service: Check this box to enable SecurePay's FraudGuard service.
j. (PayPal Payments Pro only) Is Paypal Supported: Check this box to enable support of PayPal checkout.
k. (PayPal Payments Pro and SecurePay only) Enable TLS12: This box should be selected to enable MarketDirect to use PayPal's enhanced security measures implemented in 2016.
l. (Authorize.net-Relay Response only (not for Authorize.net without Relay Response) Relay Response: You must check this box to cause buyers to be redirected from the Authorize.net payment page to the Order Confirmation page on your storefront after payment is made.
Important Note: If this option is not selected, the order will not be placed. The card is authorized but the order will remain in the buyer's cart and the buyer will not realize it.
m. (Worldpay only) Shared Secret: Enter the MD5 secret for transactions.
9. In the Credit Cards Accepted panel:
● Select all credit cards you want to accept as payment with this merchant account.
Note: Payflow Pro Hosted merchant account setup: You can disregard these credit card fields as they will be handled in the PayPal Manager (https://manager.paypal.com). However, you might want to enable at least one credit card type to test your configuration.
Note: For CyberSource Hosted merchant account setup: The credit cards will be configured at the CyberSource site.
Note: For Braspag Pagador setup: You cannot select more than one club per card type (e.g., you cannot have both Visa Cielo and Visa Banorte). You can, however, select different cards of the same account (e.g., Visa Cielo, MasterCard Cielo, Diners Club Cielo, etc.).
Note: The Account Setup (Mandatory Fields) will vary based on the type of merchant account you are setting up.
For 2Checkout accounts
● Account Number
Note: 2Checkout will provide you with your account number after you establish an account.
● Secret Word
Note: This is the secret word you chose on the 2Checkout site.
● Language
Note:
This is the language in which the 2Checkout payment form will be displayed
when your site redirects buyers to the 2Checkout payment page to complete
a purchase.
You must select one of the following languages and specify it with the
appropriate language code:
-- en
--zh
--da
--nl
--fr
--gr
--el
--it
--jp
--no
--pt
--sl
--sp
For AliPay accounts
Set up the account by entering the mandatory information in the Account Setup - AliPay (Mandatory Fields) panel:
● Partner ID
● Key
● Charset
For Authorize.Net accounts
Set up the account by entering the mandatory information in the Account Setup (Mandatory Fields) panel:
● Login ID
● Transaction Key
Note: You will get this value from the Secret Answer field on the Authorize.net account page "API Login & Transaction Key."
● Text for Return Button: Enter the text for the button that will return buyers to your site from the Authorize.net site.
Note: You can customize the text on this button with the name of your site or company, e.g., to say "Return to the SuperPrint Site."
● Click Save to save the new merchant account information, or click Cancel to discard your changes and return to the Merchant Accounts main page.
For Authorize.Net-Relay Response accounts
Set up the account by entering the mandatory information in the Account Setup (Mandatory Fields) panel:
● Login ID
● Transaction Key
Note: You will get this value from the Secret Answer field on the Authorize.net account page "API Login & Transaction Key."
● Text for Return Button: Enter the text for the button that will return buyers to your site from the Authorize.net site.
Note: You can customize the text on this button with the name of your site or company, e.g., to say "Return to the SuperPrint Site."
● Click Save to save the new merchant account information, or click Cancel to discard your changes and return to the Merchant Accounts main page.
For CardConnect merchant accounts
Set up the account by entering the mandatory information in the Credit Cards are configured at the CardPointe HPP site panel:
● Use mini form with only payer's name and no billing address: If this option is enabled, billing address fields will not be displayed in the buyer payment form.
● (Required) API access user name: Enter your CardConnect account access user name (provided by CardConnect when you established your account).
● (Required) API access password: Enter your CardConnect account access password (provided by CardConnect when you established your account).
● Click Save to save the new merchant account information, or click Cancel to discard your changes and return to the Merchant Accounts main page.
For CyberSource merchant accounts
Set up the account by entering the mandatory information in the Account Setup (Mandatory Fields) panel:
● (Required) Merchant ID: Enter your CyberSource merchant ID.
● (Required) Keys Directory: Enter the path to the folder in which your security keys are stored.
● Click Save to save the new merchant account information, or click Cancel to discard your changes and return to the Merchant Accounts main page.
For CyberSource Hosted merchant accounts
Set up the account by entering the mandatory information in the Account Setup (Mandatory Fields) panel:
● Merchant ID: Enter your CyberSource merchant ID.
● Shared Secret and Serial Number:
● Log into CyberSource Business Center at https://ebc.cybersource.com/.
Note: Note that your username is the same as your Merchant Account name. For step-by-step guidance on setting up your security keys log in to this site: http://www.cybersource.com/developers/test_and_manage/managing/update_keys_and_certificates/
● From the menu select Tools & Settings tab.
● Click Hosted Order Page in the left navigation bar and then select Security.
● In the Generate
Security Script section, select
the scripting language C#
(.NET).
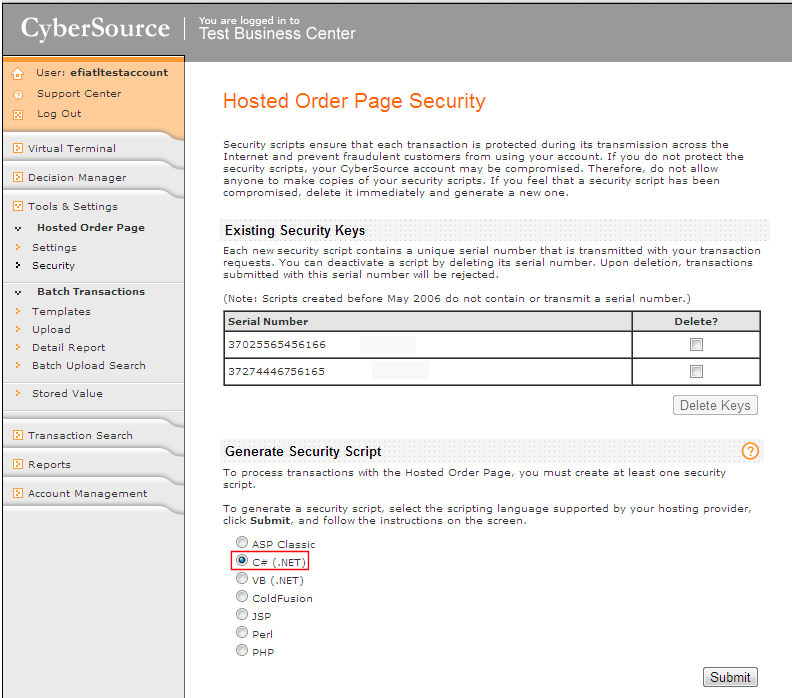
● Click Submit.
Note:
A file named “HOP.cs” will be downloaded to your system. Open the downloaded
file with a text editor such as Notepad:
1. Copy the shared secret
from the private String getSharedSecret() field (i.e., the
characters between the parentheses) to your clipboard. For example:
private String getSharedSecret()
{
return "MIGfMAGCSqGSIb3DQA4GNADCBiQKBgQCuIwkQH/+yOGcezioxQ4wIDAQAB";
2. Paste the shared secret into the Shared
Secret field.
3. Copy the serial number
from the getSerialNumber() field
(i.e., the characters between the parentheses) to your clipboard. For
example:
private String getSharedSecret()
{
return "3806528488790176056166";
4. Paste the shared secret into the Serial
Number field.
For E-xact accounts
Set up the account by entering the mandatory information in the Account Setup - Authorization (Mandatory Fields) panel:
● Login Id
● Transaction Key
Note: You will get this value from your E-xact account.
● Gateway Id
● API Password
● Text for Return Button: Enter the text for the button that will return buyers to your site from the SecurePay site.
Note: You can customize the text on this button with the name of your site or company, e.g., to say "Return to the SuperPrint Site."
For First Atlantic Commerce accounts
Set up the account by entering the mandatory information in the Account Setup (Mandatory Fields) panel:
● Merchant ID
● Acquirer ID
● Processing Password
For Ingenico merchant accounts
Set up the account by entering the mandatory information in the Account Setup (Mandatory Fields) panel:
● PSPID: This is the name you gave your account when you created it.
● SHA-IN Pass phrase: This is the pass phrase you entered in the Your technical settings > Transaction feedback tab on the Ingenico page.
Note: Remember that this pass phrase cannot contain special characters (e.g., * ! & %).
● SHA-OUT Pass phrase: This is the pass phrase you entered in the Your technical settings > Data and origin verification tab on the Ingenico page.
Note: Remember that this pass phrase cannot contain special characters (e.g., * ! & %).
● USER Id (For performing a Data Capture): This is the USERID you used for the second user account you created in step 3 above.
● Password (For User Account performing the Data Capture): This is the password you used for the second user account you created in step 3 above.
Note: You will need to click Edit and then enter the password.
● Click Save to save the new merchant account information, or click Cancel to discard your changes and return to the Merchant Accounts main page.
For Pagadito merchant accounts
● Set up the account by entering the mandatory information in the Account Setup - Authorization (Mandatory Fields) panel:
Note: Please obtain the account information below from Pagadito.
● UID: Enter your user Pagadito ID.
● WSK: Enter the key to access Pagadito.
● Click Save to save the new merchant account information, or click Cancel to discard your changes and return to the Merchant Accounts main page.
For Payflow Pro and Payflow Pro Hosted accounts
Set up the account by entering the mandatory information in the Account Setup (Mandatory Fields) panel:
● (Required Field) Host Port: Recommended port is 443 and should be used unless your system administrator advises otherwise
● Time Out: Recommended time-out value is 90 seconds
● (Required Field) Password: Your Payflow Pro account password.
Note: The password is case-sensitive. You will need to click Edit and then enter the password.
● (Required Field) Partner ID: Your Payflow Pro Partner ID, issued by Payflow Pro when you set up your account’s merchant payment processing account.
Note: The partner ID is case-sensitive.
● (Required Field) Payflow User ID: Your Payflow User ID, issued by Payflow Pro when you set up your account’s Payflow Pro gateway account with Payflow Pro.
Note: The Payflow User ID is case-sensitive.
● (Required Field) Merchant Login (Vendor ID): Your Vendor ID number, issued by Payflow Pro when you set up your account with Payflow Pro.
● Proxy Server Address: Enter a proxy server address if your server is behind a firewall.
● Proxy Server Port: Enter a number for the proxy server port if needed.
● Proxy Server Logon: Enter a number for the proxy server port if needed.
● Proxy Server Password: Enter a number for the proxy server port if needed.
Note: The password is case-sensitive. You will need to click Edit and then enter the password.
● Click Save to save the new merchant account information, or click Cancel to discard your changes and return to the Merchant Accounts main page.
For PayPal Payments Pro accounts
Set up the account by entering the mandatory information in the Account Setup (Mandatory Fields) panel:
● API User ID
● API Password
● API Signature
● API Business Mail ID: This is an optional field; you can leave this field blank.
Note: This is the email address that was used to create the account on the PayPal site.
● API Version: This field is not optional: Please enter DSFV10 in this field.
● Click Save to save the new merchant account information, or click Cancel to discard your changes and return to the Merchant Accounts main page.
For PayU (Europe) merchant accounts
● Set up the account by entering the mandatory information in the Account Setup - PayU-EU (Mandatory Fields) panel:
Note: Please obtain values for the first four fields below from the POS tab in your PayU account.
● POS ID
● Key
● Second Key
● Payment authorisation key
● Language (en/pl/cs/bg/de/el/hu/ro/ru/sk/sl): Select the language buyers will see on the PayU site after they place an order.
For PayU (Latin America) merchant accounts
● Set up the account by entering the mandatory information in the Account Setup - PayU (Mandatory Fields) panel:
Note: Please obtain values for the first four fields below from your PayU account.
● Merchant ID
● API Login
● API Key
● Account ID
● Language (en/es/pt): Select the language buyers will see on the PayU site after they place an order.
Note: When buyer gets redirected to PayU payments page, it can be shown in English / Spanish/ Portuguese. Language to be shown can be configured in the merchant account configuration. If buyer chooses the language other than what is configured in the merchant account, same will be sent to PayU if it is one among these languages (en/es/pt). If buyer chooses any other language like French/German etc, language configured in the merchant account configuration will be sent to PayU.
Important Note: The PayU-LatAm plugin supports only sales transactions instead of authorization and delayed capture. Thus you shouuld not add any buffer amount because there will be no way to return it to the buyer.
For PxPay merchant accounts
● Set up the account by entering the mandatory information in the Account Setup (Mandatory Fields) panel:
Note: Please obtain the account information below from WPM.
● API User ID: Enter your PxPay client ID.
● API Password: Enter your PxPay password.
● Post User Name: Enter your pathway ID.
● Post Password: Enter your department ID.
● Click Save to save the new merchant account information, or click Cancel to discard your changes and return to the Merchant Accounts main page.
For SecurePay accounts
Set up the account by entering the mandatory information in the Account Setup (Mandatory Fields) panel:
● Login ID
● Transaction Key
Note: You will get this value from your SecurePay account.
● Text for Return Button: Enter the text for the button that will return buyers to your site from the SecurePay site.
Note: You can customize the text on this button with the name of your site or company, e.g., to say "Return to the SuperPrint Site."
For USAePay accounts
Set up the account by entering the mandatory information in the Account Setup (Mandatory Fields) panel:
● Transaction Key
Note: You will get this value from your USAePay account.
● Pin (optional)
Note: This is the pin code you set for your USAePay account.
For Worldpay merchant accounts
Set up the account by entering the mandatory information in the Account Setup (Mandatory Fields) panel:
● Installation ID: Tthis is the Worldpay installation ID.
For WPM Hosted merchant accounts
● Set up the account by entering the mandatory information in the Account Setup (Mandatory Fields) panel:
Note: Please obtain the account information below from WPM.
● Client ID: Enter your WPM client ID.
● Shared Secret: Enter your shared secret.
● Pathway ID: Enter your pathway ID.
● Department ID: Enter your department ID.
● Click Save to save the new merchant account information, or click Cancel to discard your changes and return to the Merchant Accounts main page.
Note: To be able to test your credit card merchant account, the site must be running in Demo/Test mode. You must enable Demo/Test mode before testing a merchant account. Not all merchant accounts can be tested using the automated test routine. For example, testing Ingenico requires a manual procedure. See Testing an Ingenico Merchant Account for more information.
1. Go to Administration > Site Settings.
2. On the Basic Settings tab scroll down to the Credit Card Configuration section and check the box Enable Demo/Test Mode.
3. Click Save Changes to put your site in Demo/Test mode.
Note: In Demo/Test mode you can test merchant accounts and use test credit card numbers while placing orders.
4. Go to Administration > Credit Card Management and Configuration > Merchant Accounts.
5. On
the Merchant Accounts page, click
the Edit icon ![]() for the account to open the account profile page.
for the account to open the account profile page.
6. Click
Test. The system will test your
account settings, refresh the screen, and return results at the top of
the page and any errors found with the account data or settings will be
displayed at the bottom of the page. Here are some of the various
messages you will receive:
In Payflow Pro this message... |
Means the merchant account test... |
"The test code value is: 0. Your merchant account has been tested and no errors were found.” |
Passed |
“The test code value is: 1. The associated error string is: User authentication failed.” |
Failed |
Canceled |
Canceled |
In CyberSource this message... |
Means the merchant account test... |
"The test code value is: 100. Your merchant account has been tested and no errors were found." |
Passed |
"The test code value is: not 100. The associated error string is: User authentication failed.” |
Failed |
Canceled |
Canceled |
7. Click Save to save the new merchant account information, or click Cancel to discard your data, and return to the Merchant Accounts main page.
Warning: Be sure to uncheck the Enable Demo/Test Mode box on the Site Settings page and click Save Changes when you are ready to begin accepting credit card orders.
Testing an Ingenico merchant account
To test an Ingenico merchant account:
1. In MarketDirect, place an order for a small amount (e.g., $2) and ship the order to ensure that capture occurs.
2. Go to the Administration > Credit Card Management and Configuration > Credit Card Transactions page.
3. Locate the order in the table.
4. If the Transaction Type column for the order shows "Delayed Capture" then the merchant account is working properly.
5. If the Transaction Type column for the order does not show "Delayed Capture" then the merchant account is not working properly.
a. Login to your Ingenico merchant account.
b. In the Ingenico menu, under Operations, click View transactions.
c. Scroll down the Authorisation column. If the order name is listed the merchant account is working properly. The Status column should show the order as 9 - Payment Requested.
Note: If the merchant account test fails, verify that the account is configured properly (see the Ingenico setup section). If it is, contact Ingenico support by logging into your Ingenico account and clicking SUPPORT at the top of any page.
To assign a merchant account to a Print Shop:
1. Go to the Print Shops page.
2. Select the Print Shop you want to assign the new merchant account.
3. In the Supported Payment Method field, check the box Credit Card.
4. From the Credit Card Merchant drop-down list, select the new account.
Note: For more information on configuring Print Shops, see Creating & Editing Print Shops.
1. On the Merchant Accounts page, check the box in the Select column for the row that lists the merchant account to remove.
Note: To select all merchant accounts, check the box in the Select column heading row at the top of the table.
2. Click Remove.