Note: For information on how to set up your site for search engine optimization, see Configure Site for SEO.
MarketDirect StoreFront provides support for Google Analytics (or another similar site information tracking application, such as Yahoo!) to collect statistical information on traffic to the MarketDirect StoreFront website.
Google Analytics (and similar site information tracking applications) show you how people found your site, how they explored it (and for how long), what pages they visited, and how you can enhance their visitor experience. This information can help you optimize your site to meet customer needs.
Note: Note that the site traffic Information captured will be stored on the tracking application provider's site (e.g., Google Analytics) and MarketDirect StoreFront administrators will have to log into the provider's web site to retrieve the information. The information will not be stored or retrievable in or from MarketDirect StoreFront.
What is Google Analytics Tracking for? |
When should you use it? |
Google Analytics and similar site tracking systems gather information about how visitors to your site use the site. It tracks what pages they visit and what they do (i.e., download the PrintMessenger print driver, order a product, etc.). |
When you want to monitor how site visitors are using your site and gather data you can analyze to optimize your site. |
Before enabling Google Analytics Tracking in MarketDirect StoreFront, you must first establish a Google Analytics account.
1. Visit Google Analytics at: http://www.google.com/analytics/
2. Follow the on-screen instructions to set up your Google Analytics account and a profile for the MarketDirect StoreFront web site you will be tracking.
Note:
Online instructions for
setting up a Google Analytics account are at:
http://support.google.com/analytics/answer/1008015?hl=en&topic=1726909&ctx=topic
General help and support
for Google Analytics is available online at:
http://www.google.com/intl/en_ALL/analytics/index.html
3. After your account is set up, leave your Google Analytics account screen open and log on to MarketDirect StoreFront as an administrator.
Note: MarketDirect StoreFront sends Google Analytics e-commerce transaction details for orders placed in Classic storefronts only, not for orders placed in SmartStore storefronts.
1. Go
to Administration > Google Analytics
Tracking.
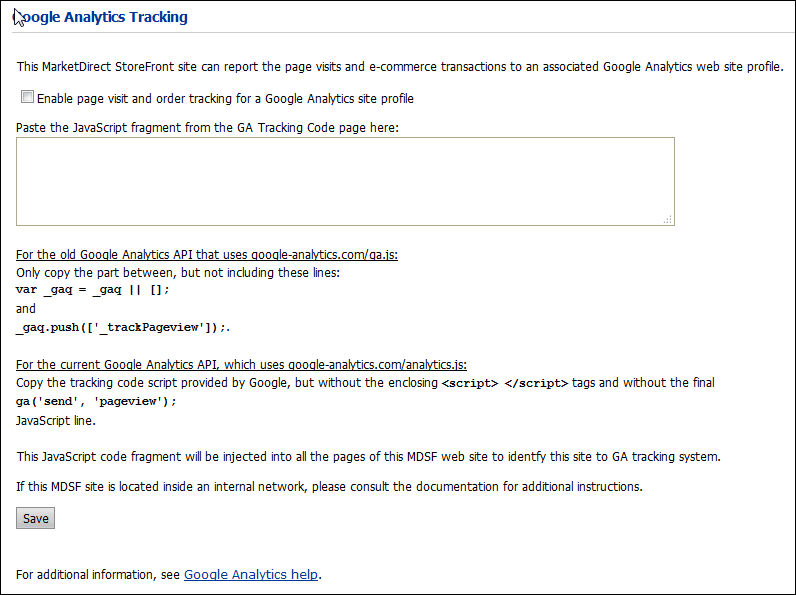
2. Select Enable page visit and order tracking for a Google Analytics site profile to enable tracking.
3. Without closing your MarketDirect StoreFront site, navigate to your Google Analytics account in a separate browser window.
4. What you do next will depend on whether you are setting up from the legacy or newer version of Google Analytics:
1. From
the "Paste this code on your site" panel, select and copy to
the clipboard only the JavaScript
code between the lines
var
 _gaq = _gaq || [];
_gaq.push(['_trackPageview']);


(as shown below)
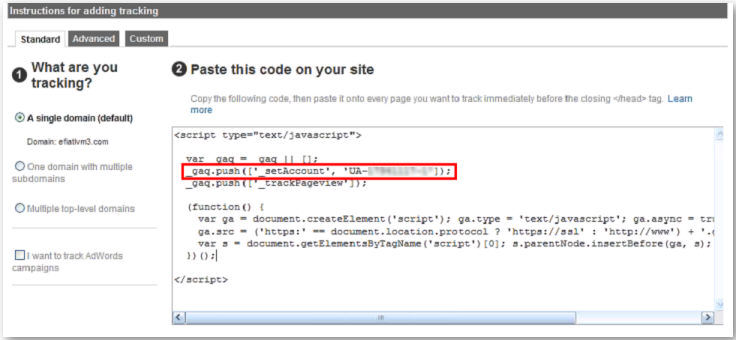
Note:
Typically this will include the following line of code (where the XXX...
is your tracking number:
_gaq.push(['_setAccount', 'XXXXXXXXX']);
2. Return to the Google Analytics Tracking page in MarketDirect StoreFront.
3. In
the Paste the JavaScript fragment
from the GA Tracking Code page here: text box, paste the code you
copied from the Google Analytics admin page.
Note:
Be aware that if your site
is behind a firewall you might receive a Tracking Status message in the
"Tracking Status Information" panel in your Google Analytics
account page that reads:
"Tracking Not Installed: The Google Analytics tracking code has not
been detected on your website's home page. For Analytics to function,
you or your web administrator must add the code to each page of your website."
This message is essentially informing you that Google Analytics cannot
connect to your site (e.g., because the URL is not exposed). Your site
is able, however, to communicate information to Google Analytics. Thus,
even though your MarketDirect StoreFront
site is behind a firewall, as long at your site can communicate with external
applications, Google Analytics will be able to track the site traffic
information.
Note: Note that Google Analytics generally updates your reports every 24 hours. Thus it may take 24 hours for data to appear in your account after you have first installed the tracking code. For more information, consult Google Analytics online help: http://support.google.com/analytics/.
4. Click Save.
1. Go to the Admin area and navigate to the Tracking Info | Tracking Code section.
2. Select
and copy the script in the script box to your clipboard.
3. Return to the Google Analytics Tracking page in MarketDirect StoreFront.
4. In the Paste the JavaScript fragment from the GA Tracking Code page here: text box, paste the code you copied from the Google Analytics admin page.
5. Remove the following elements from the code you pasted:
● <script>
● ga('send', 'pageview');
● </script>

Note: The red strikethroughs on the image above show the elements you need to remove from the script.
Note:
Be aware that if your site
is behind a firewall you might receive a Tracking Status message in the
"Tracking Status Information" panel in your Google Analytics
account page that reads:
"Tracking Not Installed: The Google Analytics tracking code has not
been detected on your website's home page. For Analytics to function,
you or your web administrator must add the code to each page of your website."
This message is essentially informing you that Google Analytics cannot
connect to your site (e.g., because the URL is not exposed). Your site
is able, however, to communicate information to Google Analytics. Thus,
even though your MarketDirect StoreFront
site is behind a firewall, as long at your site can communicate with external
applications, Google Analytics will be able to track the site traffic
information.
Note: Note that Google Analytics generally updates your reports every 24 hours. Thus it may take 24 hours for data to appear in your account after you have first installed the tracking code. For more information, consult Google Analytics online help: http://support.google.com/analytics/.
6. Click Save.
MarketDirect StoreFront sends information to Google Analytics on all pages on your site so you can track how many times the various pages in your site are visited. In addition, you can create goals and funnels in Google Analytics tailored to your objectives for tracking usage of your site. Clicks on specific pages, products, etc. are reported (e.g., /ProductAddedToCart/AdHoc/Copies) so you can use them in defining your goals and funnels.
The table below lists the URLs you can use when defining goals and funnels in Google Analytics:
This URL... |
Tracks this Buyer Activity... |
|---|---|
/KitStartForProduct/AdHoc/My_Product |
User has pressed Begin for a kit-type product that requires customization of individual items in the kit. Product type ("Kit") and product name are in the URL. |
/KitStartForPrintShop/My_Facility |
User has pressed Begin for a kit-type product that requires customization of individual items in the kit. Print Shop names are in the URL. |
/TicketingStartForProduct/AdHoc/My_Product |
User has pressed Begin for an ad-hoc product, or for a static document product that requires ticketing options. Product type and name are in the URL. |
/TicketingStartForPrintShop/My_Facility |
User has pressed Begin for an ad-hoc product, or for a static document product that requires ticketing options. Print Shop names are in the URL. |
/FilesUploadForProduct/AdHoc/My_Product |
User has pressed Begin for an ad-hoc product, or for a static document product that requires ticketing options. Print Shop names are in the URL. |
/FilesUploadForPrintShop/My_Facility |
User has entered the file upload page for a product that requires files to be provided. Product type and name are in the URL. |
/TicketOptionsForProduct/AdHoc/My_Product |
User has entered the file upload page for a product that requires files to be provided. Print Shop names are in the URL. |
/TicketOptionsForPrintShop/My_Facility |
User has entered the ticketing options page for a product that requires ticketing options. Product type and name are in the URL. |
/TicketReviewForProduct/AdHoc/My_Product |
User has entered the ticketing options page for a product that requires ticketing options. Print Shop names are in the URL. |
/TicketReviewForPrintShop/My_Facility |
User has entered the print job review page after providing files and ticketing options. Product type and name are in the URL. |
/AddProductToCart/AdHoc/My_Product |
User has entered the print job review page after providing files and ticketing options. Print Shop names are in the URL. |
/AddToCartForPrintShop/My_Facility |
User has added a new item to the shopping cart. Product type and name are in the URL. |
/OrderPlacedForProduct/AdHoc/My_Product |
User has added a new item to the shopping cart. Print Shop names are in the URL. |
/OrderPlacedInPrintShop/My_Facility |
User has placed an order that is to be fulfilled in the given Print Shop. Print Shop names are in the URL. |
/Registration/UserNameAndContact |
New user is self-registering - entering the contact and authentication information. |
/Registration/PrintShopSelection |
New user is self-registering - selecting the default Print Shop (after the contact and authentication information has been entered). |
/Registration/Confirmation |
New user has self-registered successfully. |
/ViewCategory/My_Category |
A user is viewing the list of products in the given category. |
/ViewCategory/storefront/My_Storefront |
A user is viewing the list of feature products and categories in the given storefront. |
/ProductView/AdHoc/My_Product |
A user is seeing product information either in a list of product for a storefront or a category, or in product information detail page (if such a page is enabled, instead of short-cutting straight to ticketing or shopping cart when the user clicks on a product in the list). |
/AnonymousUserVisit |
A user who is not currently logged in is viewing a page on the site. This virtual page click is only issue of the first page view by this user. |
/Login_with_ExistingAccount |
A user has logged into the MarketDirect StoreFront site using the account created earlier, as opposed to self-registering for a new account). |
/Logoff |
A user who was logged into MarketDirect StoreFront site has explicitly logged off. This virtual page click is not issued when the user abandons a login session (e.g. by closing the web browser, or leaving MarketDirect StoreFront site without logging out first). |
/DownloadPrintMessenger/Windows |
User has clicked the download link for the Windows version of the Print Messenger. |
/DownloadPrintMessenger/Mac |
User has clicked the download link for the Mac version of the Print Messenger. |
/ReorderProduct/AdHoc/My_Product |
User has re-ordered a previously placed order that includes the product in the URL. |
Note 1:
/AddProductToCart/AdHoc/My_Product
and /AddToCartForPrintShop/My_Facility my appear out of the ticketing->order
placement workflow for non-printed products (NPPs; it replaces /KitStart
or /TicketingStart actions).
Note 2:
“AdHoc” will be replaced
by an appropriate product type for non-Ad-Hoc products.
Note 3:
The product and Print Shop “file names” are derived from
the original names by replacing the spaces and special characters with
underscores “_”. MarketDirect StoreFront
does NOT
guarantee that two or more
products will not get the same file name (e.g. “Copy/Prints” and “Copy
Prints” will be both represented as “Copy_Prints”).
Note 4:
For products and categories,
the translations for the name are ignored when generating the “file name.”
The default name is always used.
Note:
EFI does not provide technical
support for Google Analytics. If you need help or support in setting up
your Google Analytics account or analyzing the data tracked, please refer
to the Google Analytics Help page at:
http://support.google.com/analytics/
Complete the steps below to configure your site for search engine optimization (SEO) with Google. You can add your site to Google to make use of Google's webmaster tools and add a sitemap for your site to improve search rankings.
Google's webmaster tools that provide you with detailed reports about your site pages' visibility on Google and useful tools to improve search engine optimization for your site (e.g., to improve your site's search engine ranking). To use these tools, follow the steps below to add and verify your site.
1. Click Google Webmaster Tools to go to the Google Webmasters page.
2. Click Sign in to Webmaster Tools with your Google account credentials.
3. Type the URL of the site you want to add in the text box and then click ADD A SITE.
Note: Be sure to type the entire URL, such as example.com/DSF.
4. (Optional) On the site ownership verification page, choose either the recommended method or one of the alternate method to verify your ownership of the site.
● Click Verify and follow the instructions.
● Click Continue.
A sitemap is a file that lists the web pages of your site that will communicate information about the organization of your site content to Google and other search engines. Search engine web crawlers such as Googlebot read the sitemap file to more crawl your site more effectively. A sitemap can improve the search engines' crawling of your site. Thus, a smartstore specific site map will improve your page ranking. Please note that the sitemap will be generated only for the default storefront. All products and categories published on the storefront will be available in the sitemap with a distinct URL. This will allow buyers to search for any product or category/sub-category available on a storefront page accessible to anonymous users. The relevance of the data available on pages and number of matches of the search term will result in a better ranking in Google.
Note: Please be aware that given Google's changed stance on keywords, if you attempt keyword stuffing, your site might be "blacklisted."
1. Click Google Webmaster Tools to go to the Google Webmasters page.
2. Click SIGN IN and enter your Google account credentials.
3. On the Search Console, click the link to the site whose sitemap you want to submit.
4. Click Sitemaps.
5. On the Sitemaps page, click ADD/TEST SITEMAP.
6. Verify
that the URL shown is your domain (e.g., has /DSF
appended to it), then type sitemap.xml
in the text box.
7. Click Submit.
8. Refresh your browser to see your new sitemap in the sitemaps list.
9. Click on your new sitemap in the list of sitemaps on the Sitemaps page to open the Sitemaps Details page and investigate any current errors or potential warnings Google encountered reaching your sitemap or the URLs included in it.
● In a web browser, search for your site in Google search engine with the following format: site:example.com/DSF.
Note: It might take 3-4 days for your site to show up in the search engine.
● Reports
● Creating a New Query with the Dynamic Query tool
● Logs and Reporting - Contents