MarketDirect StoreFront supports connection to EFI Fiery, Fiery XF, and JDF Connector output devices. The JDF Connector option supports integration with external JDF connectors enabling your site to communicate with JDF-enabled devices via the JDF/JMF structure. MarketDirect StoreFront sends jobs to the Fiery JDF Connector (FJC), eliminating the need for the Fiery Connector II. This enables sending jobs to all Fiery System 8 or higher devices and some Fiery System 7 devices. The Fiery Connector II is no longer needed as Fiery connectivity components are installed during the MarketDirect StoreFront installation process.
MarketDirect StoreFront integrates with EFI Fiery System 10 and higher driven output devices. The goal is to provide seamless integration between cloud (EFI-hosted) or self-hosted installations of MarketDirect StoreFront and Fiery-driven printers in your print facility. MarketDirect StoreFront will discover and display information on the and finishing options in all available Fiery-enables printers, enabling operators in MarketDirect StoreFront to route jobs to the appropriate output device based on the job ticket and printer capabilities.
The sections below cover how to:
● Add a device connector (EFI Fiery, Fiery XF, JDF Connector, Hot Folders, MicroPress, CD-ROM)
● Automatically or manually
● mapping between MarketDirect StoreFront and available Fiery-driven devices
● Map device capabilities between MarketDirect StoreFront and Fiery-driven devices
● Printing workflow for non-FJDF enabled printers: Hot folders
Note:
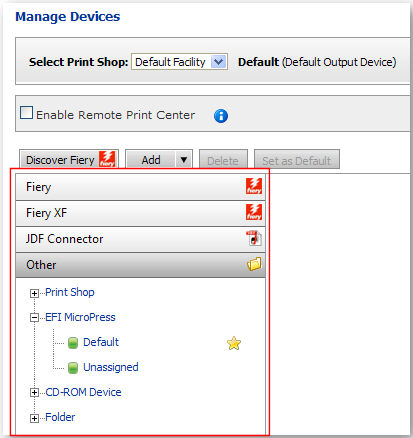
The navigation bar on the left side of the table lists all of the output
devices by type.
1. Go
to Administration > Manage Devices.
OR
1. Go to Administration > Print Shops.
a. Click the name of the Print Shop to which you want to add an output device.
b. In the Default Output Device field, click Manage Devices.
2. On the Manage Devices page, from the Select Print Shop pull-down menu select the Print Shop whose Fiery devices you are managing.
3. Enable Remote Print Center (if your MarketDirect StoreFront is hosted by EFI):
Note:
This step applies always to cloud, or EFI-hosted,
MarketDirect StoreFront
shops. In many cases, the Remote Print Center is also required for self-hosted
shops (i.e., when the MarketDirect StoreFront
server needs to communicate with output devices across a firewall-secured
network). If you are a self-hosted shop, skip this step and go to step
4 below.
Check the Enable Remote Print
Center box if your MarketDirect StoreFront
site is hosted by EFI (cloud) rather than self-hosted (standalone).
The Remote Print Center (RPC) utility is needed when the MarketDirect StoreFront server
(which is the computer that runs the MarketDirect StoreFront
software) is located outside your Print Shop’s
domain (your local network). So if your MarketDirect StoreFront
site is cloud (hosted by EFI) you will need to enable RPC. RPC allows
files and documents to be sent to your firewall-secured local network.
Note: Remote Print Center for cloud
(EFI-Hosted) Installations of MarketDirect StoreFront
In the cloud (EFI-hosted) scenario: MarketDirect StoreFront
is installed on a server in EFI’s web hosting center, which of course
is outside the shop’s firewalled network. Thus, the MarketDirect StoreFront
server at EFI cannot communicate directly with Fiery devices on the shop’s
network. To enable the hosted MarketDirect StoreFront
server to communicate with the hosted shop’s network, MarketDirect StoreFront
uses a software utility called Remote Print Center (RPC). The RPC acts
as a proxy for MarketDirect StoreFront
and monitors the shop’s hosted MarketDirect StoreFront
server to determine if it needs to perform any tasks (e.g., download document
files for the Print Shop to
print, communicate statuses to the shop). The RPC is required for discovery
of Fiery-driven devices on the hosted shop’s network.
Note: In the self-hosted (standalone)
scenario: MarketDirect StoreFront
is installed locally within the shop’s firewall-secured network and can
communicate directly with output devices on the network. Thus, the RPC
utility is not needed.
Note:
If RPC is already installed in
the Print Shop, the following
message will be displayed in green text: “RPC is enabled for the selected
Print Shop.” You can click the
down-facing arrow – – to expand the RPC panel.
a. Click Download Installer to launch the Opening RpcInstall.msi dialog.
b. Click Save File and specify a folder on the Save As dialog.
c. When download is complete, click Open or double-click the downloaded RpcInstall.msi file to launch the Remote File System MSI installation on the device you have selected to be your RPC server.
Note: Please note that RPC requires
the following on the client computer:
—.NET framework 3.5 SP1: Click
for instructions for installing .NET framework.
—Microsoft Message Queuing (MSMQ) operating system component: Click
here for instructions for installing MSMQ.
—Port 4545 must be enabled on both the host and client computers: Click
here for instructions for manually opening port 4545.
Please note that port 4545 is only used locally. All communication between
MarketDirect StoreFront
and Remote Print Center is via ports 80/443.
d. On the EFI Remote Print Center Setup Wizard click Next and then read and accept the Software License Agreement.
e. Follow on-screen instructions to install the Remote Print Center (RPC).
f. The RPC installer will automatically list Print Shops that have RPC enabled on the Remote Print Center Enablement page.
Note: For backward compatibility, MarketDirect StoreFront supports copy-paste of the installation key only if the installer failed to populate the list of Print Shops. Thus, if for some reason the installer does not show the list of Print Shops with RPC enabled, you can complete the following step: Copy the Installation Key from the Remote Print Center Enablement page and paste it into the Installation Key field if prompted for it. This installation key links to your Print Shop. You can only use this key at one Print Shop. You will need to repeat this process to get a unique key for other Print Shops. You can have only one RPC installed for a Print Shop. If you attempt to install RPC in a Print Shop that already has RPC installed, the installer will inform you that RPC is already configured for the Print Shop.
g. On the RPC Registration page, in the User Name field enter your administrator user name.
h. In the Password field, enter your administrator password.
i. From the Printshops pull-down list select the MarketDirect StoreFront Print Shop for which you are installing the RPC.
j. Click Load Printshops to load Print Shop details.
k. In the Machine Name field enter the name of the computer you are installing RPC on.
Note: If your machine (i.e., server) name contains an underscore RPC will not function correctly. Please edit your host name so that it contains no underscore (_) characters.
l. In the Machine IP field enter the network URL address for the computer you are installing RPC on.
m. Click Finish.
n. Restart your system as directed.
Note: For more information on the Remote Print Center see the topic Remote Print Center.
o. Additional RPC controls:
● Is Legacy: Check this box if RPC was installed under a previous version of MarketDirect StoreFront.
Note: Legacy refers to RPCs installed from a previous version of MarketDirect StoreFront, and these RPCs will continue to work in previous versions.
● Enable Polling: Check this box to enable polling for the selected Print Shop’s RPC (polling is when the RPC calls into MarketDirect StoreFront to report the status of the RPC).
Note: If you do not enable polling you will not be able to bring Remote Print Center status back to online status until you restart the “EFI Distributed Services” service that governs the Remote Print Center. Please make sure you restart the service after setting Polling Enabled status back to True. To do so: (1) Go to Control Panel > Administrative Tools > Services. (2) Make sure the “EFI Distributed Services” service is in “Started” status.
● Polling Interval: The interval (in seconds) between polling calls (if Polling Enabled is turned on). The minimum value is 1 second and the maximum value is 999 seconds.
● Click Turn Off RPC in Client to stop the RPC service on the client machines for the selected RPC and uncheck Enable Polling, thus preventing polling from automatically starting again when the client machine is rebooted).
Note: This can serve as a “panic” button to shut off the RPC service.
● Click Reset RPC Key to remove the RPC key (i.e., do this if you need to reinstall the RPC for this Print Shop – for example, on another client machine – because the installer is set up to prevent installation of more than one RPC per Print Shop).
Note: This setting is for backward compatibility and gives you the option of keying in the RPC installation key. Note that this is available only when there is a failure in generating the list of Print Shops.
● Click Check
Status to manually poll and update the status of all RPCs. The status
of the Print Shop’s RPC from
the latest poll will be shown.
4. Add devices:
Note: You can integrate a Fiery device with MarketDirect StoreFront either: (1) automatically or (2) manually.
a. Automatic integration (of Fiery devices):
● Click Discover Fiery.
● On the Add a new Device dialog, select AutoSearch (or choose another option if you want to limit your search to a specific range of IP addresses on your network) and then click Go to search for all Fiery devices on your network.
Note: A dialog listing all discovered Fiery devices will open.
● Device Name: the name of the Fiery device.
● IP Address: the network address for the device.
● Type: specifies whether the device is Fiery JDF-enabled (FJDF) or non-Fiery JDF-enabled.
● Select the devices you want to integrate with MarketDirect StoreFront and then click Add.
● The Device List will show all Fiery devices selected as well as any Fiery job presets and virtual printers and any Fiery Central job presets you have configured on your Fiery assets.
Note: Virtual printers are listed in blue text and presets are listed in orange text.
b. Manual integration (to add Fiery and non-Fiery output devices):
● Click Add.
● Select the device type from the pull-down list:
● EFI Fiery, Fiery XF, or JDF Connector: On the Create New dialog, enter the Name and URL (network IP address) of the device.
Note: Port 8010 is the standard port for JDF-enabled devices (and should generally be used, e.g., http://[machine name or IP address]:8010).
● Ticket Type:
Note: Consult the chart below in section Notes on JMF JDF Structure for Job Submission for guidance on when to use process and intent for various output devices.
● Process (default): Specifies actual information defining how the job is to be produced. Use for Fiery outputs; contains Fiery-specific instructions.
● Intent: Preserves print buyer’s intent for the file (buyer-entered web-form data suggests, for example, that she intends to receive a 5,000 copies of a 100-page spiral bound book on 8.5x11 white paper, with a glossy 100lb. four-color cover, full color, etc.). Use for non-Fiery JDF outputs.
Note: Process and Intent are the two main types of instructions gathered into a JDF job ticket.
● FileSpec URL: URL of the JDF content file. Specifies how the job ticket gets delivered.
● MIMEEncoded: Content file will be MIME encoded along with JMF and JDF and sent through the connector to the output device. This option provides an imte preview of the job because the JDF is part of the tickete and everything is included.
● HTTP: JMF message will have a link to the JDF file as a shared path URL and the JDF file will have a link to the content file as a shared path/HTTP/HTTPS URL.
● NTShared (Network Shared): Job ticket XML is embedded in the content file sent through the connector to the output device.
Note: You can change the JDF configuration at any time from the Print Shop Connectors page. To do so, select the Connector in the grid then click JDF Configuration. Note that if you change the configuration from the Print Shop Connectors page, however, that all the devices in JDF connector at the specified URL will share this JDF configuration (i.e., the configurations set at the individual devices will be overridden).
● Click Save.
● EFI MicroPress, Folder, or CD-ROM: Follow the steps below to configure an EFI MicroPress output device or a hot folder output for non-Fiery JDF-enabled devices.
Note: Capability and mapping are not supported for older Fiery devices that are not Fiery JDF (FJDF)-enabled. For these devices only hot folder output functionality is available. Non-JDF-enabled devices will be marked in the Device List as “No JDF.”
● Display Name: Enter a descriptive name for the output device.
● Output Ticket XML: Note that MDSF is the default ticket for all non-JDF output devices. If you choose JDF (for folder-based output devices such as CD-Rom, Folder, and MicroPress) you will need to configure the fields below:
Note:
MarketDirect StoreFront
communicates with JDF devices via the JDF/JMF infrastructure using MIME
encoding. The JMF message and the JDF (JDF Ticket) are bundled in a MIME
package and based on the FileSpecURL configuration the content file(s)
are encoded and bundled in MIME package. This MIME package is delivered
to JDF connectors through the JMF URL provided by the connector.
For folder-based Devices (MicroPress, CD-ROM, EDOX, and Folder), MIME package
will be copied to the Hot Folder.
● Quantity Expected: This field indicates whether the output device expects order or production quantity in the JDF ComponentLink Amount attribute for ComponentLink where Usage="Output."
♦ Production (default): If you use Production Quantity Expected the JDF ComponentLink Amount is calculated.
♦ Order: If you use Order Quantity Expected the JDF ComponentLink Amount is the quantity from the OrderLineItem.
Note: Take, for example, a single page content file with N-Up set to StepAndRepeat, 5 across and 4 down, and the order quantity is 100. If the output device configuration is set to use Order Quantity Expected, the JDF ComponentLink Amount will equal 100. If the output device configuration is set to use Production Quantity Expected, the JDF ComponentLink Amount will equal 5.
● MIME Package:
♦ mjm: the content file will contain JDF instructions and the JMF message.
♦ mjd: the content file will contain JDF instructions.
● Ticket Type:
Note: Consult the chart below in section Notes on JMF JDF Structure for Job Submission for guidance on when to use process and intent for various output devices.
♦ Process (default): Specifies actual information defining how the job is to be produced. Use for Fiery outputs; contains Fiery-specific instructions.
♦ Intent: Preserves print buyer's intent for the file (buyer-entered web-form data suggests, for example, that she intends to receive a 5,000 copies of a 100-page spiral bound book on 8.5x11 white paper, with a glossy 100lb. four-color cover, full color, etc.). Use for non-Fiery JDF outputs.
Note: MarketDirect StoreFront-generated intent JDF are expected to be used by advanced users who are proficient with JDF production workflows.
Note: Process and Intent are the two main types of instructions gathered into a JDF job ticket.
● FileSpec URL: URL of the JDF content file. Specifies how the job ticket gets delivered.
♦ MIMEEncoded: Content file will be MIME encoded along with JMF and JDF and sent through the connector to the output device. This option provides an imte preview of the job because the JDF is part of the tickete and everything is included.
♦ HTTP: JMF message will have a link to the JDF file as a shared path URL and the JDF file will have a link to the content file as a shared path/HTTP/HTTPS URL.
♦ NTShared (Network Shared): Job ticket XML is embedded in the content file sent through the connector to the output device.
Note: You can change the JDF configuration at any time from the Print Shop Connectors page. To do so, select the Connector in the grid then click JDF Configuration. Note that if you change the configuration from the Print Shop Connectors page, however, that all the devices in JDF connector at the specified URL will share this JDF configuration (i.e., the configurations set at the individual devices will be overridden).
● Device Directory: Enter a valid directory path. (For hot folders: It is recommended that you create this file directory as a subfolder in the installation folder for the system.)
Note: An example of a valid path is C:/[web site abbreviation]/files/outputs/default. This directory is used to store copies of files. When a device such as MicroPress monitors this file directory, the device will pick up the job/file from the specified directory, “read” the job ticket, and process the file appropriately.
● Click Save to save your changes.
● Print Shop:
● Display Name: Enter a descriptive name for the output device.
● Output Ticket XML: MarketDirect StoreFront is the default ticket for all non-JDF output devices.
● Choose Destination Print Shop: Select a Print Shop from the pull-down list.
● Click Save to save your changes.
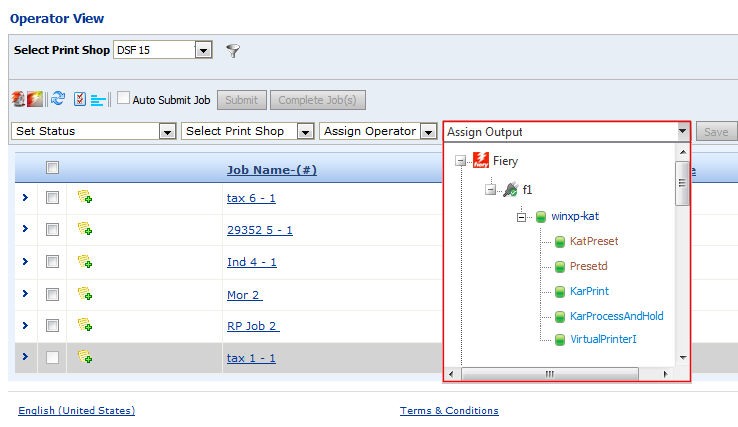
Note:
MarketDirect StoreFront
supports Fiery virtual printers and job presets. When a Fiery device is
added, all job presets and virtual printers associated with the device
(and its URL) will be listed in the Fiery tree on the Manage Devices page
and will also be available for printing from the Operator View (e.g.,
the Assign Output pull-down menu).
Printing options specified in the ticket template for a product will override
the default options specified for the virtual printer. For example, if
the virtual printer default setting is for tabloid-size (11x17) paper
but the job in MarketDirect StoreFront
specifies (i.e., on the JDF ticket) letter-size output, the Fiery device
will print the job on letter-size paper.
The second step in integrating MarketDirect StoreFront with your Fiery and Fiery XF output devices is to map the devices’ capabilities to the print services you have configured in MarketDirect StoreFront for a seamless production workflow.
Note: Mapping MarketDirect StoreFront print services with Fiery device capabilities is for Fiery JDF (FJDF)-enabled devices. Fiery devices that do not support JDF can be enabled only for hot folder integration with MarketDirect StoreFront.
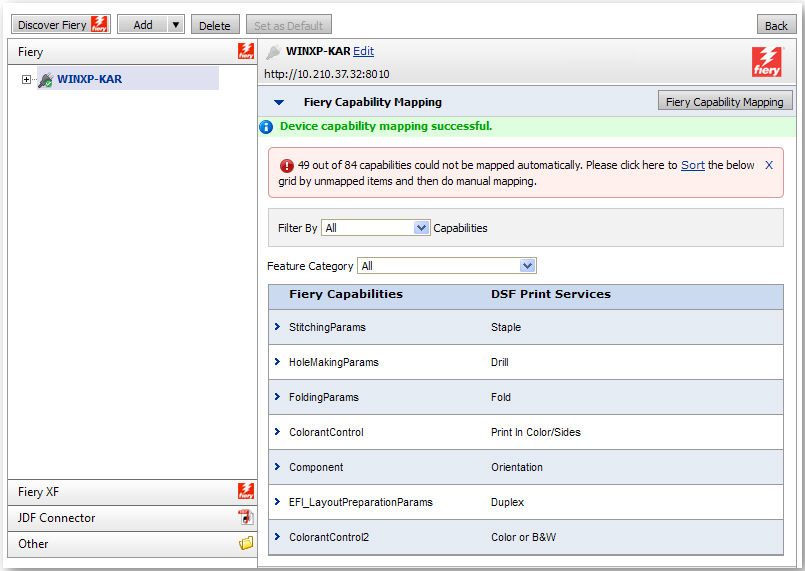
To map Fiery device capabilities to MarketDirect StoreFront print services
1. In MarketDirect StoreFront go to Administration > Manage Devices.
2. After discovering Fiery devices on your network, select a Fiery device to map to MarketDirect StoreFront.
3. Click Get Fiery Capabilities to retrieve all device capabilities for the selected Fiery device and, if possible, map them automatically to the print services configured in MarketDirect StoreFront.
Note:
A message will show the status of the action. The discovered capabilities
will be listed in the Fiery Capability
Mapping section. An alert message will inform you how many of the
capabilities discovered on the selected Fiery device could not be automatically
mapped to MarketDirect StoreFront
print services.
Note:
Fiery XF integration currently supports mapping only the following three
Fiery XF device capabilities to MarketDirect StoreFront
print services:
-- Resolution
-- Color Mode
-- Print Direction
MarketDirect StoreFront
print services were expanded in the v. 6.6 release to include all possible
JDF values (from the JDF spec) for each print service. This enables MarketDirect StoreFront to provide
wide-ranging support for JDF-enabled output devices. For instance, MarketDirect StoreFront's Color
Mode print service can map to all JDF color mode values.
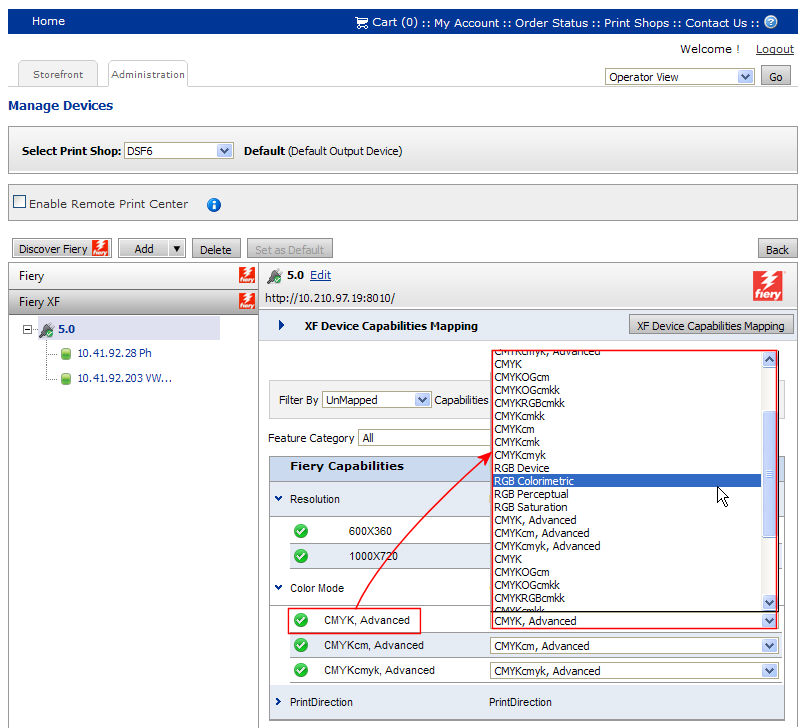
4. With the Filter By…Capabilities field set to “UnMapped,” you can manually map the Fiery capabilities to the appropriate MarketDirect StoreFront print services by selecting from the pull-down list for each capability.
Note:
To see all mapped capabilities set the Filter
By…Capabilities field to All.
You can also filter so the capabilities table shows only:
—Auto Mapped capabilities:
those that the capability mapping utility automatically mapped.
—Manually Mapped capabilities:
those that you mapped manually from the Fiery device to MarketDirect StoreFront.
—UnMapped capabilities: those
that are not mapped (or not synchronized between the Fiery device capabilities
and MarketDirect StoreFront
print services).
Note: If you manually map one or more capabilities, after
click Device Capabilities Mapping, a Select
Mapping Type dialog box will open and present you with two options:
1. Retain Manual Mapping: Choosing
the option will keep (i.e., not overwrite) any manual mapping you have
done.
2. Reset All Mapping: Choosing this option will reset all mapping and
overwrite any manual mapping you have done with the automatic mapping.
5. Click Save to save your changes to capabilities mapping.
The third step in integrating MarketDirect StoreFront with your Fiery output devices is to map the Fiery devices’ to the defined in MarketDirect StoreFront for a seamless production workflow.
To map Fiery device to MarketDirect StoreFront
1. In MarketDirect StoreFrontgo to Administration > Manage Devices.
2. After discovering Fiery devices on your network, select a Fiery device to map to MarketDirect StoreFront.
3. Click Sync to retrieve all for the selected Fiery device and, if possible, map them automatically to the defined in MarketDirect StoreFront.
Note:
The discovered will be listed in the Mapped
List section. An alert message will inform you how many of the discovered
on the selected Fiery device could not be automatically mapped to MarketDirect StoreFront .
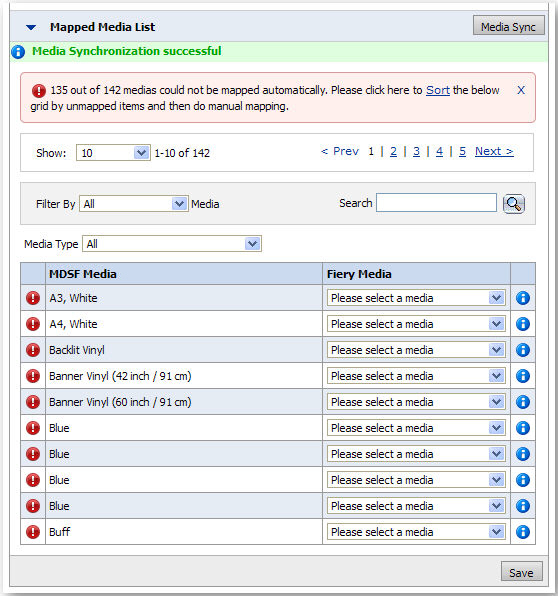
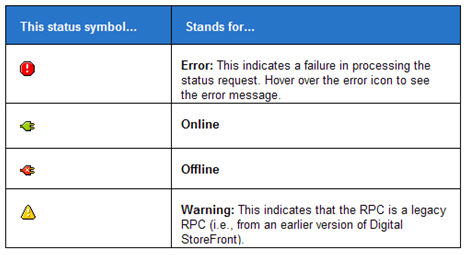
Note: The table below shows what the status icons in the table represent:
|
Manually mapped |
|
Unmapped |
|
Mapped |
|
Click this information
icon to show the properties of the Fiery and MarketDirect StoreFront
. |
4. With the Filter By… field set to “UnMapped,” you can manually map the Fiery to the appropriate MarketDirect StoreFront by selecting from the pull-down list for each .
Note:
To see all mapped set the Filter
By… field to All. You
can also filter so the table shows only:
—Auto Mapped : those that
the synchronization utility automatically mapped.
—Manually Mapped : those that
you mapped manually from the Fiery device to MarketDirect StoreFront.
—UnMapped : those that are
not mapped (or not synchronized between the Fiery device and MarketDirect StoreFront).
5. Click Save to save your changes to mapping.
● MarketDirect StoreFront communicates with JDF devices via the JDF/JMF infrastructure using MIME encoding. The JMF message and the JDF (JDF Ticket) are bundled in a MIME package and based on the FileSpecURL configuration the content file(s) are encoded and bundled in MIME package. This MIME package is delivered to JDF connectors through the JMF URL provided by the connector.
● For folder-based Devices (MicroPress, CD-ROM, EDOX, and Folder), MIME package will be copied to the Hot Folder.
● Typical JDF configurations for various connectors:
JDF Connectors |
Ticket Format |
JDF Ticket Type (Process/Intent) |
File Spec URL |
Fiery-XF |
JDF |
Process |
MIME Encoded |
FJC 1.7 |
JDF |
Process |
MIME Encoded |
FJC 1.8 |
JDF |
Process |
MIME Encoded |
FJDF v. 1.0 and higher on Windows |
JDF |
Process |
MIME Encoded |
FJDF v. 1.0 and higher on Linux |
JDF |
Process |
MIME Encoded |
External JDF Connectors |
JDF |
Process/Intent* (*recommended) |
NT Shared Path/HTTP/HTTPS/MIME Encoded |
Folder Based Devices |
MDSF/JDF |
Process/Intent* (*recommended) |
NT Shared Path/HTTP/HTTPS/MIME Encoded |
1. Go to Administration > Print Shops.
2. Click the name of the Print Shop whose output device you want to manage.
3. In the Default Output Device field, click the Manage Output Devices link to open the Print Shop Outputs page.
4. Click Manage Device Connectors.
5. Check the box for the Connector Name.
6. Click Get Devices.
Note: MarketDirect StoreFront will send a message to the connector URL requesting information on all known devices at the URL address.
7. The status column will display an icon:
This status symbol... |
Stands for... |
|
Pending Request |
|
Requested |
|
Done |
|
Error |
Note: The page will refresh automatically until the connectors Status changes from “Requested” to “Done” or “Error.”
8. In the No. of devices column, click the hyperlinked number to see the name and type of each device at that URL.
1. Go to Administration > Print Shops.
2. In the Default Output Device field, select the device you want to edit or delete.
3. Click the Manage Output Devices link to open the Print Shop Outputs page.
a. Click the Edit icon to edit the settings for the output device and follow the steps in the section To add an output device above beginning with step 5.
b. Click the Delete icon to delete the output device.
Note: If you delete an output device that is assigned to a job, the Output Device on the Operator View page will change to “Unassigned.”
4. Click Back to return to the Print Shop page.
● Overview of Output Devices in MarketDirect StoreFront
● To access output device information


