To edit or configure a category
Tip: For an overview of an omnibus workflow that presents the steps for making a list of products available to a certain set of buyers (i.e., members of a company, see Workflow - Featured Categories for Specific Company.
1. Go to Administration > Categories.
2. Select a category and then click Create Category to add a new category or click Edit Content to edit a category.
On the Progress
![]() Information
| “Category Information” page complete the fields as described
below:
Information
| “Category Information” page complete the fields as described
below:
3. Category Name—Name of the category for administrative purposes. It can be the same as the Display As name specified below.
4. Display As—Can be a more buyer-friendly name of the category that will appear to buyers on the product pages on the storefront.
5. SKU—Enter a unique ID for the category item. This SKU will be the name of the category page and used as the name of the Direct Category Link (see the Note on Direct Category Links in this step below) that takes buyers on the storefront directly to the product category.
Warning: Be sure not to have duplicate category SKUs in MarketDirect StoreFront. The category SKU must be a standard alphanumeric pattern (because it is the page name for the category). SKUs should not contain / (slash) or & (ampersand) characters.
Note on
Direct Category Links: You can create direct "deep links"
to categories. A "deep
link" to the category goes directly to a specific page where the
category is located. The purpose
of such a deep link to the category is to ensure that the category remains
accessible. For instance, if you copied the link to a category from
the browser's address field the
link could not be expected to remain valid because such links are typically
encrypted and cannot be guaranteed to remain functional from one version
of MarketDirect StoreFront to the next. Direct category links prevent
this problem by making certain links (to categories and products) permanent
and short. The deep link should follow this format:
/DSF/CATEGORIES/SKU/[YOUR_SKU].aspx
Note on Deep Links with Login Bypass:
To navigate to the category
with login bypass, append the following code to the deep link after
?ssotok= (followed
by the user's single sign on token) and &ssotokpwd=
(followed by that user's
password). Thus, the deep link will be in this format:
http://[MyPrintSite]/DSF/CATEGORIES/SKU/brochures.aspx?cmd=begin&ssotok=[User
Profile Single Sign On Token]&ssotokpwd=[User Password]Note:
6. Keywords: Enter keywords for the category. These will help buyers locate products in the category when they are searching on the storefront.
7. Brief Description: Enter descriptive text for the product that will be displayed to buyers on the storefront. This brief product description is augmented by a longer description that is displayed on an entire page when user clicks for more information on a product.
Note: At this point, you can click either (1) Save and Continue to save the category without configuring it (you might choose this option if you want to quickly add multiple categories and then configure them later following the steps beginning with Step 2 below), or (2) Manage to open the category management page to configure the category.
Note: Most of the controls on the text editor will be familiar to users of word processing packages such as Microsoft Word or Corel WordPerfect. A few of the controls that might not be so familiar are:
Control |
Description |
|
This displays the text editor workspace in design mode, which means it will be displayed WYSIWYG (“what you see is what you get”). |
|
This displays the text editor workspace in HTML mode, which means you can use standard HTML formatting tags to define how your text will appear (e.g., <b>Sale!</b> will cause the word “Sale!” to display in boldface on the storefront). |
|
This displays the text in the workspace without any formatting controls. |
8. Category Icon—you can upload a large version of the image to represent the category to display to buyers on the storefront.
a. None: Click this radio button if you want no product image to appear on the storefront.
b. Stock Icon Library: Click this radio button if you want to select an image from the stock icon library, which includes icons for nearly 30 categories (e.g., binders, business cards, brochures, calendars).
c. Upload Custom Icon: Click this radio button to select an image to display.
● Click Browse... and on the Choose File dialog navigate to the image file you want to display, select it, then click Open.
Note: The recommended size for the logo image is: 110 x 110 pixels and the supported image formats are: BMP, GIF, JPEG, JPG, PJPEG, and PNG.
● Click Upload.
9. Click the Details button on the left navigation menu.
On the Progress
![]() Information | “Category Details”
page:
Information | “Category Details”
page:
1. Long Description—Enter a detailed category description that will be displayed to buyers on the category details section on the storefront.
2. Category Icon & Category Details Image—You can select a category icon, which is a small version of the category image that will display to buyers on the storefront when they are viewing category details, and a category details image that will be the image displayed at the top of the page on the storefront to represent the category.
a. None: Click this radio button if you want no category image to appear on the storefront.
b. Stock Icon Library: Click this radio button if you want to select an image from the stock icon library, which includes icons for nearly 30 categories (e.g., binders, business cards, brochures, calendars).
c. Upload Custom Icon: Click this radio button to select an image to display.
● Click Browse... and on the Choose File dialog navigate to the image file you want to display, select it, then click Open.
Note: For the Category Icon—The recommended size for the logo image is: 110 x 110 pixels and the supported image formats are: BMP, GIF, JPEG, JPG, PJPEG, and PNG. For the Category Details Image—The recommended size for the logo image is: 410 x 300 pixels and the supported image formats are: BMP, GIF, JPEG, JPG, PJPEG, and PNG.
● Click Upload.
● Upload Flash / HTML Content: Click this radio button to select an HTML or Flash animation (.swf) you want to display.
(i) Click Browse... and on the Choose File dialog navigate to the HTML or Flash file you want to display, select it, then click Open.
(ii) Click Upload.
d. Click the Security button on the left menu.
On the Progress
![]() Information | “Category Settings”
page:
Information | “Category Settings”
page:
Category settings let you designate the category as a fulfillment category and choose how products in the category will be displayed (in list view or grid view).
A fulfillment category is a category that allows buyers to add multiple products to the cart at once. Thus, fulfillment categories present all products in the category to buyers on a streamlined interface (either in a table or a grid) that enables them to scan and select one or more products that do not require configuration (i.e., non-printed, static, and digital download products) to add to the cart.
Note:
To enable fulfillment shopping for a SmartStore storefront, follow the
steps in Catalog
Display.
Fulfillment categories can be used in conjunction with the SmartStore settings
Add + Continue Shopping and Add + Go to Cart on the SmartStore
builder.
For information on setting up a SmartStore storefront for fast shopping,
see Add
to cart behavior for a SmartStore).
Note:
You can designate any category
a "fulfillment" category and add products of any type to a fulfillment
category.
Important
Note: Although you
can include products of any type to a fulfillment category, it is intended
primarily for products that do not required buyer configuration (e.g.,
non-printed products, static document products, digital download products,
and kit products in which none of the items requires configuration).
If
a fulfillment category includes a product that requires customizing, the
product cannot be added to the cart as part of a group. Buyers must customize
the product as usual and add it to the cart individually.
Note: Fulfillment categories are supported only with SmartStore storefronts, not with classic storefronts.
1. Check the Is Fulfillment Category check box to designate the category as a fulfillment category.
2. In the Product Listing Style - Default View section, specify how the products in the category should be displayed:
● List View (i.e., Table): Choose this option if you want the products in the category to be displayed to buyers in a table by default.
Note: Buyers will be able to toggle between list view and grid view on the storefront.
● Grid View (i.e., Thumbnail Blocks): Choose this option if you want the products in the category to be displayed to buyers in a grid (with blocks of thumbnail images representing each product) by default.
Note: Buyers will be able to toggle between list view and grid view on the storefront.
On the Progress
![]() Information | “Category Security”
page:
Information | “Category Security”
page:
Note:
Assigning Ownership and Access Rights
for the Category: In this section of the category manager you can
assign an owner for the category and set permissions to restrict access
to it. This lets you make the category available to one user group but
not to another. The security option lets you assign management and publishing
rights for a category:
Purchase Items: can order products
in the category
Manage: can change the category
1. Click Change to add or change who owns (is in charge of) the category. On the Select Owner dialog:
a. In the first drop-down select the category of user to assign ownership of the category to: Users, Groups, Companies, or Departments.
Note: The search field will help you locate the group or user you are looking for, and the Show field will limit the number of items displayed.
b. Click the user, group, company, or department to assign ownership to.
Note: The function of “owner” is to ensure that someone can always get to the category (even if s/he does not otherwise have access rights). It exists in order to prevent a situation in which you would inadvertently configure yourself out of access to the category.
c. Click Add User, Group, Company, or Department. On the Select Security Principal... dialog:
● In the first drop-down select the category of user to whom to assign access to the category: Built-in Groups, Users, Groups, Companies, or Departments.
Note: The search field will help you locate the group or user you are looking for, and the Show field will limit the number of items displayed.
● Click the group, user, or company to assign access to.
Note: Note that if you have checked the box Enable Relational Branding Catalog Security on the Site Settings | Basic Settings tab, you will only be able to select a Company(ies) as security principal to which you can then assign permissions to Purchase Items.
Note:
If you use relational branding, please read the following note carefully.
In most cases in which you have two or more relational branding sites,
you will want to restrict pre-login (i.e., “anonymous”) visitors to relational
company-branded sites to seeing only those product categories intended
to be seen by members of the company the site is branded for.
For example: Say you have two relational
branded sites—one for Company A and another for Company B. Each company
has different product offerings. You do not want customers of Company
A to see products offered to customers of Company B (and vice versa).
The remedy is to restrict product category access (e.g., Purchase Items
permissions) to members of the appropriate company so that Company A members
can see only those product categories intended for Company A customers
(and likewise for members of Company B).
To ensure that this category access by company works properly, complete
these steps:
(1) Go to the Site Settings > Basic
Settings tab and ensure that the box Enable
Relational Branding Catalog Security is checked. This will ensure
that you can only set Company-level security for any new categories created.
(2) Set the Purchase Items permission
for a category for a specific company or companies.
Note that if the Purchase Items
permission is set to any user/group/department (e.g., from a pre-5.2 version
of MarketDirect StoreFront), click Remove
to remove them and add the company that should have purchase permission
for the category.
For more information on relational branding, see Relational
(or Pre-Login) Branding.
Note: This security safeguard applies only to Categories and not to other entities in MarketDirect StoreFront (e.g., ticket templates).
(1) The selected user, group, company, or department will display on the Security page in the Access Permissions table. You can grant users the right to Purchase Items in the category and/or Manage (modify) it.
Note: You can retract access permissions at any time by clicking the Remove button for the user, group, company, or department in the Access Permissions table on the Security page.
(2) Click Check Permissions For... and select the user, group, or company whose permissions you want to check. A new dialog will display the permissions for the selected entity.
(3) To apply the security settings to subcategories, check the box Also, copy these security settings to the subcategories.
d. Click Next.
e. On
the Progress ![]() “Published
Products” page:
“Published
Products” page:
● To add products to the category you are creating, click Add Products.
● On the Add Products dialog, select one or more of the published products that display in the list by checking the boxes.
● Click Add.
● Click Finish.
Note: Go to the Storefront and review the category as it will appear to buyers. If changes need to be made, return to the Manage Categories page, select the category, and make changes.
Note: A single product can be shared across multiple categories.
1. Go to Administration > Categories.
2. In the Categories tree, select the category to edit by clicking it.
3. Click Edit.
4. Click Next.
5. On the Progress
![]() “Published Products” page, click
Add Products.
“Published Products” page, click
Add Products.
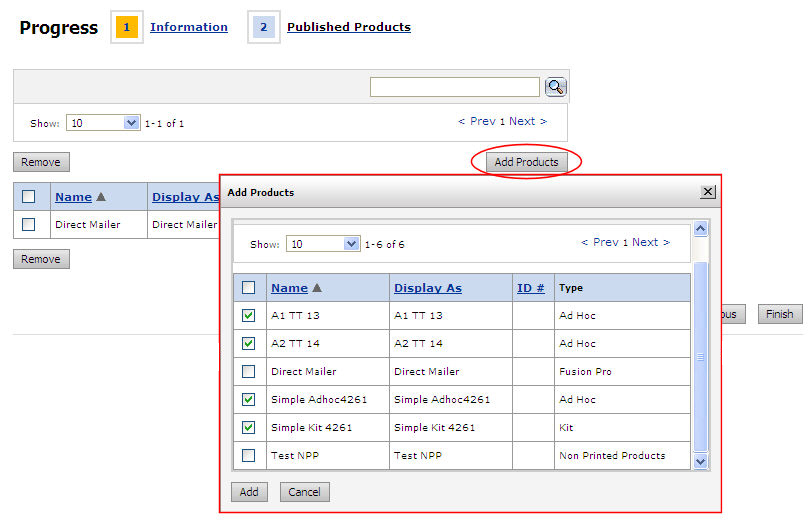
6. On the Add Products dialog, check boxes to select the products to add to the category.
7. Click Add.
8. Review the list of products in the category.
9. Click Finish.
1. Go to Administration > Categories.
2. In the Categories tree, select the category to delete by clicking it.
3. Click Delete.