Extended applications is a licensable option that passes user credentials to both EFI and non-EFI third-party external applications. The external application is then presented in a frame within MarketDirect StoreFront. This new feature extends the capabilities of MarketDirect StoreFront by allowing users to have external applications such as print business management systems (such as EFI Pace™ or EFI PrintStream®) displayed in a MarketDirect StoreFront window.
Note:
If you are interested in having your
site connect with an external extended application, the MarketDirect StoreFront - Extended
Application Implementation Guide contains all
the information the application developer will need to configure the third-party
application to work with MarketDirect StoreFront's
extended applications functionality.
This guide can be accessed from the MarketDirect StoreFront
Forum (http://dsfforums.efi.com/
changing to http://mdsfforums.efi.com).
Once you are logged into the MDSF
Forum:
(1) Access the sub-forum "Documentation & Reference Guides."
(2) Open the thread "Sticky: MarketDirect StoreFront
Extended Application Implementation Guide."
(3) Download the MarketDirect StoreFront
- Extended Application Implementation Guide.pdf file.
Note: To enable administrative users to access the extended application configuration pages, select the appropriate pages (e.g., Manage EFI Extended Apps) on the Page Access page. For more information, see Manage Page Access. To specify who can use the extended applications, see the To assign access rights to embedded applications section later in this topic.
Note: Please note that data is not communicated between MarketDirect StoreFront and the external application.
If you have not already done so, please contact your MarketDirect StoreFront sales representative for information about acquiring a license for extended applications in MarketDirect StoreFront.
There are two licensable options for integrating MarketDirect StoreFront with extended applications:
● External Extended Applications: This license option is scalable and supports passing credentials to either 0 (disabled) to a maximum of 99 external extended applications.
Note:
When you have reached the maximum number of external applications you
are licensed for and attempt to add another, the following message will
be displayed at the top of the Manage Extended Application Configuration
screen:
* Adding another external
application will exceed the number of licenses permitted for this site.
For information on adding this option, please contact your Sales Representative.
To view your current licensed options, go to MarketDirect StoreFront
Administration tab > Platform Settings > License.
After you re-enter the page, the Add New
button will be disabled (grayed out) and the above message will be displayed
when you hover the mouse over the button.
● EFI Extended Applications: This license option enables passing credentials to an unlimited number of EFI extended applications.
Note:
If you have not acquired a license for extended applications, the following
message will be displayed at the top of the Manage Extended
Application Configuration screen:
* EFI extended applications are
not licensed. For information on adding this option, please contact your
Sales Representative. To view your current licensed options, go to MarketDirect StoreFront Administration
tab > Platform Settings > License.
To add an Extended Application
1. To add an EFI Extended Application go to Administration > Manage EFI Extended Apps.
or
To add an External Extended Application go to Administration > Manage External Extended Apps.
2. Click Add New Extended Application.
3. Enter the following
information:
a. Name: Enter a name for the extended application (you can name it anything you like so long as it is unique).
Note: This name will become a link to the Additional Configuration Details page where you can edit the configuration for extended application.
b. Configuration URL: Enter the URL to the extended application's web service that MarketDirect StoreFront will use to communicate with the application and get configuration details for integrating with the application.
c. Timeout: Enter the amount of time (in minutes) before a session automatically closes due to inactivity. MarketDirect StoreFront communicates this value to the extended application as a suggestion. The extended application can either enforce this suggested timeout or disregard it.
Note: MarketDirect StoreFront will receive no feedback from the extended application on whether the timeout is used or not.
d. Active: Check this box to make the extended application available to a designated set of users.
e. Status: This read-only field will be displayed only after the extended application has been added. Results are shown at the top of the screen. The statuses are:
This status symbol... |
Stands for... |
|
Connectivity Error: Failed: Cannot establish communication with the extended application's URL. You will be directed to consult the Event Log for details on the failure. |
|
OK: Completed Successfully: Communication was established with the extended application's URL and the configuration details were received. |
|
Pending: Communication with the extended application is pending. |
|
Caution: This alerts you that a connection has been tested prior to entering a configuration URL. |
f. Click Add.
Note: To configure the integration follow the steps in the section To configure (or edit) an EFI Extended Application or External Application beginning with step 3.
To configure (or edit) an EFI Extended Application or External Extended Application
1. To manage an EFI Extended Application go to Administration > Manage EFI Extended Apps.
or
To manage an External Extended Application go to Administration > Manage External Extended Apps.
2. On the Manage Extended Application Configuration page, click the appropriate tab for the type of extended application you are managing: EFI Extended Applications or External Extended Applications.
3. Click the name (link) of the extended application.
Note: Click the Edit link to configure and edit all options except banner colors and user permissions in-line.
4. Configure the following configuration detail fields:
● Name: You can change the name for the extended application (you can name it anything you like so long as it is unique).
● ID: Read-only system-assigned ID for the extended application.
● Configuration URL: You can change the URL to the extended application's web service that MarketDirect StoreFront will use to communicate with the application and get configuration details for redirecting to the application.
● Test Configuration: This tests the extended application. The results of the test will be reported at the top of the screen (e.g., "Completed Successfully" or "Failed: 1 There was an error. Please see the Event Log for more information").
● Request Details: This does two thing: (1) it tests the configuration to ensure that MarketDirect StoreFront can actually communicate with the extended application, and (2) retrieves information about the extended application in order to redirect to it. This results in getting the implementation URL, which takes users to the homepage of the extended application, as well as any items (e.g., query string tokens) needed to redirect to the external application.
● Extended Application URL: This read-only field displays the URL returned by the external application after you click Request Details.
● Timeout: Enter the amount of time (in minutes) before an external application closes due to inactivity. MarketDirect StoreFront communicates this value to the extended application as a suggestion. The extended application can either enforce this suggested timeout or disregard it.
● Active: This box makes the extended application available to the set of users to whom you have granted access permission.
● Banner Background: Specify the color of the banner displayed at the top of the extended application's page. Choose a color that is similar to the extended application's color scheme so the look of banner is consistent with the extended application. Enter a hex number for the color or click the color box and select a color on the Choose Color dialog.
Note: The default banner background is white.
● Banner Text Color: Specify the color of the banner text displayed at the top of the extended application's page. Enter a hex number for the color or click the color box and select a color on the Choose Color dialog.
Note: The default banner text color is black.
● Choose Font: From the pull-down menus, select a type and size so that it is consistent with the text style used in the extended application.
● Query String Tokens: This table displays information below on any tokens that were returned from the extended application (e.g., when Request Details was clicked).
Note: This is information obtained from the extended application that will determine how MarketDirect StoreFront. For example, a token returned with Key with "NoMenu" and a Value of "True" means that MarketDirect StoreFront will obtain information that will enable it to do the navigation and thus no menu will be displayed in the extended application.
● ID: This is the ID MarketDirect StoreFront assigns to a specific configuration detail with the extended application.
● Key: This is the configuration token the extended application returns to MarketDirect StoreFront when the Request Details button is clicked.
● Values: This is the value associated with a key returned to MarketDirect StoreFront that provides MarketDirect StoreFront with information on how to display the extended application.
To assign access rights to extended applications
Note:
When a user
is granted access to one or more extended applications, a block with links
to those applications will be shown on the storefront after the user signs
into MarketDirect StoreFront.
When the user clicks a link, the Extended Applications page will show
the selected application. The extended applications blocks (for EFI Extended
Apps and External Extended Apps) can be manipulated like any other storefront
blocks. For information on specifying the
position of the block,
see Arranging
the Web Blocks.
Note:
Only active applications that
have been successfully configured (e.g., those with a check mark in the
“Status” column) will be displayed in the block on the storefront.
5. To change the Owner (manager) of the extended application, in the Associate Users and Configure Permissions section:
● Click Change to add or change who can access and use the extended application.
● On the Select Owner dialog:
● In the first drop-down select the category of user to assign access to the extended application: Users, Groups, Companies, or Departments.
● The search field
( ![]() ) will help you locate the group or user you are
looking for, and the Show field
will limit the number of items displayed.
) will help you locate the group or user you are
looking for, and the Show field
will limit the number of items displayed.
● Click the group, user, company, or department to assign access to.
6. To set access permissions that specify who can use the extended application:
● Click Add User, Group, Company, or Department.
● On the Select Security Principal for which to Assign Permissions dialog:
● In the first drop-down select the category of user to whom to assign access to the extended application: Built-in Groups, Users, Groups, Companies, or Departments.
● The search ( ![]() ) field will help you locate the group or user you are
looking for, and the Show field
will limit the number of items displayed.
) field will help you locate the group or user you are
looking for, and the Show field
will limit the number of items displayed.
● Click the group, user, company, or department to assign access to. The selected user, group, or company will be listed in the Access Permissions table. You can grant users the right to Use the extended application and/or manage security for the extended application (i.e., change these security settings).
Note: You can retract access permissions at any time by clicking the Remove button for the user, group, company, or department in the Access Permissions table.
● Check the Allow Access check box.
● If you want to check permissions, click the Check Permissions For... and select the user, group, company, or department to check. A new dialog will display the permissions for the selected entity.
● Click Save.
7. Click Save And Go Back.
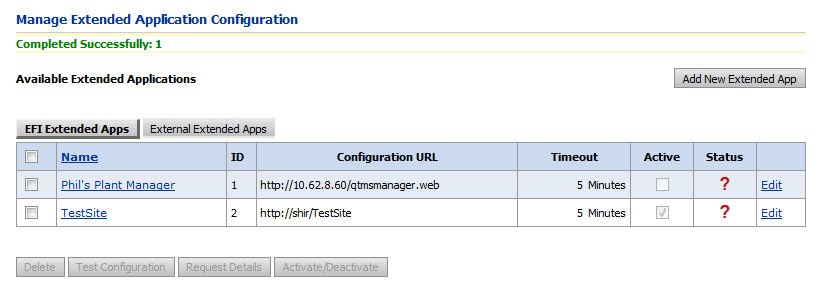
The Available Extended Applications table lists all extended applications set up in MarketDirect StoreFront.
● Add New Extended Application: Adds a new extended application (and a new row) to the Available Extended Applications table.
● Delete: Removes the selected extended application and it row from the Available Extended Applications table.
● Test Configuration: This tests the extended application. The results of the test will be reported at the top of the screen (e.g., "Completed Successfully" or "Failed: 1 There was an error. Please see the Event Log for more information").
● Request Details: This does two thing: (1) it tests the configuration to ensure that MarketDirect StoreFront can actually communicate with the extended application, and (2) retrieves information about the extended application in order to redirect to it. This results in getting the implementation URL, which takes users to the homepage of the extended application, as well as any items (e.g., query string tokens) needed to redirect to the external application.
● Activate/Deactivate: Toggles the selected extended application between an active and inactive state.
● MIS integration and fulfillment in MarketDirect StoreFront


