Note: For EFI-hosted (cloud) sites, please refer to Active Directory Services with Federated Identity Services.
Note: If licensed, the integration option Authentication Pkg: LDAP and Login Bypass will be checked on the License page. For more information see Licensing.
In Site-Level Active Directory Authentication, the site communicates with an enterprise-wide Active Directory (AD) server (in the same domain/network as the site server) that contains a directory of user information and associated privileges. When users log into your site, their credentials are authenticated against the AD server, which in turn will communicate information on the user to the site. This method requires that the system be located on the AD domain.
Ideal for: Self-hosted (standalone) sites that want to provide users with single sign-on (SSO) capabilities and when authentication will be at the site level and against a single Active Directory server in the same network as your site server. Example: A university Print Shop that wants student, staff, and faculty members of the university to access the Print Shop's site with their university network login credentials (SSO).
Site setup required: For the steps to set up Active Directory Authentication at the site level using active directory authentication for same-network environments, see Site-Level Active Directory Authentication.
Note: The system authenticates only that the user has access to his or her own account in the Directory Service database.
Note: If you are not using LDAP services, make sure you have selected [System] Internal Authentication option in the Which authentication method to use for User Name and Password login form? field on the Site Settings > Authentication
Note: Active Directory Authentication enables users who log into your site via LDAP to be automatically registered as users (and the directory services profile fields can be mapped to the user profile fields following the steps in the To map user profile fields with Directory Services profile fields section in this help topic).
1. Verify that your system meets the prerequisites for LDAP setup:
● Make sure Authentication Pkg: LDAP and Login Bypass is licensed.
Note: Go to Administration > License and scroll down to the Integration Options section and verify that the option above is checked. If you do not have the option licensed, please contact your EFI sales representative for information on obtaining the Authentication Package: LDAP and Login Bypass licensed option.
● Make sure that your system server is in the domain.
● Click Windows Start.
● Click Computer.
● Click Properties.
● Scroll down to the Computer name and domain settings section and ensure that the computer is on the domain.
● If you need to change credentials, click Change Settings.
2. Configure the LDAP OAuth application in IIS:
Note: This step is necessary only if you want to enable SSO (single sign on).
● Set the IIS Application Pool Identity to custom account:
● Click Windows Start > Administrator Tools > IIS Manager.
● In the left navigation tree, click to expand Application Pools > DSFASPNET40AppPool>Advanced Settings.
Note: Please note: The SSO (AUTH) module uses DSFASPNET40AppPool.
● Scroll down to the Process Model section and change Identity from "Built-in account" to "Custom account" (e.g., domain\name).
● Ensure that the user account (for the Custom account) is known in user management:
● Open Control Panel > User Accounts.
● Click Manage User Accounts.
● Select the account and click Add... to add the account if needed.
● Create the OAuth IIS application:
● The OAuth IIS folder can be found on the system server at: X:\inetpub\wwwroot\OAuth (where X is the local install drive on the system server).
● Convert OAuth into an IIS application:
● Click Windows Start > Administrator Tools > IIS Manager.
● In the left navigation tree, right-click OAuth and select Convert to Application.
● Enable Windows Authentication in auth:
● In the left navigation tree, click to select OAuth.
● In the IIS section, click Authentication.
● Disable all authentications except Windows Authentication (e.g., Anonymous Authentication, ASP.NET Impersonation, Forms Authentication).
● Set the auth IIS using the MDSF Application Pool:
● In the left navigation tree, right-click auth and select Manage Application > Advanced Settings.
● On the Advanced Settings dialog, set the Application Pool to DSFASPNET40AppPool.
● Configure the files Authorize.ashx and QueryUser.ashx:
● Change to Content View:
● In the left navigation tree, right-click auth and select Switch to Content View.
● In the left navigation tree, under auth right-click Authorize.ashx and select Switch to Features View.
● Select Authorize.ashx and on the Authentication dialog enable Anonymous Authentication.
![]() Make sure the other authentication is disabled.
Make sure the other authentication is disabled.
● In the left navigation tree, under auth right-click QueryUser.ashx and select Switch to Features View.
● Select QueryUser.ashx and on the Authentication dialog enable Anonymous Authentication.
● Set the Providers NTLM on top:
● In the left navigation tree, click to select auth.
● On the Authentication dialog, click Windows Authentication.
● On the Providers dialog, move NTLM to the top of the Enabled Providers list.
● Click OK.
● Perform and IIS reset.
To enable Active Directory Services Authentication
1 Go to Administration > Site Settings.
2 Open the Authentication tab.
3. Click Directory Services Authentication.
4. On the Directory Services Administration page select Use Directory Service Authentication.
5. From the Service Type pull-down list select the appropriate type of service:
● LDAP
● ADSI
● NDS
● NWCOMPAT
Note: If you are not certain which type to select, consult with your site’s IT administrator.
6. Check the Enable SSL checkbox to enable SSL on the directory services authentication. This will secure LDAP communication (LDAP-S) with an SSL tunnel.
7. On the Authentication Type pull-down list select the type:
● None—Sends the user's distinguished name (DN) and password directly to the LDAP port (unlike the Secure option, in which the system obtains a token from the authenticating server and sends it to LDAP instead of the username and password).
● Secure (Recommended)—Requests secure authentication.
● Anonymous—No authentication is performed.
● FastBind—Simply validates credentials without establishing authorization.
Note: The table below will help you select the appropriate authentication type:
Member Name |
Description |
Supported |
|---|---|---|
Anonymous |
No authentication is performed. |
Y(Default) |
FastBind |
Specifies that ADSI will not attempt to query the Active Directory objectClass property. Therefore, only the base interfaces that are supported by all ADSI objects will be exposed. Other interfaces that the object supports will not be available. A user can use this option to boost the performance in a series of object manipulations that involve only methods of the base interfaces. However, ADSI does not verify if any of the request objects actually exist on the server. For more information, see the topic "Fast Binding Option for Batch Write/Modify Operations" in the MSDN Library at http://msdn.microsoft.com/library. For more information about the objectClass property, see the "Object-Class" topic in the MSDN Library at http://msdn.microsoft.com/library. |
Y |
Secure |
Requests secure authentication. When this flag is set, the WinNT provider uses NTLM to authenticate the client. Active Directory uses Kerberos, and possibly NTLM, to authenticate the client. When the user name and password are a null reference (Nothing in Visual Basic), ADSI binds to the object using the security context of the calling thread, which is either the security context of the user account under which the application is running or of the client user account that the calling thread is impersonating. |
Y |
8. Domain Name—Type the domain name.
● Always use this domain name: Choose this option to always use the specified domain.
● If possible, use the list of domains from the current AD forest: Choose this option if you want to use the list of domains available in the active directory.
9. Port Number—In most cases, accept the default port number 389.
10. Naming Context—For typical Active Directory-based LDAP login, leave this field blank because when logging into an Active Directory domain using Secure authentication type, the system will use Kerberos authentication to validate the user's typed-in username and password against the domain's KDC server. Thus, there is no need to determine the user's full LDAP path for this type of authentication.
11. User Query—For typical Active Directory-based LDAP login, leave this field blank.
12. Click Save Changes.
Note: The password you use to login must be the same as the password set to login to the Service Type (LDAP). If multiple domains are used, it can be included in the LDAP user name domain\user name. This will override the domain name in the site configuration. LDAP authentication validates site users against an LDAP Directory. It does not allow users to be managed, stored, etc., for the site elsewhere. The system still requires its own user database that must be kept synchronized with the LDAP database.
To verify Active Directory setup
Note: This section lets you verify a username/password combination. This same verification takes place when a user logs in with his credentials.
1. Go to Administration > Site Settings.
2. Open the Authentication tab.
3. Click Directory Services Authentication.
4. In the Test LDAP Configuration section:
a. Type a User Name.
b. Type a Password.
5. Click Authenticate User.
Note: If the authentication was successful, you will receive an on-screen message: "Successfully authenticated user..."
To configure a Single Sign-On User
1. Login to the system and go to Administration > Site Settings.
2. Open the Authentication tab.
3. Click Directory Services Authentication.
4. In the SSO User Configuration section:
● Username: Enter the user name for the single sign-on user.
Note: Use an existing account in LDAP that can be read in LDAP.
● Password: Enter the password for the single sign-on user.
● Client ID: Enter the consumer ID.
Note:
The Client ID and Client Secret are defined in the auth\web.config file.
--To find the client ID, open the auth\web.config file and then search
for the key "consumer_id." Write down or copy and paste the
value corresponding to the key and enter it in the Client
ID field.
● Client Secret: Enter the consumer secret.
Note: To find the client secret, open the auth\web.config file and then search for the key "consumer_secret." Write down or copy and paste the value corresponding to the key and enter it in the Client Secret field.
● OAuth Server URL: Enter the path to the auth IIS application.
Note:
For Windows 2012 Server, you will need to have a fully qualified name
for the system server.
You must include the full path
to the auth IIS application (e.g., http://<dsfservername>/auth).
5. Click Save.
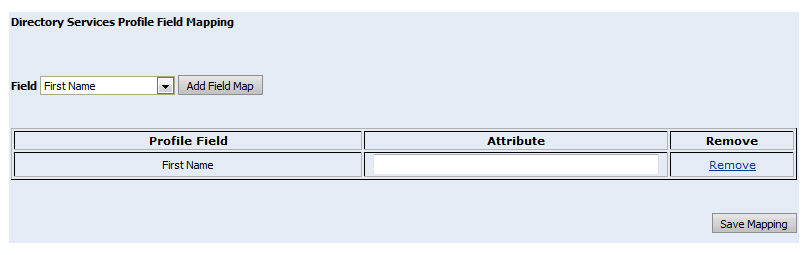
To map user profile fields with Directory Services profile fields
Note: Note that when a directory services field is updated or deleted, the User profile field will be automatically updated the next time the user logs into the system.
1. Go to Administration > Site Settings.
2. Open the Authentication tab.
3. Click Directory Services Authentication.
4. Scroll down to the Rules for Mapping External User Attributes to MDSF User Profile Fields section.
5. From the Field
pull-down list, select the user profile field to map to the directory
services profile field.
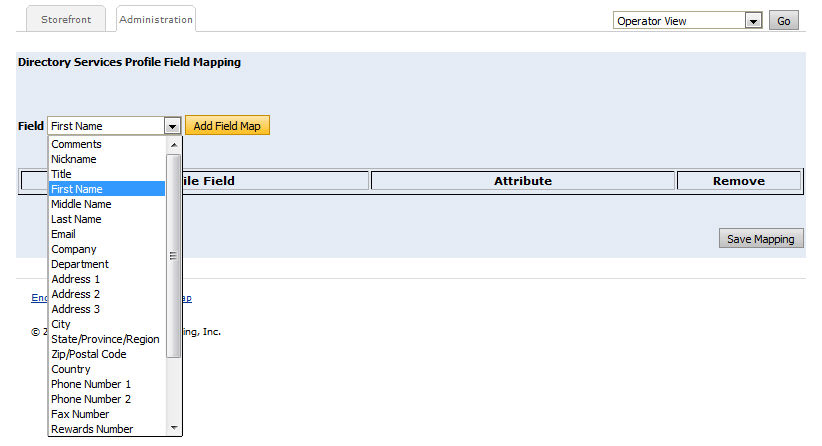
6. Click Add Field Map.
7. In
the Attribute text entry field,
enter the directory services profile field to the map with the selected
profile field.
● For examples:
● First name would map to the directory services profile attribute givenName.
● Last name would map to sn.
● Email would map to mail.
● Company would map to company.
● Department would map to department.
● Country would map to c.
● Title would map to title.
● Address 1 would map to streetAddress.
● State would map to st.
● Zip/Postal code would map to postalCode.
● Phone Number 1 would map to telephoneNumber (e.g., office phone).
Note: For a complete list of directory services profile field names (i.e., attributes), search the Internet for "LDAP attributes" to consult a resource such as the one found here: http://computerperformance.co.uk/Logon/LDAP_attributes_active_directory.htm#LDAP_Attribute_.
8. Click Save Mapping.
To specify rules for mapping external groups or roles to groups in the system
These settings determine which groups users are assigned to (how users are mapped to groups defined on your site) when they log in to the site.
1. Go to Administration > Site Settings.
2. Open the Authentication tab.
3. Click Directory Services Authentication.
4. Scroll down to the Rules for Mapping External Groups or Roles to MDSF Groups section.
5. Configure the General Settings:
● Require at least one directory service group from the list below to match a group: Select this option to require that at least one of the directory service user groups matches a user group listed below (i.e., Administrators, CSR, Operators, Registered Users, Rogo).
● Remove any un-matched group memberships from the directory service users upon login into this site: Select this option to remove any of the directory service user groups that do not match a MarketDirecdt user group listed below when a user logs in to the site.
6. Configure the Group Matching Strategy settings:
● Match the groups by their names in the site-preferred language: Choose this option to have the user groups mapped by their names in the default language for the site.
● Match the groups by their names in the language specified here: Choose this option to have the user groups mapped by their names in a specific language, which you select from the language pull-down list.
Select the group allowed to be mapped to the external groups
Note:
This section will be hidden if you select the Use
the list of external group names provided for every MDSF
group option in the Group Matching Strategy section.
This list will include all the groups from the Administration
> Groups page.
Select the user group(s) that you want to map with external groups (directory service user groups):
● Administrators
● CSR
● Operators
● Registered Users
Note: If you have not already done so, specify the type of user authentication to use on your site: See Specify the Type of User Authentication to Use on Your Site for the steps to do so.
The DirectoryServicesType is prepended to a directory bind and the LDAP user’s name is used with the password that is entered to do the bind.
EXAMPLE 1: A typical example would be:
myuniversity.com
with an LDAP user name: Jane Dough Password: Test
To set this up you would:
1. Select LDAP from the Service Type pull-down list.
2. Enter the domain name and domain type in the
Domain Name field—notated with
your values in place of the italicized text in the example:
dc=myuniversity,dc=com
If you entered the above values then a secure bind would be performed as
follows:
LDAP://dc=myuniversity,dc=com
with username Jane Dough and password Test.
So in this case the variable domain is used as the bind statement.
EXAMPLE 2: Another case may be a bind with a domain controller, such as:
mycompany.internal
In this case you would enter: Domain Name:
mycompany.internal and the resulting bind would be LDAP://mycompany.internal.
When there is not a domain but a server:
In many true LDAP installations there is not a domain but a server, so the LDAP Domain Name would simply be "SERVERNAME" where SERVERNAME is the name of the server LDAP is running on. This is sometimes referred to as the host.
Then the LDAPDNBase would be configured to point to the users. This is sometimes referred to as the base.
For example:
Say you have a user with the DN of: cn=Jane Dough,ou=People,dc=myuniversity,dc=com
and LDAP is running on a server named MYUMAIN.
You would configure the system as follows:
Use Directory Service Authentication: Check this box.
Service Type: LDAP
AuthenticationType: Secure
Domain Name: [myuniversity.com]
Port Number: 389
● Active Directory Services with Federated Identity Services