The Manage Status page enables you to correlate order and job production statuses to suit your production and fulfillment workflows.
● Go to Administration
> Status.
Warning: This is an advanced option and is rarely needed. It is recommended that you leave the statuses in default condition.
In most cases, the status can be edited in Operator View to change it to another status. However, by default the following statuses are locked. Click Edit and clear the Locked box to unlock them.
● Completed
● Canceled
● Deleted
As the order is being processed, the status of the order in the Order View will correspond with a status in the Operator View and the buyer's order status. Note that the buyer's order status always corresponds with the Order View status (not the Operator View status).
Note: Sites integrated with the licensed fulfillment option (MarketDirect Fulfillment) will have additional job and order statuses (e.g., Ready for Picking, Picking, etc.).
Order View Status |
Operator View Status |
Buyer's Order Status |
|---|---|---|
Manual Quote Required |
Waiting Approval |
Order requires manual quote |
User Approval Required |
Waiting Approval |
Order requires approval from customer |
User Approved |
User Approved |
User approved |
Approval Required |
Waiting Approval |
Approval required |
Approved |
Approved |
Approved |
Rejected |
Rejected |
Rejected |
In Production |
Awaiting Production File |
In production |
In Production |
Production File Received |
In production |
In Production |
Setup |
In production |
In Production |
Transferring |
In production |
In Production |
Transferred |
In production |
In Production |
Printing |
In production |
In Production |
Printed |
In production |
In Production |
Binding |
In production |
Printed |
Completed |
Printed |
Shipped |
Completed |
Shipped |
Canceled |
Canceled |
Canceled |
Deleted |
Deleted |
Deleted |
Canceled by Buyer |
Canceled by Buyer |
Canceled by Buyer |
On Hold |
On Hold |
On Hold |
Declined |
Declined |
Declined |
Abandoned |
Abandoned |
Abandoned |
Completed and Invoiced |
Completed |
Completed and Invoiced |
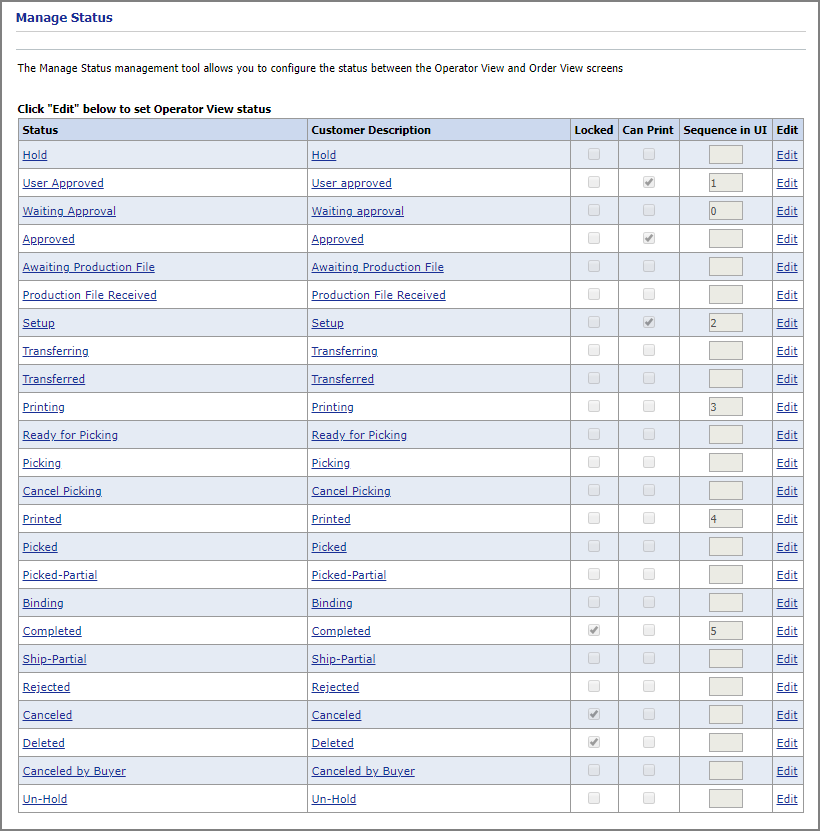
The Manage Status tool enables you to effectively manage your shop’s workflow process by controlling the status of jobs in the system. You can:
● Configure the order and operator statuses and the customer job status in a way that best meets your shop’s workflow
● Lock jobs in a given status to prevent the status from being changed on the Operator View page
● Configure the system to send automatic email notifications to customers when orders reach a specified status
● Set the system to print the job automatically (i.e., if it is a standard job; see “Automated Printing” on page 18 for more details) when a specified status is reached
Warning: This is an advanced option and is rarely needed. It is recommended that you leave the statuses in default condition.
In most cases, you can change the status of a job in the Order View and Operator View. The “final condition” statuses—Canceled, Deleted, Rejected, Shipped—are locked by default. You can unlock the Deleted and Rejected statuses (though this is not recommended) and lock others depending on the needs of your shop. The Canceled and Shipped statuses cannot be changed. Follow the steps below to lock or unlock an order or job status.
1. Go to Administration > Status.
2. On the Manage Status page, click Edit for any status displayed on the Operator or Order view tables that you want to change.
3. To lock a status check its Locked box.
4. Click Update to save your changes, or click Cancel to discard your changes and revert to the previously saved settings.
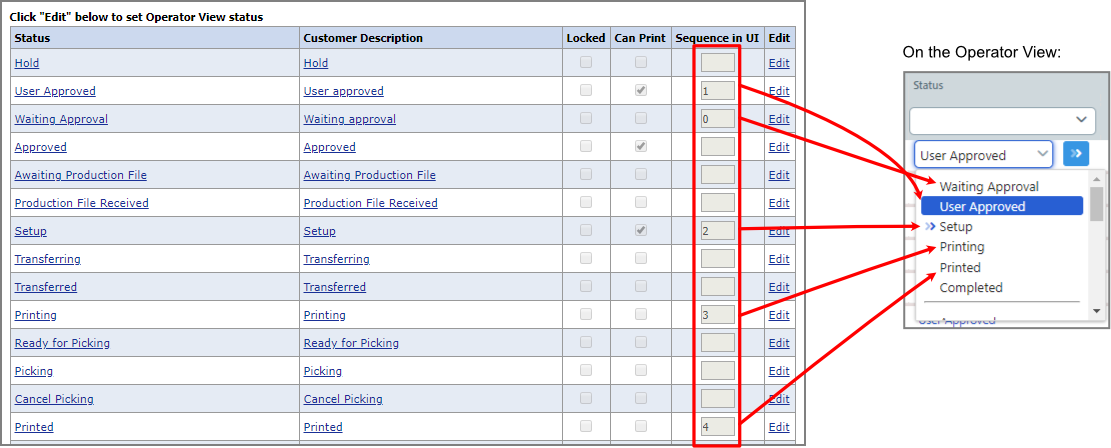
To set the Sequence in UI value for Operator and Order View statuses
The Sequence in UI field lets you set the order in which order and line item statuses will be listed in the Status column pull-down list on the Operator View and in the Order Status column pull-down list on the Order View.
Example: If you set up the Sequence in UI values for the Operator View statuses as shown below at left, the statuses in the Status pull-down list for each line item in the Operator View will be ordered as shown below at right.
Note:
Clicking the change status button will change
the status to the next status in the sequence. This enables operators to quickly
move to the next status in the sequence in the Order View or Operator
View.
will change
the status to the next status in the sequence. This enables operators to quickly
move to the next status in the sequence in the Order View or Operator
View.
Note:
The sequenced statuses are arranged in the sequence above while non-sequenced
statues appear lower in the list.
Note:
This is just a visual guidance for the operator and will not restrict
or limit the operator from choosing any of the order or job statues, including
non-sequenced ones.
1. Go to Administration > Status.
2. On the Manage Status page, click Edit for any status you want to change.

3. In the Sequence in UI field, specify a number to set the order in the Order View: 0 will be first, 1 will be second, and so on.
4. Click Update to save your changes, or click Cancel to discard your changes and revert to the previously saved settings.
To configure automatic email notification
You can configure the system to automatically send an email notification to a customer when an order reaches a certain Order View status. These change-of-status notifications will be sent to the email address listed in the customer’s user profile and are a good way to keep customers posted on the status of their order and alert them to any action they need to take (approve a quote, pick up a job, etc.). Follow the steps below to set a status to automatically send an email notification.
1. Go to Administration > Status.
2. On the Manage Status page, click Edit for any status displayed on the Order View table that you want to change.
3. Check the Send Email box (to notify customers) and / or the Send Email to Print Shop box (to notify the Print Shop) corresponding to any status listed in the table.
4. Click Update to save your changes, or click Cancel to discard your changes and revert to the previously saved settings.
Note: You can customize the statuses in any language except the default language.
1. To edit a status, click on the status (a link) to open the Language Management page.
Note: For complete information on customizing language strings, see the topic Language Management-Customize Strings.
2. Once you locate the instance of the word or phrase you want to customize by language (localized version) then click Edit corresponding to it.
3. In the text entry
box ![]() that opens in the Overridden
Text column, enter the custom status that you want to replace the
default status text.
that opens in the Overridden
Text column, enter the custom status that you want to replace the
default status text.
4. Click Update to save your change (or Cancel to disregard it).
5. Result: Your custom text will be displayed in the Overridden Text column.
6. Repeat the steps above if you want to customize the word or phrase in other localized versions.
Note: For information on customizing email notifications, see Editing Email Messages.
To enable Operator View printing when a status is reached
You can configure MarketDirect StoreFront to enable printing (via the Print option for a job on the Operator View) when an order reaches a specified status. For example, you can set the Approved status to enable printing from the Operator View once an order reaches the Approved status.
1. Go to Administration > Status.
2. On the Manage Status page, click Edit for any status displayed on the Operator View table that you want to change.
3. Check the Can Print box.
4. Click Update to save your changes, or click Cancel to discard your changes and revert to the previously saved settings.